
-
1. Per Iniziare
- 1.1 Il Controllo di Versione
- 1.2 Una Breve Storia di Git
- 1.3 Cos’é Git?
- 1.4 La riga di comando
- 1.5 Installing Git
- 1.6 First-Time Git Setup
- 1.7 Chiedere aiuto
- 1.8 Sommario
-
2. Git Basics
- 2.1 Getting a Git Repository
- 2.2 Recording Changes to the Repository
- 2.3 Viewing the Commit History
- 2.4 Undoing Things
- 2.5 Working with Remotes
- 2.6 Tagging
- 2.7 Git Aliases
- 2.8 Sommario
-
3. Git Branching
- 3.1 Branches in a Nutshell
- 3.2 Basic Branching and Merging
- 3.3 Branch Management
- 3.4 Branching Workflows
- 3.5 Remote Branches
- 3.6 Rebasing
- 3.7 Summary
-
4. Git on the Server
- 4.1 The Protocols
- 4.2 Getting Git on a Server
- 4.3 Generating Your SSH Public Key
- 4.4 Setting Up the Server
- 4.5 Git Daemon
- 4.6 Smart HTTP
- 4.7 GitWeb
- 4.8 GitLab
- 4.9 Third Party Hosted Options
- 4.10 Summary
-
5. Distributed Git
- 5.1 Distributed Workflows
- 5.2 Contributing to a Project
- 5.3 Maintaining a Project
- 5.4 Summary
-
6. GitHub
-
7. Git Tools
- 7.1 Revision Selection
- 7.2 Interactive Staging
- 7.3 Stashing and Cleaning
- 7.4 Signing Your Work
- 7.5 Searching
- 7.6 Rewriting History
- 7.7 Reset Demystified
- 7.8 Advanced Merging
- 7.9 Rerere
- 7.10 Debugging with Git
- 7.11 Submodules
- 7.12 Bundling
- 7.13 Replace
- 7.14 Credential Storage
- 7.15 Summary
-
8. Customizing Git
- 8.1 Git Configuration
- 8.2 Git Attributes
- 8.3 Git Hooks
- 8.4 An Example Git-Enforced Policy
- 8.5 Summary
-
9. Git and Other Systems
- 9.1 Git as a Client
- 9.2 Migrating to Git
- 9.3 Summary
-
10. Git Internals
- 10.1 Plumbing and Porcelain
- 10.2 Git Objects
- 10.3 Git References
- 10.4 Packfiles
- 10.5 The Refspec
- 10.6 Transfer Protocols
- 10.7 Maintenance and Data Recovery
- 10.8 Environment Variables
- 10.9 Summary
-
A1. Appendice A: Git in altri contesti
- A1.1 Graphical Interfaces
- A1.2 Git in Visual Studio
- A1.3 Git in Eclipse
- A1.4 Git in Bash
- A1.5 Git in Zsh
- A1.6 Git in Powershell
- A1.7 Riassunto
-
A2. Appendice B: Embedding Git in your Applications
- A2.1 Command-line Git
- A2.2 Libgit2
- A2.3 JGit
-
A3. Appendice C: Git Commands
- A3.1 Setup and Config
- A3.2 Getting and Creating Projects
- A3.3 Basic Snapshotting
- A3.4 Branching and Merging
- A3.5 Sharing and Updating Projects
- A3.6 Inspection and Comparison
- A3.7 Debugging
- A3.8 Patching
- A3.9 Email
- A3.10 External Systems
- A3.11 Administration
- A3.12 Plumbing Commands
6.5 GitHub - Scripting GitHub
Scripting GitHub
So now we’ve covered all of the major features and workflows of GitHub, but any large group or project will have customizations they may want to make or external services they may want to integrate.
Luckily for us, GitHub is really quite hackable in many ways. In this section we’ll cover how to use the GitHub hooks system and it’s API to make GitHub work how we want it to.
Hooks
The Hooks and Services section of GitHub repository administration is the easiest way to have GitHub interact with external systems.
Services
First we’ll take a look at Services. Both the Hooks and Services integrations can be found in the Settings section of your repository, where we previously looked at adding Collaborators and changing the default branch of your project. Under the “Webhooks and Services” tab you will see something like Services and Hooks configuration section..
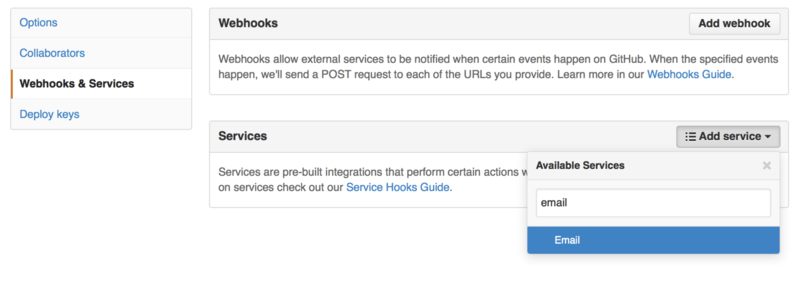
There are dozens of services you can choose from, most of them integrations into other commercial and open source systems. Most of them are for Continuous Integration services, bug and issue trackers, chat room systems and documentation systems. We’ll walk through setting up a very simple one, the Email hook. If you choose “email” from the “Add Service” dropdown, you’ll get a configuration screen like Email service configuration..

In this case, if we hit the “Add service” button, the email address we specified will get an email every time someone pushes to the repository. Services can listen for lots of different types of events, but most only listen for push events and then do something with that data.
If there is a system you are using that you would like to integrate with GitHub, you should check here to see if there is an existing service integration available. For example, if you’re using Jenkins to run tests on your codebase, you can enable the Jenkins builtin service integration to kick off a test run every time someone pushes to your repository.
Hooks
If you need something more specific or you want to integrate with a service or site that is not included in this list, you can instead use the more generic hooks system. GitHub repository hooks are pretty simple. You specify a URL and GitHub will post an HTTP payload to that URL on any event you want.
Generally the way this works is you can setup a small web service to listen for a GitHub hook payload and then do something with the data when it is received.
To enable a hook, you click the “Add webhook” button in Services and Hooks configuration section.. This will bring you to a page that looks like Web hook configuration..

The configuration for a web hook is pretty simple. In most cases you simply enter a URL and a secret key and hit “Add webhook”. There are a few options for which events you want GitHub to send you a payload for — the default is to only get a payload for the push event, when someone pushes new code to any branch of your repository.
Let’s see a small example of a web service you may set up to handle a web hook. We’ll use the Ruby web framework Sinatra since it’s fairly concise and you should be able to easily see what we’re doing.
Let’s say we want to get an email if a specific person pushes to a specific branch of our project modifying a specific file. We could fairly easily do that with code like this:
require 'sinatra'
require 'json'
require 'mail'

post '/payload' do
  push = JSON.parse(request.body.read) # parse the JSON

  # gather the data we're looking for
  pusher = push["pusher"]["name"]
  branch = push["ref"]

  # get a list of all the files touched
  files = push["commits"].map do |commit|
    commit['added'] + commit['modified'] + commit['removed']
  end
  files = files.flatten.uniq

  # check for our criteria
  if pusher == 'schacon' &&
     branch == 'ref/heads/special-branch' &&
     files.include?('special-file.txt')

    Mail.deliver do
      from     'tchacon@example.com'
      to       'tchacon@example.com'
      subject  'Scott Changed the File'
      body     "ALARM"
    end
  end
end
Here we’re taking the JSON payload that GitHub delivers us and looking up who pushed it, what branch they pushed to and what files were touched in all the commits that were pushed. Then we check that against our criteria and send an email if it matches.
In order to develop and test something like this, you have a nice developer console in the same screen where you set the hook up. You can see the last few deliveries that GitHub has tried to make for that webhook. For each hook you can dig down into when it was delivered, if it was successful and the body and headers for both the request and the response. This makes it incredibly easy to test and debug your hooks.
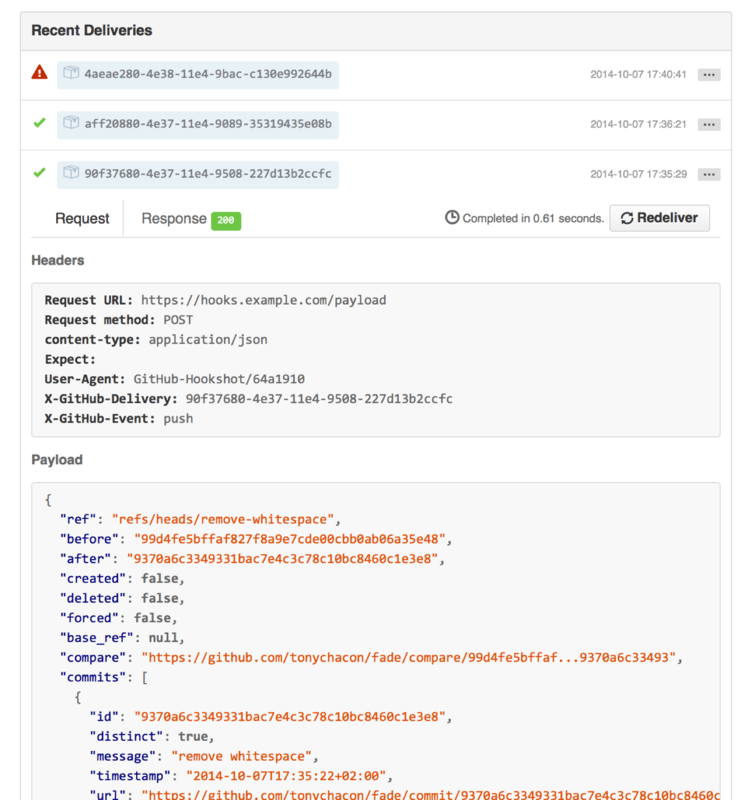
The other great feature of this is that you can redeliver any of the payloads to test your service easily.
For more information on how to write webhooks and all the different event types you can listen for, go to the GitHub Developer documentation at: https://developer.github.com/webhooks/
The GitHub API
Services and hooks give you a way to receive push notifications about events that happen on your repositories, but what if you need more information about these events? What if you need to automate something like adding collaborators or labeling issues?
This is where the GitHub API comes in handy. GitHub has tons of API endpoints for doing nearly anything you can do on the website in an automated fashion. In this section we’ll learn how to authenticate and connect to the API, how to comment on an issue and how to change the status of a Pull Request through the API.
Basic Usage
The most basic thing you can do is a simple GET request on an endpoint that doesn’t require authentication. This could be a user or read-only information on an open source project. For example, if we want to know more about a user named “schacon”, we can run something like this:
$ curl https://api.github.com/users/schacon
{
  "login": "schacon",
  "id": 70,
  "avatar_url": "https://avatars.githubusercontent.com/u/70",
# …
  "name": "Scott Chacon",
  "company": "GitHub",
  "following": 19,
  "created_at": "2008-01-27T17:19:28Z",
  "updated_at": "2014-06-10T02:37:23Z"
}
There are tons of endpoints like this to get information about organizations, projects, issues, commits — just about anything you can publicly see on GitHub. You can even use the API to render arbitrary Markdown or find a .gitignore template.
$ curl https://api.github.com/gitignore/templates/Java
{
  "name": "Java",
  "source": "*.class

# Mobile Tools for Java (J2ME)
.mtj.tmp/

# Package Files #
*.jar
*.war
*.ear

# virtual machine crash logs, see http://www.java.com/en/download/help/error_hotspot.xml
hs_err_pid*
"
}
Commenting on an Issue
However, if you want to do an action on the website such as comment on an Issue or Pull Request or if you want to view or interact with private content, you’ll need to authenticate.
There are several ways to authenticate. You can use basic authentication with just your username and password, but generally it’s a better idea to use a personal access token. You can generate this from the “Applications” tab of your settings page.
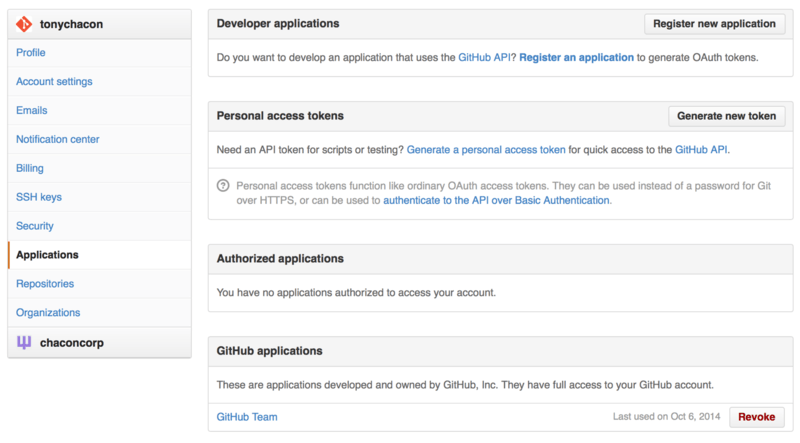
It will ask you which scopes you want for this token and a description. Make sure to use a good description so you feel comfortable removing the token when your script or application is no longer used.
GitHub will only show you the token once, so be sure to copy it. You can now use this to authenticate in your script instead of using a username and password. This is nice because you can limit the scope of what you want to do and the token is revokable.
This also has the added advantage of increasing your rate limit. Without authenticating, you will be limited to 60 requests per hour. If you authenticate you can make up to 5,000 requests per hour.
So let’s use it to make a comment on one of our issues. Let’s say we want to leave a comment on a specific issue, Issue #6. To do so we have to do an HTTP POST request to repos/<user>/<repo>/issues/<num>/comments with the token we just generated as an Authorization header.
$ curl -H "Content-Type: application/json" \
       -H "Authorization: token TOKEN" \
       --data '{"body":"A new comment, :+1:"}' \
       https://api.github.com/repos/schacon/blink/issues/6/comments
{
  "id": 58322100,
  "html_url": "https://github.com/schacon/blink/issues/6#issuecomment-58322100",
  ...
  "user": {
    "login": "tonychacon",
    "id": 7874698,
    "avatar_url": "https://avatars.githubusercontent.com/u/7874698?v=2",
    "type": "User",
  },
  "created_at": "2014-10-08T07:48:19Z",
  "updated_at": "2014-10-08T07:48:19Z",
  "body": "A new comment, :+1:"
}
Now if you go to that issue, you can see the comment that we just successfully posted as in A comment posted from the GitHub API..

You can use the API to do just about anything you can do on the website — creating and setting milestones, assigning people to Issues and Pull Requests, creating and changing labels, accessing commit data, creating new commits and branches, opening, closing or merging Pull Requests, creating and editing teams, commenting on lines of code in a Pull Request, searching the site and on and on.
Changing the Status of a Pull Request
One final example we’ll look at since it’s really useful if you’re working with Pull Requests. Each commit can have one or more statuses associated with it and there is an API to add and query that status.
Most of the Continuous Integration and testing services make use of this API to react to pushes by testing the code that was pushed, and then report back if that commit has passed all the tests. You could also use this to check if the commit message is properly formatted, if the submitter followed all your contribution guidelines, if the commit was validly signed — any number of things.
Let’s say you set up a webhook on your repository that hits a small web service that checks for a Signed-off-by string in the commit message.
require 'httparty'
require 'sinatra'
require 'json'

post '/payload' do
  push = JSON.parse(request.body.read) # parse the JSON
  repo_name = push['repository']['full_name']

  # look through each commit message
  push["commits"].each do |commit|

    # look for a Signed-off-by string
    if /Signed-off-by/.match commit['message']
      state = 'success'
      description = 'Successfully signed off!'
    else
      state = 'failure'
      description = 'No signoff found.'
    end

    # post status to GitHub
    sha = commit["id"]
    status_url = "https://api.github.com/repos/#{repo_name}/statuses/#{sha}"

    status = {
      "state"       => state,
      "description" => description,
      "target_url"  => "http://example.com/how-to-signoff",
      "context"     => "validate/signoff"
    }
    HTTParty.post(status_url,
      :body => status.to_json,
      :headers => {
        'Content-Type'  => 'application/json',
        'User-Agent'    => 'tonychacon/signoff',
        'Authorization' => "token #{ENV['TOKEN']}" }
    )
  end
end
Hopefully this is fairly simple to follow. In this web hook handler we look through each commit that was just pushed, we look for the string Signed-off-by in the commit message and finally we POST via HTTP to the /repos/<user>/<repo>/statuses/<commit_sha> API endpoint with the status.
In this case you can send a state (success, failure, error), a description of what happened, a target URL the user can go to for more information and a “context” in case there are multiple statuses for a single commit. For example, a testing service may provide a status and a validation service like this may also provide a status — the “context” field is how they’re differentiated.
If someone opens a new Pull Request on GitHub and this hook is setup, you may see something like Commit status via the API..
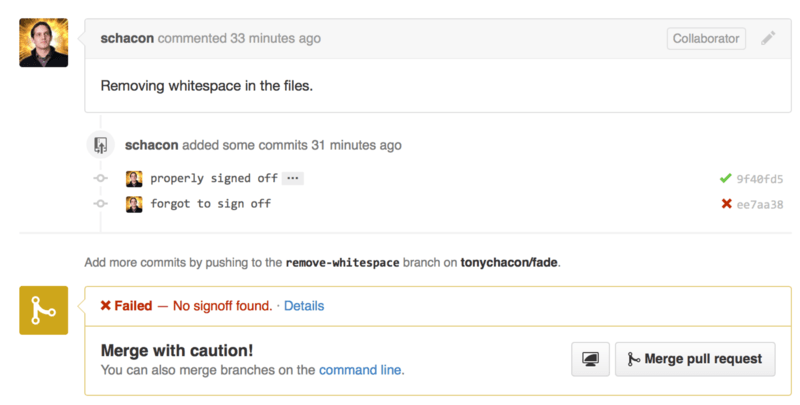
You can now see a little green check mark next to the commit that has a “Signed-off-by” string in the message and a red cross through the one where the author forgot to sign off. You can also see that the Pull Request takes the status of the last commit on the branch and warns you if it is a failure. This is really useful if you’re using this API for test results so you don’t accidentally merge something where the last commit is failing tests.
Octokit
Though we’ve been doing nearly everything through curl and simple HTTP requests in these examples, several open-source libraries exist that make this API available in a more idiomatic way.
At the time of this writing, the supported languages include Go, Objective-C, Ruby, and .NET.
Check out http://github.com/octokit for more information on these, as they handle much of the HTTP for you.
Hopefully these tools can help you customize and modify GitHub to work better for your specific workflows. For complete documentation on the entire API as well as guides for common tasks, check out https://developer.github.com.