
-
1. Per Iniziare
- 1.1 Il Controllo di Versione
- 1.2 Una Breve Storia di Git
- 1.3 Cos’é Git?
- 1.4 La riga di comando
- 1.5 Installing Git
- 1.6 First-Time Git Setup
- 1.7 Chiedere aiuto
- 1.8 Sommario
-
2. Git Basics
- 2.1 Getting a Git Repository
- 2.2 Recording Changes to the Repository
- 2.3 Viewing the Commit History
- 2.4 Undoing Things
- 2.5 Working with Remotes
- 2.6 Tagging
- 2.7 Git Aliases
- 2.8 Sommario
-
3. Git Branching
- 3.1 Branches in a Nutshell
- 3.2 Basic Branching and Merging
- 3.3 Branch Management
- 3.4 Branching Workflows
- 3.5 Remote Branches
- 3.6 Rebasing
- 3.7 Summary
-
4. Git on the Server
- 4.1 The Protocols
- 4.2 Getting Git on a Server
- 4.3 Generating Your SSH Public Key
- 4.4 Setting Up the Server
- 4.5 Git Daemon
- 4.6 Smart HTTP
- 4.7 GitWeb
- 4.8 GitLab
- 4.9 Third Party Hosted Options
- 4.10 Summary
-
5. Distributed Git
- 5.1 Distributed Workflows
- 5.2 Contributing to a Project
- 5.3 Maintaining a Project
- 5.4 Summary
-
6. GitHub
-
7. Git Tools
- 7.1 Revision Selection
- 7.2 Interactive Staging
- 7.3 Stashing and Cleaning
- 7.4 Signing Your Work
- 7.5 Searching
- 7.6 Rewriting History
- 7.7 Reset Demystified
- 7.8 Advanced Merging
- 7.9 Rerere
- 7.10 Debugging with Git
- 7.11 Submodules
- 7.12 Bundling
- 7.13 Replace
- 7.14 Credential Storage
- 7.15 Summary
-
8. Customizing Git
- 8.1 Git Configuration
- 8.2 Git Attributes
- 8.3 Git Hooks
- 8.4 An Example Git-Enforced Policy
- 8.5 Summary
-
9. Git and Other Systems
- 9.1 Git as a Client
- 9.2 Migrating to Git
- 9.3 Summary
-
10. Git Internals
- 10.1 Plumbing and Porcelain
- 10.2 Git Objects
- 10.3 Git References
- 10.4 Packfiles
- 10.5 The Refspec
- 10.6 Transfer Protocols
- 10.7 Maintenance and Data Recovery
- 10.8 Environment Variables
- 10.9 Summary
-
A1. Appendice A: Git in altri contesti
- A1.1 Graphical Interfaces
- A1.2 Git in Visual Studio
- A1.3 Git in Eclipse
- A1.4 Git in Bash
- A1.5 Git in Zsh
- A1.6 Git in Powershell
- A1.7 Riassunto
-
A2. Appendice B: Embedding Git in your Applications
- A2.1 Command-line Git
- A2.2 Libgit2
- A2.3 JGit
-
A3. Appendice C: Git Commands
- A3.1 Setup and Config
- A3.2 Getting and Creating Projects
- A3.3 Basic Snapshotting
- A3.4 Branching and Merging
- A3.5 Sharing and Updating Projects
- A3.6 Inspection and Comparison
- A3.7 Debugging
- A3.8 Patching
- A3.9 Email
- A3.10 External Systems
- A3.11 Administration
- A3.12 Plumbing Commands
6.2 GitHub - Contributing to a Project
Contributing to a Project
Now that our account is setup, let’s walk through some details that could be useful in helping you contribute to an existing project.
Forking Projects
If you want to contribute to an existing project to which you don’t have push access, you can “fork” the project. What this means is that GitHub will make a copy of the project that is entirely yours; it lives in your user’s namespace, and you can push to it.
|
Nota
|
Historically, the term “fork” has been somewhat negative in context, meaning that someone took an open source project in a different direction, sometimes creating a competing project and splitting the contributors. In GitHub, a “fork” is simply the same project in your own namespace, allowing you to make changes to a project publicly as a way to contribute in a more open manner. |
This way, projects don’t have to worry about adding users as collaborators to give them push access. People can fork a project, push to it, and contribute their changes back to the original repository by creating what’s called a Pull Request, which we’ll cover next. This opens up a discussion thread with code review, and the owner and the contributor can then communicate about the change until the owner is happy with it, at which point the owner can merge it in.
To fork a project, visit the project page and click the “Fork” button at the top-right of the page.

After a few seconds, you’ll be taken to your new project page, with your own writeable copy of the code.
The GitHub Flow
GitHub is designed around a particular collaboration workflow, centered on Pull Requests. This flow works whether you’re collaborating with a tightly-knit team in a single shared repository, or a globally-distributed company or network of strangers contributing to an project through dozens of forks. It is centered on the Topic Branches workflow covered in [ch03-git-branching].
Here’s how it generally works:
-
Create a topic branch from
master. -
Make some commits to improve the project.
-
Push this branch to your GitHub project.
-
Open a Pull Request on GitHub.
-
Discuss, and optionally continue committing.
-
The project owner merges or closes the Pull Request.
This is basically the Integration Manager workflow covered in Integration-Manager Workflow, but instead of using email to communicate and review changes, teams use GitHub’s web based tools.
Let’s walk through an example of proposing a change to an open source project hosted on GitHub using this flow.
Creating a Pull Request
Tony is looking for code to run on his Arduino programmable microcontroller and has found a great program file on GitHub at https://github.com/schacon/blink.
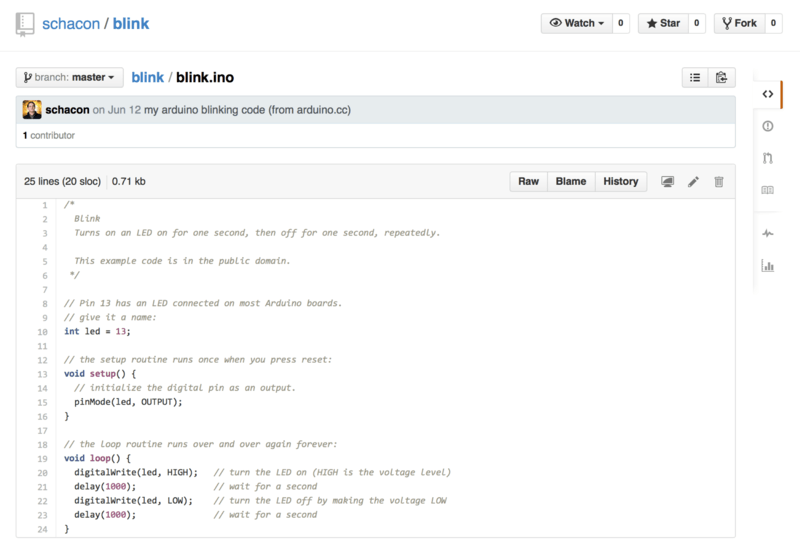
The only problem is that the blinking rate is too fast, we think it’s much nicer to wait 3 seconds instead of 1 in between each state change. So let’s improve the program and submit it back to the project as a proposed change.
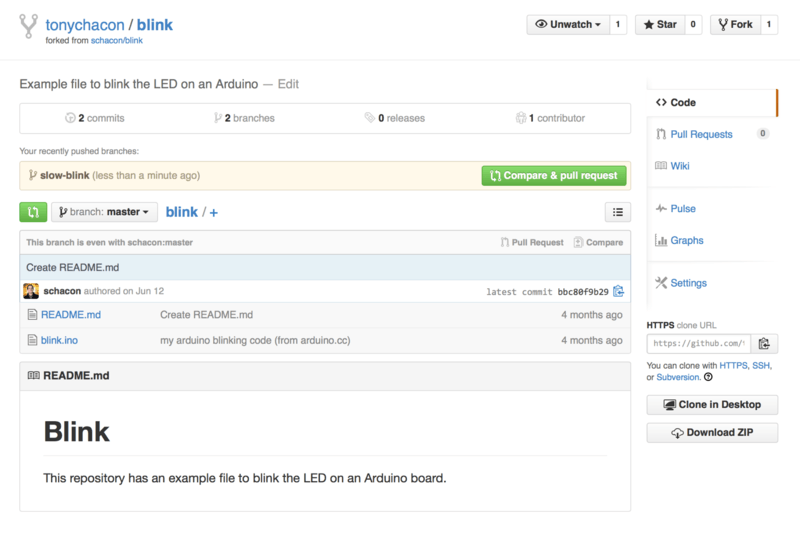
First, we click the Fork button as mentioned earlier to get our own copy of the project. Our user name here is “tonychacon” so our copy of this project is at https://github.com/tonychacon/blink and that’s where we can edit it. We will clone it locally, create a topic branch, make the code change and finally push that change back up to GitHub.
$ git clone https://github.com/tonychacon/blink (1)
Cloning into 'blink'...

$ cd blink
$ git checkout -b slow-blink (2)
Switched to a new branch 'slow-blink'

$ sed -i '' 's/1000/3000/' blink.ino (3)

$ git diff --word-diff (4)
diff --git a/blink.ino b/blink.ino
index 15b9911..a6cc5a5 100644
--- a/blink.ino
+++ b/blink.ino
@@ -18,7 +18,7 @@ void setup() {
// the loop routine runs over and over again forever:
void loop() {
  digitalWrite(led, HIGH);   // turn the LED on (HIGH is the voltage level)
  [-delay(1000);-]{+delay(3000);+}               // wait for a second
  digitalWrite(led, LOW);    // turn the LED off by making the voltage LOW
  [-delay(1000);-]{+delay(3000);+}               // wait for a second
}

$ git commit -a -m 'three seconds is better' (5)
[master 5ca509d] three seconds is better
 1 file changed, 2 insertions(+), 2 deletions(-)

$ git push origin slow-blink (6)
Username for 'https://github.com': tonychacon
Password for 'https://tonychacon@github.com':
Counting objects: 5, done.
Delta compression using up to 8 threads.
Compressing objects: 100% (3/3), done.
Writing objects: 100% (3/3), 340 bytes | 0 bytes/s, done.
Total 3 (delta 1), reused 0 (delta 0)
To https://github.com/tonychacon/blink
* [new branch] slow-blink -> slow-blink-
Clone our fork of the project locally
-
Create a descriptive topic branch
-
Make our change to the code
-
Check that the change is good
-
Commit our change to the topic branch
-
Push our new topic branch back up to our GitHub fork
Now if we go back to our fork on GitHub, we can see that GitHub noticed that we pushed a new topic branch up and present us with a big green button to check out our changes and open a Pull Request to the original project.
You can alternatively go to the “Branches” page at https://github.com/<user>/<project>/branches to locate your branch and open a new Pull Request from there.
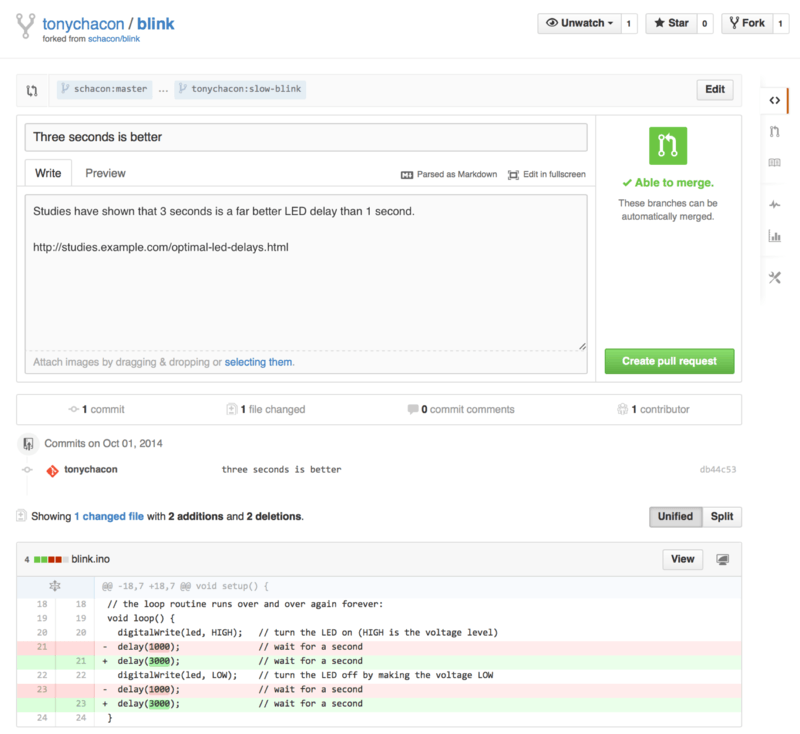
If we click that green button, we’ll see a screen that allows us to create a title and description for the change we would like to request so the project owner has a good reason to consider it. It is generally a good idea to spend some effort making this description as useful as possible so the author knows why this is being suggested and why it would be a valuable change for them to accept.
We also see a list of the commits in our topic branch that are “ahead” of the master branch (in this case, just the one) and a unified diff of all the changes that will be made should this branch get merged by the project owner.
When you hit the Create pull request button on this screen, the owner of the project you forked will get a notification that someone is suggesting a change and will link to a page that has all of this information on it.
|
Nota
|
Though Pull Requests are used commonly for public projects like this when the contributor has a complete change ready to be made, it’s also often used in internal projects at the beginning of the development cycle. Since you can keep pushing to the topic branch even after the Pull Request is opened, it’s often opened early and used as a way to iterate on work as a team within a context, rather than opened at the very end of the process. |
Iterating on a Pull Request
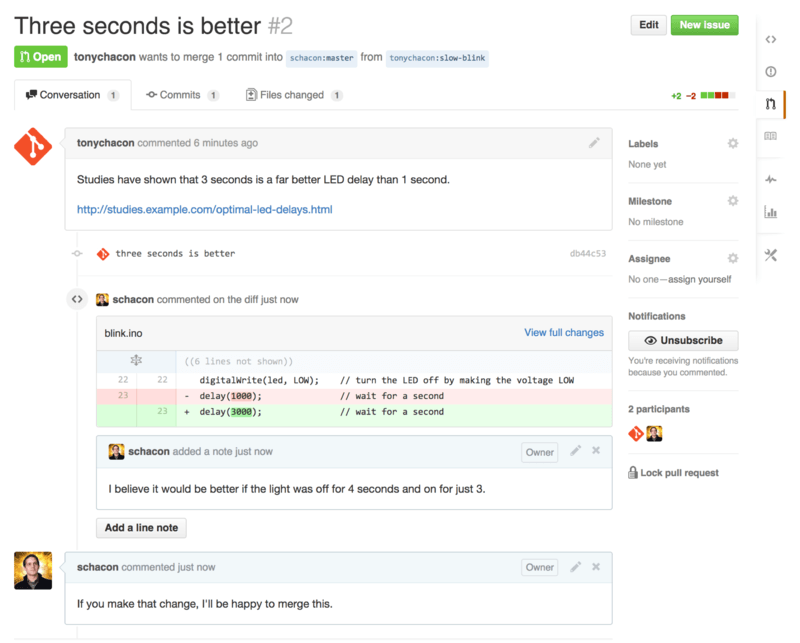
At this point, the project owner can look at the suggested change and merge it, reject it or comment on it. Let’s say that he likes the idea, but would prefer a slightly longer time for the light to be off than on.
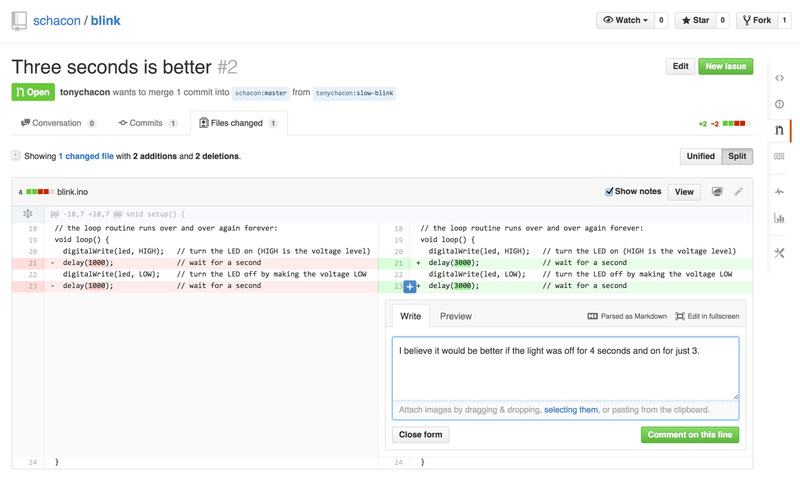
Where this conversation may take place over email in the workflows presented in [ch05-distributed-git], on GitHub this happens online. The project owner can review the unified diff and leave a comment by clicking on any of the lines.
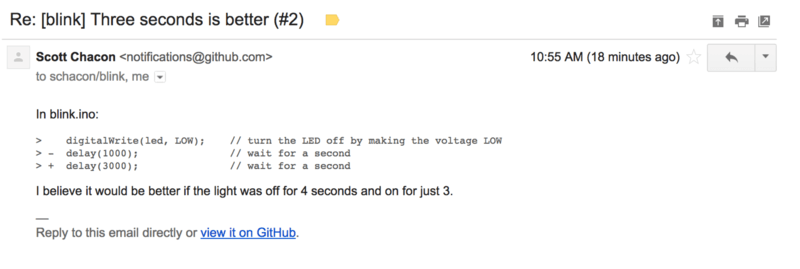
Once the maintainer makes this comment, the person who opened the Pull Request (and indeed, anyone else watching the repository) will get a notification. We’ll go over customizing this later, but if he had email notifications turned on, Tony would get an email like this:
Anyone can also leave general comments on the Pull Request. In Pull Request discussion page we can see an example of the project owner both commenting on a line of code and then leaving a general comment in the discussion section. You can see that the code comments are brought into the conversation as well.
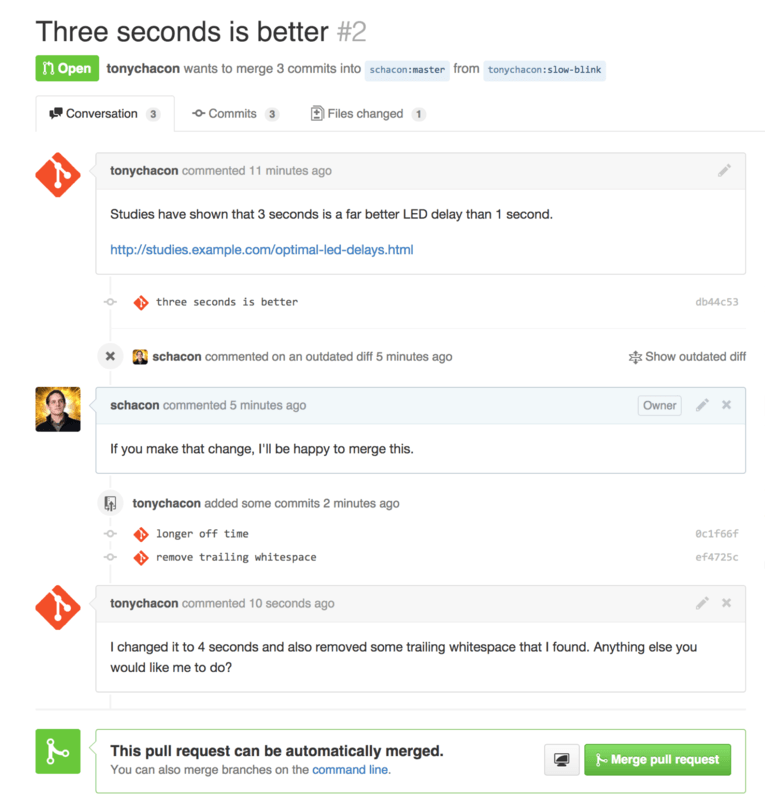
Now the contributor can see what they need to do in order to get their change accepted. Luckily this is also a very simple thing to do. Where over email you may have to re-roll your series and resubmit it to the mailing list, with GitHub you simply commit to the topic branch again and push.
If the contributor does that then the project owner will get notified again and when they visit the page they will see that it’s been addressed. In fact, since a line of code changed that had a comment on it, GitHub notices that and collapses the outdated diff.
An interesting thing to notice is that if you click on the “Files Changed” tab on this Pull Request, you’ll get the “unified” diff — that is, the total aggregate difference that would be introduced to your main branch if this topic branch was merged in. In git diff terms, it basically automatically shows you git diff master...<branch> for the branch this Pull Request is based on. See Determining What Is Introduced for more about this type of diff.
The other thing you’ll notice is that GitHub checks to see if the Pull Request merges cleanly and provides a button to do the merge for you on the server. This button only shows up if you have write access to the repository and a trivial merge is possible. If you click it GitHub will perform a “non-fast-forward” merge, meaning that even if the merge could be a fast-forward, it will still create a merge commit.
If you would prefer, you can simply pull the branch down and merge it locally. If you merge this branch into the master branch and push it to GitHub, the Pull Request will automatically be closed.
This is the basic workflow that most GitHub projects use. Topic branches are created, Pull Requests are opened on them, a discussion ensues, possibly more work is done on the branch and eventually the request is either closed or merged.
|
Nota
|
Not Only Forks
It’s important to note that you can also open a Pull Request between two branches in the same repository. If you’re working on a feature with someone and you both have write access to the project, you can push a topic branch to the repository and open a Pull Request on it to the |
Advanced Pull Requests
Now that we’ve covered the basics of contributing to a project on GitHub, let’s cover a few interesting tips and tricks about Pull Requests so you can be more effective in using them.
Pull Requests as Patches
It’s important to understand that many projects don’t really think of Pull Requests as queues of perfect patches that should apply cleanly in order, as most mailing list-based projects think of patch series contributions. Most GitHub projects think about Pull Request branches as iterative conversations around a proposed change, culminating in a unified diff that is applied by merging.
This is an important distinction, because generally the change is suggested before the code is thought to be perfect, which is far more rare with mailing list based patch series contributions. This enables an earlier conversation with the maintainers so that arriving at the proper solution is more of a community effort. When code is proposed with a Pull Request and the maintainers or community suggest a change, the patch series is generally not re-rolled, but instead the difference is pushed as a new commit to the branch, moving the conversation forward with the context of the previous work intact.
For instance, if you go back and look again at Pull Request final, you’ll notice that the contributor did not rebase his commit and send another Pull Request. Instead they added new commits and pushed them to the existing branch. This way if you go back and look at this Pull Request in the future, you can easily find all of the context of why decisions were made. Pushing the “Merge” button on the site purposefully creates a merge commit that references the Pull Request so that it’s easy to go back and research the original conversation if necessary.
Keeping up with Upstream
If your Pull Request becomes out of date or otherwise doesn’t merge cleanly, you will want to fix it so the maintainer can easily merge it. GitHub will test this for you and let you know at the bottom of every Pull Request if the merge is trivial or not.

If you see something like Pull Request does not merge cleanly, you’ll want to fix your branch so that it turns green and the maintainer doesn’t have to do extra work.
You have two main options in order to do this. You can either rebase your branch on top of whatever the target branch is (normally the master branch of the repository you forked), or you can merge the target branch into your branch.
Most developers on GitHub will choose to do the latter, for the same reasons we just went over in the previous section. What matters is the history and the final merge, so rebasing isn’t getting you much other than a slightly cleaner history and in return is far more difficult and error prone.
If you want to merge in the target branch to make your Pull Request mergeable, you would add the original repository as a new remote, fetch from it, merge the main branch of that repository into your topic branch, fix any issues and finally push it back up to the same branch you opened the Pull Request on.
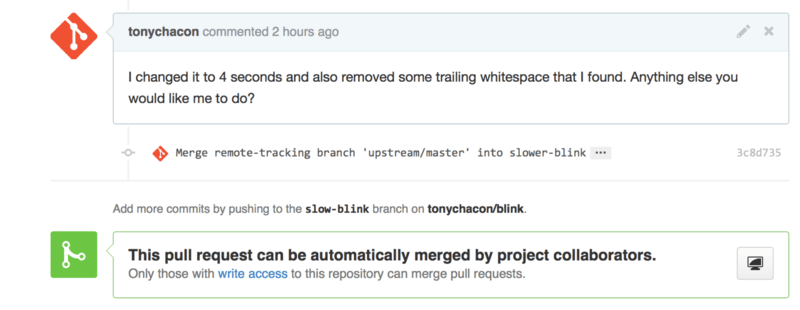
For example, let’s say that in the “tonychacon” example we were using before, the original author made a change that would create a conflict in the Pull Request. Let’s go through those steps.
$ git remote add upstream https://github.com/schacon/blink (1)
$ git fetch upstream (2)
remote: Counting objects: 3, done.
remote: Compressing objects: 100% (3/3), done.
Unpacking objects: 100% (3/3), done.
remote: Total 3 (delta 0), reused 0 (delta 0)
From https://github.com/schacon/blink
* [new branch] master -> upstream/master
$ git merge upstream/master (3)
Auto-merging blink.ino
CONFLICT (content): Merge conflict in blink.ino
Automatic merge failed; fix conflicts and then commit the result.
$ vim blink.ino (4)
$ git add blink.ino
$ git commit
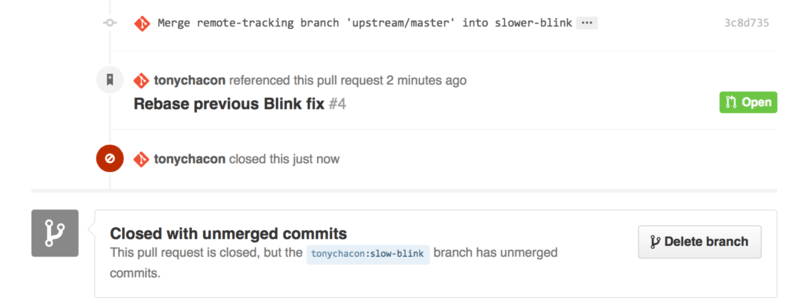
[slow-blink 3c8d735] Merge remote-tracking branch 'upstream/master' \
into slower-blink
$ git push origin slow-blink (5)
Counting objects: 6, done.
Delta compression using up to 8 threads.
Compressing objects: 100% (6/6), done.
Writing objects: 100% (6/6), 682 bytes | 0 bytes/s, done.
Total 6 (delta 2), reused 0 (delta 0)
To https://github.com/tonychacon/blink
ef4725c..3c8d735 slower-blink -> slow-blink-
Add the original repository as a remote named “upstream”
-
Fetch the newest work from that remote
-
Merge the main branch into your topic branch
-
Fix the conflict that occurred
-
Push back up to the same topic branch
Once you do that, the Pull Request will be automatically updated and re-checked to see if it merges cleanly.
One of the great things about Git is that you can do that continuously. If you have a very long-running project, you can easily merge from the target branch over and over again and only have to deal with conflicts that have arisen since the last time that you merged, making the process very manageable.
If you absolutely wish to rebase the branch to clean it up, you can certainly do so, but it is highly encouraged to not force push over the branch that the Pull Request is already opened on. If other people have pulled it down and done more work on it, you run into all of the issues outlined in I pericoli del rebase. Instead, push the rebased branch to a new branch on GitHub and open a brand new Pull Request referencing the old one, then close the original.
References
Your next question may be “How to I reference the old Pull Request?”. It turns out there are many, many ways to reference other things almost anywhere you can write in GitHub.
Let’s start with how to cross-reference another Pull Request or an Issue. All Pull Requests and Issues are assigned numbers and they are unique within the project. For example, you can’t have Pull Request #3 and Issue #3. If you want to reference any Pull Request or Issue from any other one, you can simply put #<num> in any comment or description. You can also be more specific if the Issue or Pull request lives somewhere else; write username#<num> if you’re referring to an Issue or Pull Request in a fork of the repository you’re in, or username/repo#<num> to reference something in another repository.
Let’s look at an example. Say we rebased the branch in the previous example, created a new pull request for it, and now we want to reference the old pull request from the new one. We also want to reference an issue in the fork of the repository and an issue in a completely different project. We can fill out the description just like Cross references in a Pull Request..
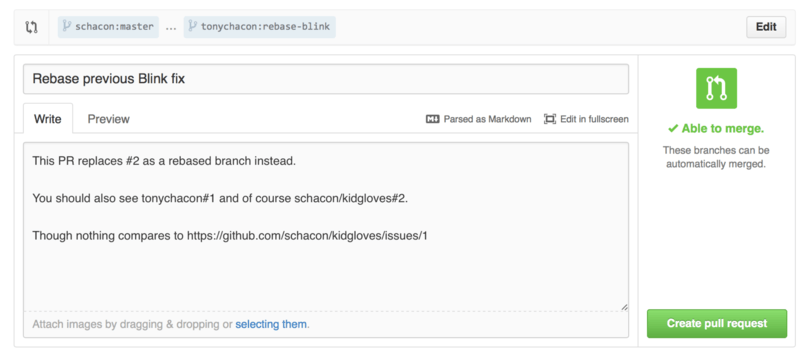
When we submit this pull request, we’ll see all of that rendered like Cross references rendered in a Pull Request..
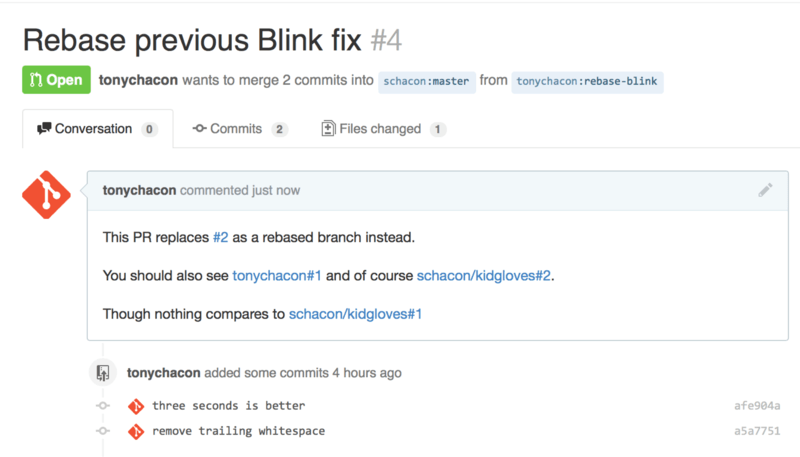
Notice that the full GitHub URL we put in there was shortened to just the information needed.
Now if Tony goes back and closes out the original Pull Request, we can see that by mentioning it in the new one, GitHub has automatically created a trackback event in the Pull Request timeline. This means that anyone who visits this Pull Request and sees that it is closed can easily link back to the one that superceded it. The link will look something like Cross references rendered in a Pull Request..
In addition to issue numbers, you can also reference a specific commit by SHA. You have to specify a full 40 character SHA, but if GitHub sees that in a comment, it will link directly to the commit. Again, you can reference commits in forks or other repositories in the same way you did with issues.
Markdown
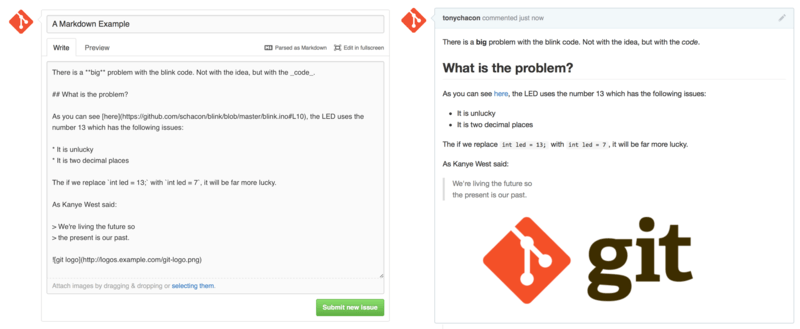
Linking to other Issues is just the beginning of interesting things you can do with almost any text box on GitHub. In Issue and Pull Request descriptions, comments, code comments and more, you can use what is called “GitHub Flavored Markdown”. Markdown is like writing in plain text but which is rendered richly.
See An example of Markdown as written and as rendered. for an example of how comments or text can be written and then rendered using Markdown.
GitHub Flavored Markdown
The GitHub flavor of Markdown adds more things you can do beyond the basic Markdown syntax. These can all be really useful when creating useful Pull Request or Issue comments or descriptions.
Task Lists
The first really useful GitHub specific Markdown feature, especially for use in Pull Requests, is the Task List. A task list is a list of checkboxes of things you want to get done. Putting them into an Issue or Pull Request normally indicates things that you want to get done before you consider the item complete.
You can create a task list like this:
- [X] Write the code
- [ ] Write all the tests
- [ ] Document the code
If we include this in the description of our Pull Request or Issue, we’ll see it rendered like Task lists rendered in a Markdown comment.
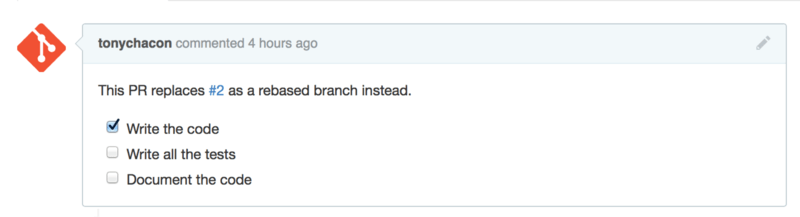
This is often used in Pull Requests to indicate what all you would like to get done on the branch before the Pull Request will be ready to merge. The really cool part is that you can simply click the checkboxes to update the comment — you don’t have to edit the Markdown directly to check tasks off.
What’s more, GitHub will look for task lists in your Issues and Pull Requests and show them as metadata on the pages that list them out. For example, if you have a Pull Request with tasks and you look at the overview page of all Pull Requests, you can see how far done it is. This helps people break down Pull Requests into subtasks and helps other people track the progress of the branch. You can see an example of this in Task list summary in the Pull Request list..

These are incredibly useful when you open a Pull Request early and use it to track your progress through the implementation of the feature.
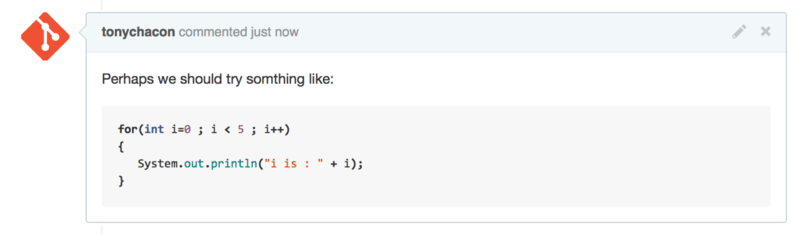
Code Snippets
You can also add code snippets to comments. This is especially useful if you want to present something that you could try to do before actually implementing it as a commit on your branch. This is also often used to add example code of what is not working or what this Pull Request could implement.
To add a snippet of code you have to “fence” it in backticks.
```java
for(int i=0 ; i < 5 ; i++)
{
   System.out.println("i is : " + i);
}
```
If you add a language name like we did there with java, GitHub will also try to syntax highlight the snippet. In the case of the above example, it would end up rendering like Rendered fenced code example..
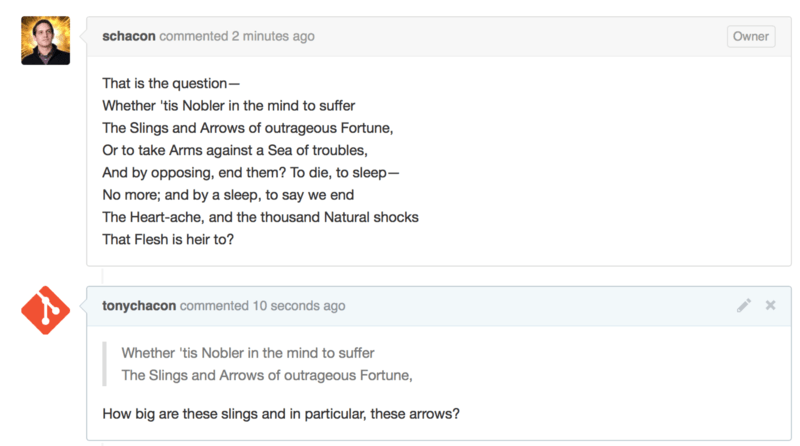
Quoting
If you’re responding to a small part of a long comment, you can selectively quote out of the other comment by preceding the lines with the > character. In fact, this is so common and so useful that there is a keyboard shortcut for it. If you highlight text in a comment that you want to directly reply to and hit the r key, it will quote that text in the comment box for you.
The quotes look something like this:
> Whether 'tis Nobler in the mind to suffer
> The Slings and Arrows of outrageous Fortune,

How big are these slings and in particular, these arrows?
Once rendered, the comment will look like Rendered quoting example..
Emoji
Finally, you can also use emoji in your comments. This is actually used quite extensively in comments you see on many GitHub Issues and Pull Requests. There is even an emoji helper in GitHub. If you are typing a comment and you start with a : character, an autocompleter will help you find what you’re looking for.
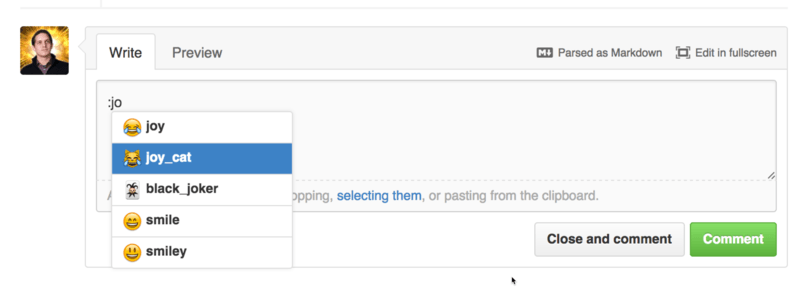
Emojis take the form of :<name>: anywhere in the comment. For instance, you could write something like this:
I :eyes: that :bug: and I :cold_sweat:.

:trophy: for :microscope: it.

:+1: and :sparkles: on this :ship:, it's :fire::poop:!

:clap::tada::panda_face:
When rendered, it would look something like Heavy emoji commenting..
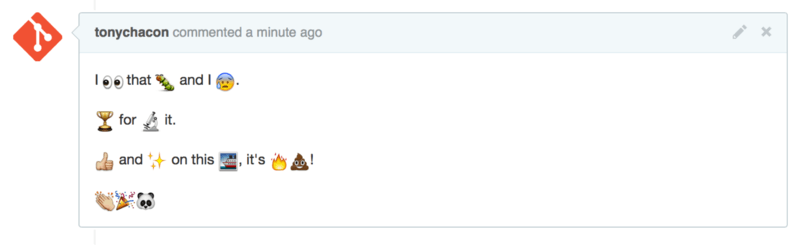
Not that this is incredibly useful, but it does add an element of fun and emotion to a medium that is otherwise hard to convey emotion in.
|
Nota
|
There are actually quite a number of web services that make use of emoji characters these days. A great cheat sheet to reference to find emoji that expresses what you want to say can be found at: |
Images
This isn’t technically GitHub Flavored Markdown, but it is incredibly useful. In addition to adding Markdown image links to comments, which can be difficult to find and embed URLs for, GitHub allows you to drag and drop images into text areas to embed them.
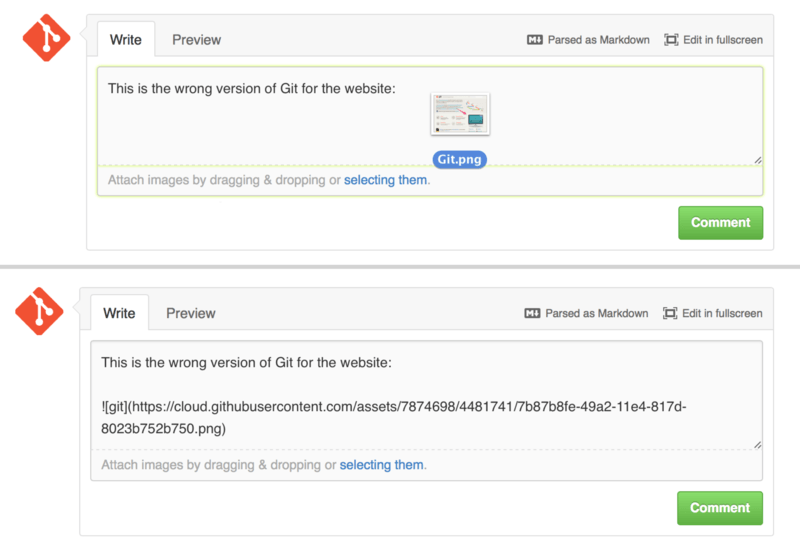
If you look back at Cross references in a Pull Request., you can see a small “Parsed as Markdown” hint above the text area. Clicking on that will give you a full cheat sheet of everything you can do with Markdown on GitHub.