
-
1. Memulai
- 1.1 Tentang Version Control
- 1.2 Sejarah Singkat Git
- 1.3 Dasar-dasar Git
- 1.4 Command Line
- 1.5 Memasang Git
- 1.6 Pengaturan Awal Git
- 1.7 Mendapatkan Bantuan
- 1.8 Kesimpulan
-
2. Git Basics
- 2.1 Mendapatkan Repository Git
- 2.2 Recording Changes to the Repository
- 2.3 Viewing the Commit History
- 2.4 Undoing Things
- 2.5 Working with Remotes
- 2.6 Tagging
- 2.7 Alias Git
- 2.8 Summary
-
3. Git Branching
- 3.1 Branches in a Nutshell
- 3.2 Basic Branching and Merging
- 3.3 Branch Management
- 3.4 Branching Workflows
- 3.5 Remote Branches
- 3.6 Rebasing
- 3.7 Summary
-
4. Git di Server
- 4.1 Protokol
- 4.2 Getting Git on a Server
- 4.3 Generating Your SSH Public Key
- 4.4 Setting Up the Server
- 4.5 Git Daemon
- 4.6 Smart HTTP
- 4.7 GitWeb
- 4.8 GitLab
- 4.9 Third Party Hosted Options
- 4.10 Ringkasan
-
5. Distributed Git
- 5.1 Distributed Workflows
- 5.2 Contributing to a Project
- 5.3 Maintaining a Project
- 5.4 Summary
-
6. GitHub
-
7. Git Tools
- 7.1 Revision Selection
- 7.2 Interactive Staging
- 7.3 Stashing and Cleaning
- 7.4 Signing Your Work
- 7.5 Searching
- 7.6 Rewriting History
- 7.7 Reset Demystified
- 7.8 Advanced Merging
- 7.9 Rerere
- 7.10 Debugging with Git
- 7.11 Submodules
- 7.12 Bundling
- 7.13 Replace
- 7.14 Credential Storage
- 7.15 Summary
-
8. Kostumisasi Git
- 8.1 Konfigurasi Git
- 8.2 Git Attributes
- 8.3 Git Hooks
- 8.4 An Example Git-Enforced Policy
- 8.5 Ringkasan
-
9. Git and Other Systems
- 9.1 Git as a Client
- 9.2 Migrating to Git
- 9.3 Summary
-
10. Git Internals
- 10.1 Plumbing and Porcelain
- 10.2 Git Objects
- 10.3 Git References
- 10.4 Packfiles
- 10.5 The Refspec
- 10.6 Transfer Protocols
- 10.7 Maintenance and Data Recovery
- 10.8 Environment Variables
- 10.9 Summary
-
A1. Appendix A: Git in Other Environments
- A1.1 Graphical Interfaces
- A1.2 Git in Visual Studio
- A1.3 Git in Eclipse
- A1.4 Git in Bash
- A1.5 Git in Zsh
- A1.6 Git in Powershell
- A1.7 Summary
-
A2. Appendix B: Embedding Git in your Applications
- A2.1 Command-line Git
- A2.2 Libgit2
- A2.3 JGit
-
A3. Appendix C: Git Commands
- A3.1 Setup and Config
- A3.2 Getting and Creating Projects
- A3.3 Basic Snapshotting
- A3.4 Branching and Merging
- A3.5 Sharing and Updating Projects
- A3.6 Inspection and Comparison
- A3.7 Debugging
- A3.8 Patching
- A3.9 Email
- A3.10 External Systems
- A3.11 Administration
- A3.12 Plumbing Commands
8.1 Kostumisasi Git - Konfigurasi Git
Sejauh ini, kita sudah membahas dasar-dasar bagaimana Git bekerja dan bagaimana menggunakannya, kita juga sudah memperkenalkan beberapa peralatan yang disediakan Git untuk membantu Anda menggunakannya dengan mudah dan efektif. Pada bab ini, kita akan melihat bagaimana Anda bisa membuat Git bekerja dengan kostumisasi, sambil memperkenalkan beberapa pengaturan konfigurasi penting dan sistem hook. Dengan peralatan-peralatan tersebut, akan memudahkan untuk membuat Git bekerja sesuai dengan yang Anda inginkan, perusahaan Anda, atau kebutuhan kelompok Anda.
Konfigurasi Git
Sebagaimana telah Anda lihat secara singkat di Memulai, Anda bisa menentukan pengaturan konfigurasi Git dengan perintah git config.
Salah satu hal pertama yang harus Anda lakukan adalah menyiapkan nama dan alamat surel Anda:
$ git config --global user.name "John Doe"
$ git config --global user.email johndoe@example.com
Sekarang Anda akan mempelajari beberapa pilihan yang lebih menarik lagi yang bisa Anda gunakan untuk mengkostumisasi penggunaan Git Anda.
Pertama, tinjauan singkat: Git menggunakan bermacam-macam konfigurasi berkas untuk menentukan perilaku non-bawaan yang Anda inginkan.
Tempat pertama Git mencari nilai-nilai tersebut adalah di berkas /etc/gitconfig, yang berisi nilai-nilai untuk setiap pengguna di sistem dan semua repositori-repositori mereka.
Jika Anda memberikan pilihan --system ke git config, maka pilihan tersebut akan membaca dan menulis dari berkas ini secara khusus.
Tempat selanjutnya yang akan dilihat oleh Git adalah berkas ~/.gitconfig (atau ~/.config/git/config), yang khusus untuk setiap pengguna.
Anda bisa membuat Git membaca dan menulis pada berkas ini dengan memberikan pilihan --global.
Akhirnya, Git akan mencari nilai-nilai konfigurasi di dalam berkas konfigurasi yang berada di direktori Git (.git/config) untuk repositori apapun yang sedang Anda gunakan.
Nilai-nilai tersebut hanya untuk satu repositori tersebut.
Tiap-tiap “levels” tersebut (sistem, global, lokal) menulis ulang nilai-nilai pada level sebelumnya, jadi nilai-nilai di .git/config sebagai contohnya akan mengganti nilai-nilai yang ada di /etc/gitconfig.
Berkas konfigurasi Git merupakan teks biasa, jadi Anda juga bisa mengatur nilai-nilai tersebut dengan menyunting berkas secara manual dan memasukkan sintaks yang benar.
Umumnya perintah git config lebih mudah dijalankan.
Konfigurasi Dasar Klien Git
Pilihan-pilihan konfigurasi yang dikenali oleh Git terbagi ke dalam dua kategori: sisi-klien dan sisi-server. Pilihan-pilihan pada umumnya merupakan sisi-klien - yang mengkonfigurasi pilihan cara kerja personal Anda. Ada banyak sekali pilihan-pilihan konfigurasi yang sudah didukung, tetapi kebanyakan dari pilihan-pilihan tersebut hanya berguna pada kasus-kasus tertentu. Kita hanya akan membahas yang paling umum dan yang paling berguna disini. Jika Anda ingin melihat semua daftar pilihan-pilihan yang dikenali oleh versi Git Anda, Anda bisa menjalankan
$ man git-configPerintah ini akan mencantumkan semua pilihan-pilihan yang tersedia dengan lebih mendetail. Anda juga bisa menemukan materi untuk rujukan ini di http://git-scm.com/docs/git-config.html.
core.editor
Secara default, Git menggunakan apapun yang sudah Anda atur sebagai default penyunting teks Anda ($VISUAL atau $EDITOR) jika tidak maka akan kembali menggunakan penyunting vi untuk membuat dan mengubah pesan commit dan tag.
Untuk mengubah default tersebut menjadi sesuatu yang lain, Anda bisa menggunakan pengaturan core.editor:
$ git config --global core.editor emacsSekarang, terlepas dari apapun yang dipasang sebagai shell default penyunting Anda, Git akan menggunakan Emacs untuk menyunting pesan-pesan Anda.
commit.template
Jika Anda memasang ini ke jalur berkas pada komputer Anda, Git akan menggunakan berkas tersebut sebagai pesan default ketika melakukan commit.
Sebagai contoh, anggap saja Anda membuat sebuah templat berkas di ~/.gitmessage.txt yang terlihat seperti ini:
subject line

what happened

[ticket: X]
Untuk meminta Git menggunakannya sebagai pesan default yang muncul pada penyunting Anda saat Anda menjalankan git commit, aturlah nilai konfigurasi commit.template:
$ git config --global commit.template ~/.gitmessage.txt
$ git commit
Maka, penyunting Anda akan terbuka seperti ini pada tempat pesan commit Anda ketika Anda melakukan commit:
subject line

what happened

[ticket: X]
# Please enter the commit message for your changes. Lines starting
# with '#' will be ignored, and an empty message aborts the commit.
# On branch master
# Changes to be committed:
#   (use "git reset HEAD <file>..." to unstage)
#
# modified:   lib/test.rb
#
~
~
".git/COMMIT_EDITMSG" 14L, 297C
Jika tim Anda mempunyai aturan untuk pesan-commit, maka memasang templat untuk aturan tersebut pada sistem Anda dan mengkonfigurasi Git untuk menggunakannya secara default akan membantu untuk meningkatkan kemungkinan aturan tersebut diikuti secara teratur.
core.pager
Pengaturan ini menentukan pager yang mana yang digunakan ketika Git melakukan pages output seperti log dan diff. Anda bisa mengaturnya menjadi more atau ke pager favorit Anda (secara default, hal tersebut merupakan less), atau Anda bisa mematikannya dengan mangaturnya ke string kosong:
$ git config --global core.pager ''Jika Anda menjalankan perintah tersebut, Git akan menampilkan semua pesan tanpa perantara more atau less, tidak perduli seberapa panjang perintah tersebut.
user.signingkey
jika Anda membuat signed annotated tags (sebagaimana yang telah dibahas di Signing Your Work), mengatur kunci signin GPG Anda menjadi sebuah pengaturan konfigurasi akan membuat segala sesuatu menjadi lebih mudah. Atur kunci ID Anda seperti contoh berikut:
$ git config --global user.signingkey <gpg-key-id>Sekarang, Anda bisa menandai tag tanpa harus selalu menentukan kunci Anda dengan perintah git tag:
$ git tag -s <tag-name>core.excludesfile
Anda bisa membuat pola pada berkas .gitignore proyek Anda agar Git tidak melihatnya sebagai berkas yang untracked atau coba untuk menampilkannya ketika Anda menjalankan git add pada berkas-berkas tersebut, sebagaimana telah dibahas di Ignoring Files.
Tetapi adakalannya Anda ingin mengabaikan berkas-berkas tertentu untuk semua repositori yang sedang Anda gunakan.
Jika komputer Anda menggunakan Mac OS X, mungkin Anda sudah terbiasa dengan berkas-berkas .DS_Store.
Jika Anda lebih suka menggunakan penyunting Emacs atau Vim, Anda pasti tahu tentang berkas-berkas yang berakhir dengan tanda ~.
Pengaturan ini membuat Anda bisa menulis sebuah berkas umum dari .gitignore.
Jika Anda membuat sebuah berkas ~/.gitignore_global dengan konten-konten berikut:
*~
.DS_Store
…dan Anda menjalankan perintah git config --global core.excludesfile ~/.gitignore_global, Git tidak akan pernah lagi mempermasalahkan berkas-berkas tersebut.
help.autocorrect
Jika Anda salah menulis perintah, Anda akan melihat sesuatu seperti ini:
$ git chekcout master
git: 'chekcout' is not a git command. See 'git --help'.

Did you mean this?
    checkout
Git akan mencoba memahami apa yang Anda maksud, tetapi tetap akan menolak untuk melakukannya.
Jika Anda mengatur help.autocorrect dengan angka 1, Git hanya akan menjalankan perintah ini untuk Anda:
$ git chekcout master
WARNING: You called a Git command named 'chekcout', which does not exist.
-Continuing under the assumption that you meant 'checkout'
-in 0.1 seconds automatically...
Catat bahwa nilai “0.1 seconds”. help.autocorrect sebenarnya merupakan sebuah bilangan bulat yang mewakili sepersepuluh detik.
Jadi jika Anda mengaturnya pada angka 50, Git akan memberikan anda waktu 5 detik untuk berubah pikiran sebelum melakukan perintah autocorrected (perbaikan secara otomatis).
Warna-warna didalam Git
Git memberi dukungan penuh untuk pewarnaan terminal output, yang akan sangat membantu dalam memvisualisasikan penguraian perintah output secara cepat dan mudah. Beberapa pilihan bisa membantu Anda mengatur pewarnaan sesuai dengan keinginan Anda.
color.ui
Git mewarnai hampir semua outputnya secara otomatis, jikan Anda tidak suka dengan pengaturan seperti ini ada opsi untuk mematikannya. Semua pewarnaan pada terminal output Git bisa dimatikan dengan menjalankan perintah berikut:
$ git config --global color.ui falseThe default setting is auto, which colors output when it’s going straight to a terminal, but omits the color-control codes when the output is redirected to a pipe or a file.
You can also set it to always to ignore the difference between terminals and pipes.
You’ll rarely want this; in most scenarios, if you want color codes in your redirected output, you can instead pass a --color flag to the Git command to force it to use color codes.
The default setting is almost always what you’ll want.
color.*
If you want to be more specific about which commands are colored and how, Git provides verb-specific coloring settings.
Each of these can be set to true, false, or always:
color.branch
color.diff
color.interactive
color.status
In addition, each of these has subsettings you can use to set specific colors for parts of the output, if you want to override each color. For example, to set the meta information in your diff output to blue foreground, black background, and bold text, you can run
$ git config --global color.diff.meta "blue black bold"
You can set the color to any of the following values: normal, black, red, green, yellow, blue, magenta, cyan, or white.
If you want an attribute like bold in the previous example, you can choose from bold, dim, ul (underline), blink, and reverse (swap foreground and background).
External Merge and Diff Tools
Although Git has an internal implementation of diff, which is what we’ve been showing in this book, you can set up an external tool instead. You can also set up a graphical merge-conflict-resolution tool instead of having to resolve conflicts manually. We’ll demonstrate setting up the Perforce Visual Merge Tool (P4Merge) to do your diffs and merge resolutions, because it’s a nice graphical tool and it’s free.
If you want to try this out, P4Merge works on all major platforms, so you should be able to do so.
I’ll use path names in the examples that work on Mac and Linux systems; for Windows, you’ll have to change /usr/local/bin to an executable path in your environment.
To begin, download P4Merge from http://www.perforce.com/downloads/Perforce/.
Next, you’ll set up external wrapper scripts to run your commands.
I’ll use the Mac path for the executable; in other systems, it will be where your p4merge binary is installed.
Set up a merge wrapper script named extMerge that calls your binary with all the arguments provided:
$ cat /usr/local/bin/extMerge
#!/bin/sh
/Applications/p4merge.app/Contents/MacOS/p4merge $*
The diff wrapper checks to make sure seven arguments are provided and passes two of them to your merge script. By default, Git passes the following arguments to the diff program:
path old-file old-hex old-mode new-file new-hex new-modeBecause you only want the old-file and new-file arguments, you use the wrapper script to pass the ones you need.
$ cat /usr/local/bin/extDiff
#!/bin/sh
[ $# -eq 7 ] && /usr/local/bin/extMerge "$2" "$5"
You also need to make sure these tools are executable:
$ sudo chmod +x /usr/local/bin/extMerge
$ sudo chmod +x /usr/local/bin/extDiff
Now you can set up your config file to use your custom merge resolution and diff tools.
This takes a number of custom settings: merge.tool to tell Git what strategy to use, mergetool.<tool>.cmd to specify how to run the command, mergetool.<tool>.trustExitCode to tell Git if the exit code of that program indicates a successful merge resolution or not, and diff.external to tell Git what command to run for diffs.
So, you can either run four config commands
$ git config --global merge.tool extMerge
$ git config --global mergetool.extMerge.cmd \
  'extMerge \"$BASE\" \"$LOCAL\" \"$REMOTE\" \"$MERGED\"'
$ git config --global mergetool.extMerge.trustExitCode false
$ git config --global diff.external extDiff
or you can edit your ~/.gitconfig file to add these lines:
[merge]
  tool = extMerge
[mergetool "extMerge"]
  cmd = extMerge "$BASE" "$LOCAL" "$REMOTE" "$MERGED"
  trustExitCode = false
[diff]
  external = extDiff
After all this is set, if you run diff commands such as this:
$ git diff 32d1776b1^ 32d1776b1Instead of getting the diff output on the command line, Git fires up P4Merge, which looks something like this:
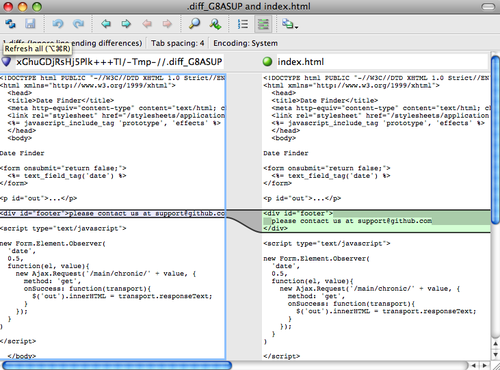
If you try to merge two branches and subsequently have merge conflicts, you can run the command git mergetool; it starts P4Merge to let you resolve the conflicts through that GUI tool.
The nice thing about this wrapper setup is that you can change your diff and merge tools easily.
For example, to change your extDiff and extMerge tools to run the KDiff3 tool instead, all you have to do is edit your extMerge file:
$ cat /usr/local/bin/extMerge
#!/bin/sh
/Applications/kdiff3.app/Contents/MacOS/kdiff3 $*
Now, Git will use the KDiff3 tool for diff viewing and merge conflict resolution.
Git comes preset to use a number of other merge-resolution tools without your having to set up the cmd configuration. To see a list of the tools it supports, try this:
$ git mergetool --tool-help
'git mergetool --tool=<tool>' may be set to one of the following:
        emerge
        gvimdiff
        gvimdiff2
        opendiff
        p4merge
        vimdiff
        vimdiff2

The following tools are valid, but not currently available:
        araxis
        bc3
        codecompare
        deltawalker
        diffmerge
        diffuse
        ecmerge
        kdiff3
        meld
        tkdiff
        tortoisemerge
        xxdiff

Some of the tools listed above only work in a windowed
environment. If run in a terminal-only session, they will fail.
If you’re not interested in using KDiff3 for diff but rather want to use it just for merge resolution, and the kdiff3 command is in your path, then you can run
$ git config --global merge.tool kdiff3If you run this instead of setting up the extMerge and extDiff files, Git will use KDiff3 for merge resolution and the normal Git diff tool for diffs.
Formatting and Whitespace
Formatting and whitespace issues are some of the more frustrating and subtle problems that many developers encounter when collaborating, especially cross-platform. It’s very easy for patches or other collaborated work to introduce subtle whitespace changes because editors silently introduce them, and if your files ever touch a Windows system, their line endings might be replaced. Git has a few configuration options to help with these issues.
core.autocrlf
If you’re programming on Windows and working with people who are not (or vice-versa), you’ll probably run into line-ending issues at some point. This is because Windows uses both a carriage-return character and a linefeed character for newlines in its files, whereas Mac and Linux systems use only the linefeed character. This is a subtle but incredibly annoying fact of cross-platform work; many editors on Windows silently replace existing LF-style line endings with CRLF, or insert both line-ending characters when the user hits the enter key.
Git can handle this by auto-converting CRLF line endings into LF when you add a file to the index, and vice versa when it checks out code onto your filesystem.
You can turn on this functionality with the core.autocrlf setting.
If you’re on a Windows machine, set it to true – this converts LF endings into CRLF when you check out code:
$ git config --global core.autocrlf trueIf you’re on a Linux or Mac system that uses LF line endings, then you don’t want Git to automatically convert them when you check out files; however, if a file with CRLF endings accidentally gets introduced, then you may want Git to fix it.
You can tell Git to convert CRLF to LF on commit but not the other way around by setting core.autocrlf to input:
$ git config --global core.autocrlf inputThis setup should leave you with CRLF endings in Windows checkouts, but LF endings on Mac and Linux systems and in the repository.
If you’re a Windows programmer doing a Windows-only project, then you can turn off this functionality, recording the carriage returns in the repository by setting the config value to false:
$ git config --global core.autocrlf falsecore.whitespace
Git comes preset to detect and fix some whitespace issues. It can look for six primary whitespace issues – three are enabled by default and can be turned off, and three are disabled by default but can be activated.
The ones that are turned on by default are blank-at-eol, which looks for spaces at the end of a line; blank-at-eof, which notices blank lines at the end of a file; and space-before-tab, which looks for spaces before tabs at the beginning of a line.
The three that are disabled by default but can be turned on are indent-with-non-tab, which looks for lines that begin with spaces instead of tabs (and is controlled by the tabwidth option); tab-in-indent, which watches for tabs in the indentation portion of a line; and cr-at-eol, which tells Git that carriage returns at the end of lines are OK.
You can tell Git which of these you want enabled by setting core.whitespace to the values you want on or off, separated by commas.
You can disable settings by either leaving them out of the setting string or prepending a - in front of the value.
For example, if you want all but cr-at-eol to be set, you can do this:
$ git config --global core.whitespace \
    trailing-space,space-before-tab,indent-with-non-tab
Git will detect these issues when you run a git diff command and try to color them so you can possibly fix them before you commit.
It will also use these values to help you when you apply patches with git apply.
When you’re applying patches, you can ask Git to warn you if it’s applying patches with the specified whitespace issues:
$ git apply --whitespace=warn <patch>Or you can have Git try to automatically fix the issue before applying the patch:
$ git apply --whitespace=fix <patch>These options apply to the git rebase command as well.
If you’ve committed whitespace issues but haven’t yet pushed upstream, you can run git rebase --whitespace=fix to have Git automatically fix whitespace issues as it’s rewriting the patches.
Server Configuration
Not nearly as many configuration options are available for the server side of Git, but there are a few interesting ones you may want to take note of.
receive.fsckObjects
Git is capable of making sure every object received during a push still matches its SHA-1 checksum and points to valid objects.
However, it doesn’t do this by default; it’s a fairly expensive operation, and might slow down the operation, especially on large repositories or pushes.
If you want Git to check object consistency on every push, you can force it to do so by setting receive.fsckObjects to true:
$ git config --system receive.fsckObjects trueNow, Git will check the integrity of your repository before each push is accepted to make sure faulty (or malicious) clients aren’t introducing corrupt data.
receive.denyNonFastForwards
If you rebase commits that you’ve already pushed and then try to push again, or otherwise try to push a commit to a remote branch that doesn’t contain the commit that the remote branch currently points to, you’ll be denied.
This is generally good policy; but in the case of the rebase, you may determine that you know what you’re doing and can force-update the remote branch with a -f flag to your push command.
To tell Git to refuse force-pushes, set receive.denyNonFastForwards:
$ git config --system receive.denyNonFastForwards trueThe other way you can do this is via server-side receive hooks, which we’ll cover in a bit. That approach lets you do more complex things like deny non-fast-forwards to a certain subset of users.
receive.denyDeletes
One of the workarounds to the denyNonFastForwards policy is for the user to delete the branch and then push it back up with the new reference.
To avoid this, set receive.denyDeletes to true:
$ git config --system receive.denyDeletes trueThis denies any deletion of branches or tags – no user can do it. To remove remote branches, you must remove the ref files from the server manually. There are also more interesting ways to do this on a per-user basis via ACLs, as you’ll learn in An Example Git-Enforced Policy.