-
1. Úvod
- 1.1 Správa verzí
- 1.2 Stručná historie systému Git
- 1.3 Základy systému Git
- 1.4 Příkazový řádek
- 1.5 Instalace systému Git
- 1.6 První nastavení systému Git
- 1.7 Získání nápovědy
- 1.8 Shrnutí
-
2. Základy práce se systémem Git
-
3. Větve v systému Git
- 3.1 Větve v kostce
- 3.2 Základy větvení a slučování
- 3.3 Správa větví
- 3.4 Postupy při práci s větvemi
- 3.5 Vzdálené větve
- 3.6 Přeskládání
- 3.7 Shrnutí
-
4. Git na serveru
- 4.1 Protokoly
- 4.2 Zprovoznění Gitu na serveru
- 4.3 Generování veřejného klíče SSH
- 4.4 Nastavení serveru
- 4.5 Démon Git
- 4.6 Chytrý HTTP
- 4.7 GitWeb
- 4.8 GitLab
- 4.9 Možnosti hostování u třetí strany
- 4.10 Shrnutí
-
5. Distribuovaný Git
- 5.1 Distribuované pracovní postupy
- 5.2 Přispívání do projektu
- 5.3 Správa projektu
- 5.4 Shrnutí
-
6. GitHub
-
7. Git Tools
- 7.1 Revision Selection
- 7.2 Interactive Staging
- 7.3 Stashing and Cleaning
- 7.4 Signing Your Work
- 7.5 Searching
- 7.6 Rewriting History
- 7.7 Reset Demystified
- 7.8 Advanced Merging
- 7.9 Rerere
- 7.10 Ladění v systému Git
- 7.11 Submodules
- 7.12 Bundling
- 7.13 Replace
- 7.14 Credential Storage
- 7.15 Shrnutí
-
8. Customizing Git
- 8.1 Git Configuration
- 8.2 Atributy Git
- 8.3 Git Hooks
- 8.4 An Example Git-Enforced Policy
- 8.5 Shrnutí
-
9. Git a ostatní systémy
- 9.1 Git as a Client
- 9.2 Migrating to Git
- 9.3 Shrnutí
-
10. Git Internals
- 10.1 Plumbing and Porcelain
- 10.2 Git Objects
- 10.3 Git References
- 10.4 Balíčkové soubory
- 10.5 The Refspec
- 10.6 Přenosové protokoly
- 10.7 Správa a obnova dat
- 10.8 Environment Variables
- 10.9 Shrnutí
-
A1. Appendix A: Git in Other Environments
- A1.1 Graphical Interfaces
- A1.2 Git in Visual Studio
- A1.3 Git in Eclipse
- A1.4 Git in Bash
- A1.5 Git in Zsh
- A1.6 Git in Powershell
- A1.7 Shrnutí
-
A2. Appendix B: Embedding Git in your Applications
- A2.1 Command-line Git
- A2.2 Libgit2
- A2.3 JGit
-
A3. Appendix C: Git Commands
- A3.1 Setup and Config
- A3.2 Getting and Creating Projects
- A3.3 Basic Snapshotting
- A3.4 Branching and Merging
- A3.5 Sharing and Updating Projects
- A3.6 Inspection and Comparison
- A3.7 Debugging
- A3.8 Patching
- A3.9 Email
- A3.10 External Systems
- A3.11 Administration
- A3.12 Plumbing Commands
6.1 GitHub - Zřízení účtu a úprava konfigurace
GitHub je největší hostingový server pro gitové repozitáře. Je centrem pro spolupráci miliónů vývojářů a úložištěm jejich projektů. Značné procento všech gitových repozitářů je hostováno právě na GitHubu a mnoho open-source projektů ho využívá pro Git hosting, pro diskuse o problémech (issue tracking), pro recenzování kódu a pro další věci. Takže i když není přímou součástí open-source projektu (zvaného) Git, je velmi pravděpodobné, že při profesionálním používání Gitu budete chtít nebo potřebovat s GitHubem pracovat.
Tato kapitola je zaměřena na efektivní používání GitHubu. Popíšeme si zřízení a správu účtu, vytvoření a používání gitových repozitářů, běžné pracovní postupy při přispívání do (jiných) projektů a přijímání příspěvku do vlastních projektů, programátorské rozhraní GitHubu a řadu drobných tipů, které vám mohou usnadnit život.
Pokud vás nezajímá používání GitHubu pro hostování vlastních projektů nebo pro spolupráci na jiných projektech hostovaných na GitHubu, přeskočte na kapitolu Git Tools.
Zřízení účtu a úprava konfigurace
The first thing you need to do is set up a free user account. Simply visit https://github.com, choose a user name that isn’t already taken, provide an email address and a password, and click the big green “Sign up for GitHub” button.

The next thing you’ll see is the pricing page for upgraded plans, but it’s safe to ignore this for now. GitHub will send you an email to verify the address you provided. Go ahead and do this, it’s pretty important (as we’ll see later).
|
Note
|
GitHub provides all of its functionality with free accounts, with the limitation that all of your projects are fully public (everyone has read access). GitHub’s paid plans include a set number of private projects, but we won’t be covering those in this book. |
Clicking the Octocat logo at the top-left of the screen will take you to your dashboard page. You’re now ready to use GitHub.
SSH Access
As of right now, you’re fully able to connect with Git repositories using the https:// protocol, authenticating with the username and password you just set up.
However, to simply clone public projects, you don’t even need to sign up - the account we just created comes into play when we fork projects and push to our forks a bit later.
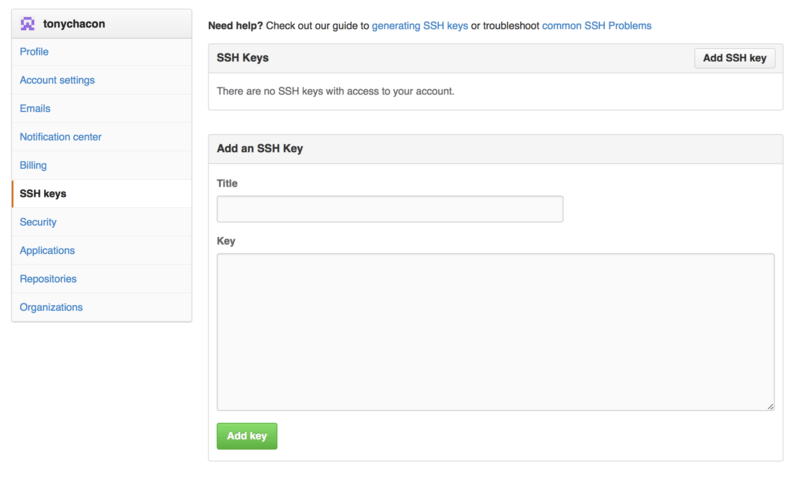
If you’d like to use SSH remotes, you’ll need to configure a public key. (If you don’t already have one, see Generování veřejného klíče SSH.) Open up your account settings using the link at the top-right of the window:

Then select the “SSH keys” section along the left-hand side.

From there, click the "Add an SSH key" button, give your key a name, paste the contents of your ~/.ssh/id_rsa.pub (or whatever you named it) public-key file into the text area, and click “Add key”.
|
Note
|
Be sure to name your SSH key something you can remember. You can name each of your keys (e.g. "My Laptop" or "Work Account") so that if you need to revoke a key later, you can easily tell which one you’re looking for. |
Your Avatar
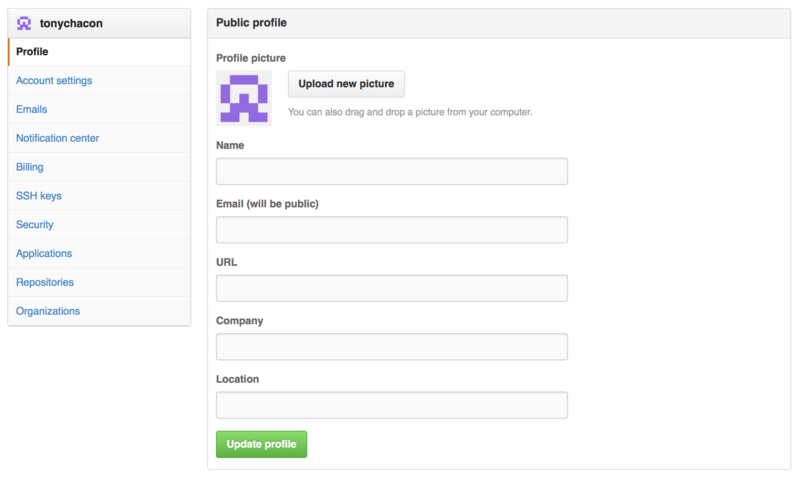
Next, if you wish, you can replace the avatar that is generated for you with an image of your choosing. First go to the “Profile” tab (above the SSH Keys tab) and click “Upload new picture”.

We’ll choose a copy of the Git logo that is on our hard drive and then we get a chance to crop it.
Now anywhere you interact on the site, people will see your avatar next to your username.
If you happen to have uploaded an avatar to the popular Gravatar service (often used for Wordpress accounts), that avatar will be used by default and you don’t need to do this step.
Your Email Addresses
The way that GitHub maps your Git commits to your user is by email address. If you use multiple email addresses in your commits and you want GitHub to link them up properly, you need to add all the email addresses you have used to the Emails section of the admin section.

In Add email addresses we can see some of the different states that are possible. The top address is verified and set as the primary address, meaning that is where you’ll get any notifications and receipts. The second address is verified and so can be set as the primary if you wish to switch them. The final address is unverified, meaning that you can’t make it your primary address. If GitHub sees any of these in commit messages in any repository on the site, it will be linked to your user now.
Two Factor Authentication
Finally, for extra security, you should definitely set up Two-factor Authentication or “2FA”. Two-factor Authentication is an authentication mechanism that is becoming more and more popular recently to mitigate the risk of your account being compromised if your password is stolen somehow. Turning it on will make GitHub ask you for two different methods of authentication, so that if one of them is compromised, an attacker will not be able to access your account.
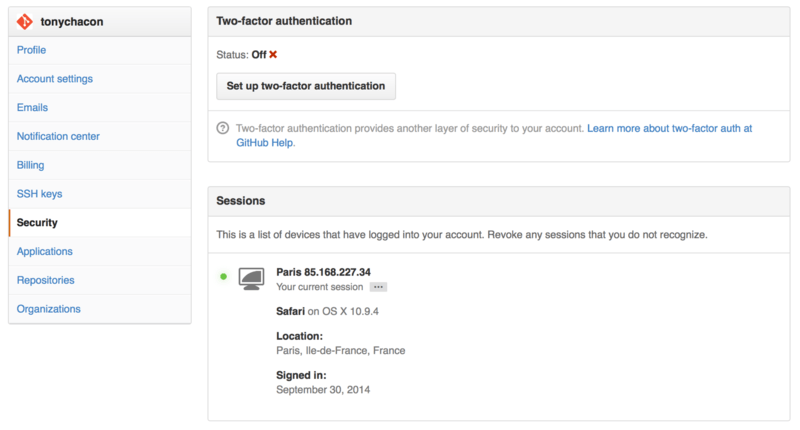
You can find the Two-factor Authentication setup under the Security tab of your Account settings.

If you click on the “Set up two-factor authentication” button, it will take you to a configuration page where you can choose to use a phone app to generate your secondary code (a “time based one-time password”), or you can have GitHub send you a code via SMS each time you need to log in.
After you choose which method you prefer and follow the instructions for setting up 2FA, your account will then be a little more secure and you will have to provide a code in addition to your password whenever you log into GitHub.
