
-
1. Začetek
- 1.1 O nadzoru različic
- 1.2 Kratka zgodovina Gita
- 1.3 Kaj je Git?
- 1.4 Ukazna vrstica
- 1.5 Namestitev Gita
- 1.6 Prva nastavitev Gita
- 1.7 Pridobivanje pomoči
- 1.8 Povzetek
-
2. Osnove Git
- 2.1 Pridobivanje repozitorija Git
- 2.2 Snemanje sprememb v repozitorij
- 2.3 Pregled zgodovine potrditev
- 2.4 Razveljavljanje stvari
- 2.5 Delo z daljavami
- 2.6 Označevanje
- 2.7 Aliasi Git
- 2.8 Povzetek
-
3. Veje Git
- 3.1 Veje na kratko
- 3.2 Osnove vej in združevanja
- 3.3 Upravljanje vej
- 3.4 Poteki dela z vejami
- 3.5 Oddaljene veje
- 3.6 Ponovno baziranje
- 3.7 Povzetek
-
4. Git na strežniku
- 4.1 Protokoli
- 4.2 Pridobitev Gita na strežniku
- 4.3 Generiranje vaših javnih ključev SSH
- 4.4 Nastavitev strežnika
- 4.5 Prikriti proces Git
- 4.6 Pametni HTTP
- 4.7 GitWeb
- 4.8 GitLab
- 4.9 Možnosti gostovanja pri tretjih ponudnikih
- 4.10 Povzetek
-
5. Porazdeljeni Git
- 5.1 Porazdeljeni poteki dela
- 5.2 Prispevek k projektu
- 5.3 Vzdrževanje projekta
- 5.4 Povzetek
-
6. GitHub
-
7. Orodja Git
- 7.1 Izbira revizije
- 7.2 Interaktivno pripravljanje
- 7.3 Shranjevanje na varno (angl. stashing) in čiščenje
- 7.4 Podpisovanje vašega dela
- 7.5 Iskanje
- 7.6 Prepisovanje zgodovine
- 7.7 Demistifikacija ponastavitve
- 7.8 Napredno združevanje
- 7.9 Rerere
- 7.10 Razhroščevanje z Gitom
- 7.11 Podmoduli
- 7.12 Povezovanje v pakete
- 7.13 Zamenjava
- 7.14 Shramba poverilnic
- 7.15 Povzetek
-
8. Prilagoditev Gita
- 8.1 Konfiguracija Git
- 8.2 Atributi Git
- 8.3 Kljuke Git
- 8.4 Primer pravilnika, ki ga uveljavlja Git
- 8.5 Povzetek
-
9. Git in ostali sistemi
- 9.1 Git kot odjemalec
- 9.2 Migracija na Git
- 9.3 Povzetek
-
10. Notranjost Gita
- 10.1 Napeljava in keramika
- 10.2 Objekti Git
- 10.3 Reference Git
- 10.4 Packfiles (datoteke zmanjšanih podatkov)
- 10.5 Refspec
- 10.6 Protokoli prenosa
- 10.7 Vzdrževanje in obnovitev podatkov
- 10.8 Spremenljivke okolja
- 10.9 Povzetek
-
A1. Dodatek A: Git v drugih okoljih
- A1.1 Grafični vmesniki
- A1.2 Git v Visual Studio
- A1.3 Git v Visual Studio Code
- A1.4 Git v IntelliJ / PyCharm / WebStorm / PhpStorm / RubyMine
- A1.5 Git v Sublime Text
- A1.6 Git v Bashu
- A1.7 Git v Zsh
- A1.8 Git v Powershellu
- A1.9 Povzetek
-
A2. Dodatek B: Vdelava Gita v vašo aplikacijo
- A2.1 Git v ukazni vrstici
- A2.2 Libgit2
- A2.3 JGit
- A2.4 go-git
- A2.5 Dulwich
-
A3. Dodatek C: Ukazi Git
- A3.1 Nastavitev in konfiguracija
- A3.2 Pridobivanje in ustvarjanje projektov
- A3.3 Osnove posnetkov
- A3.4 Veje in združevanje
- A3.5 Deljenje in posodabljanje projektov
- A3.6 Pregled in primerjava
- A3.7 Razhroščevanje
- A3.8 Popravljanje
- A3.9 E-pošta
- A3.10 Zunanji sistemi
- A3.11 Administracija
- A3.12 Orodja za sisteme napeljave
6.3 GitHub - Vzdrževanje projekta
Vzdrževanje projekta
Sedaj, ko smo domači s prispevanjem projektu, poglejmo drugo stran: ustvarjanje, vzdrževanje in administriranje vašega lastnega projekta.
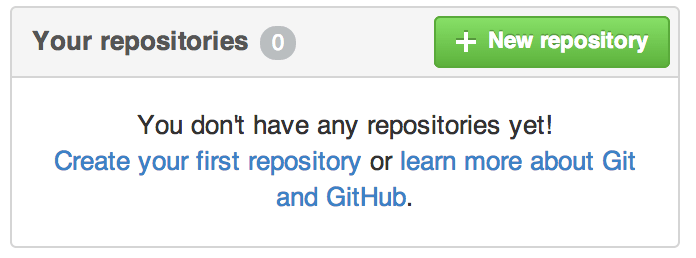
Ustvarjanje novega repozitorija
Ustvarimo nov repozitorij, da delimo kodo vašega projekta.
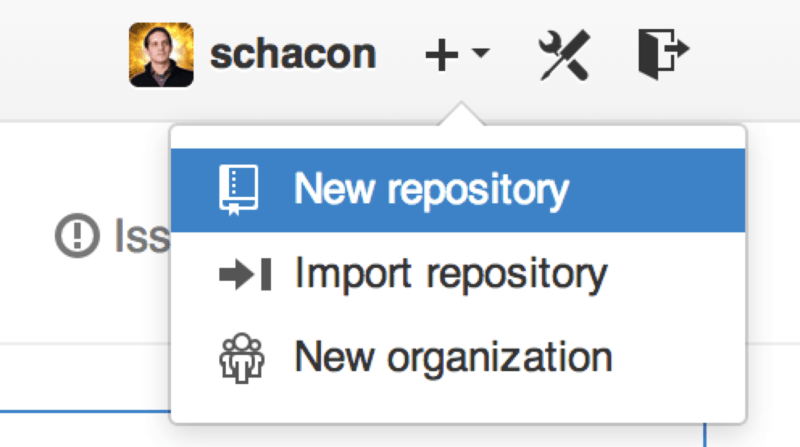
Začnite s klikom na gumb »New repository« na desni strani plošče ali z gumbom + na vrhnji orodni vrstici zraven vašega uporabniškega imena, kot je prikazano na sliki Spustni seznam »New repository«.
To vas popelje na obrazec »new repository«:

Vse kar morate v resnici tu narediti, je ponuditi ime projekta; preostanek polj je v celoti neobvezen.
Za sedaj, samo kliknite na gumb »Create Repository« in že imate nov repozitorij na GitHubu imenovan <user>/<project_name>.
Ker še nimate kode, vam bo GitHub prikazal navodila, kako ustvariti popolnoma nov repozitorij Git ali povezati obstoječi projekt Git. Tega tu ne bomo poudarjali; če potrebujete osvežitev, preverite poglavje Osnove Git.
Sedaj, ko vaš projekt gostuje na GitHubu, lahko daste URL komurkoli, s komer želite deliti svoj projekt.
Vsak projekt na GitHubu je dostopen preko HTTPS kot https://github.com/<user>/<project_name> in preko SSH kot git@github.com:<user>/<project_name>.
Git lahko prenese in potisne na oba od teh URL-jev, vendar sta osnovana na nadzoru dostopa poverilnic uporabnika, ki se povezuje z njimi.
|
Opomba
|
Pogostokrat je bolje deliti HTTPS osnovan URL za javni projekt, saj uporabniku ni treba imeti računa GitHub, da dostopa do njega za kloniranje. Uporabniki bodo morali imeti račun in naložiti ključ SSH za dostop do vašega projekta, če jim daste SSH URL. HTTPS URL je tudi točno tak URL, kot bi ga prilepili v brskalnik, da si tam pogledajo projekt. |
Dodajanje sodelavcev
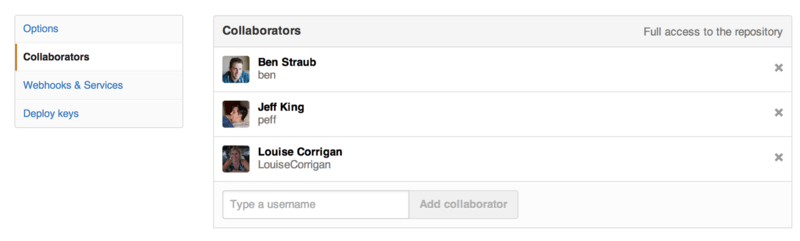
Če delate z drugimi ljudmi, ki jim želite dati dostop potrjevanja, jih morate dodati kot »sodelavce«. Če se Ben, Jeff in Louise vsi prijavijo za račune na GitHubu in jim želite dati dostop potiskanja do svojega repozitorija, jih lahko dodate k svojemu projektu. To jim bo dalo dostop »push«, kar pomeni, da imajo tako pravice branja kot tudi pisanja za projekt in repozitorij Git.
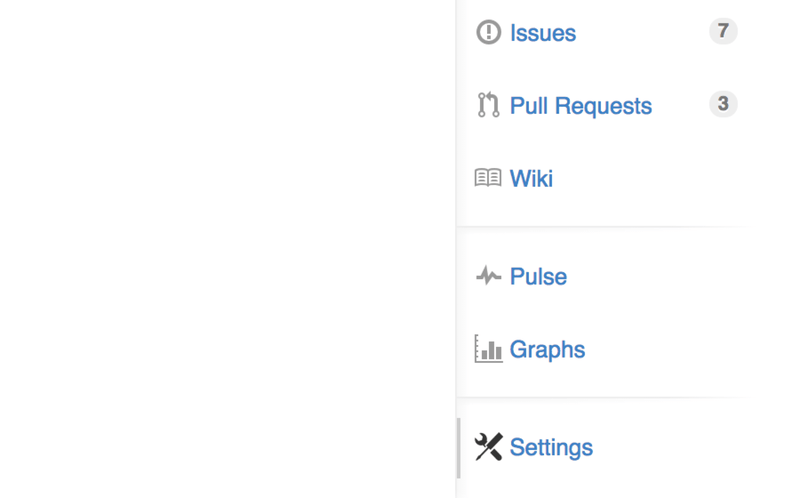
Kliknite na povezavo »Settings« na dnu orodne vrstice desne strani.
Nato izberite »Collaborators« iz menija na levi strani. Nato samo vpišite uporabniško ime v prostor in kliknite »Add collaborator«. To lahko ponovite kolikorkrat želite, da daste dostop vsakomur, komur želite. Če morate odstraniti dostop, samo kliknite »X« na desni strani vrstice.
Upravljanje zahtevkov potega
Sedaj, ko imate projekt z nekaj kode v njem in morda celo nekaj sodelavcev, ki imajo tudi dostop potiskanja, pojdimo skozi, kaj narediti, ko dobite zahtevek potega.
Zahtevki potegov lahko pridejo ali iz veje v vejitvi vašega projekta ali pa pridejo iz druge veje v istem repozitoriju. Edina razlika je, da so tisti v vejitvi pogostokrat od ljudi, kjer ne morete potiskati v njihovo vejo in oni ne morejo potiskati v vašo, kjer z internimi zahtevki potegov v splošnem obe strani lahko dostopata do veje.
Za te primere, predpostavimo, da ste »tonychacon« in ste ustvarili nov kodni projekt Arduino imenovan »fade«.
E-poštna obvestila
Nekdo pride zraven in naredi spremembe v vaši kodi ter vam pošlje zahtevek potega. Morali bi dobiti e-pošto, ki vas obvesti o novem zahtevku potega in videti bi morala biti nekako kot na sliki E-poštno obvestilo o novem zahtevku potega.
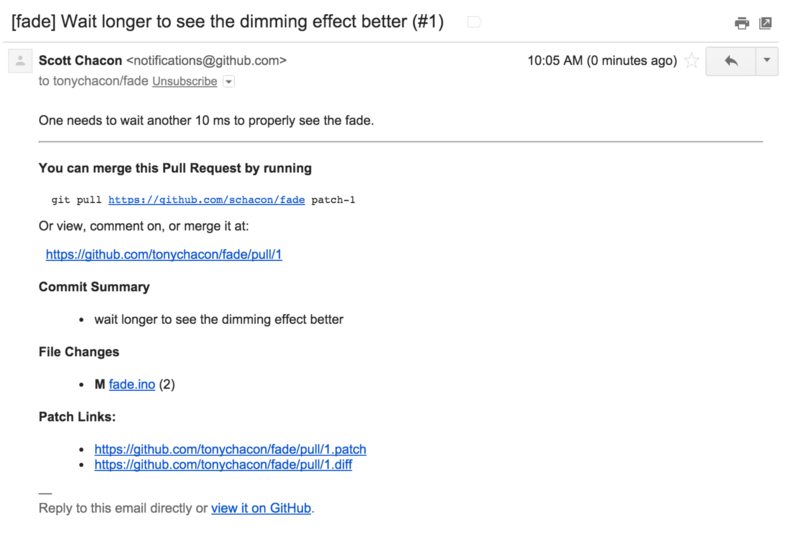
Tam se opazi nekaj stvari o tej e-pošti. Dalo vam bo majhen status razlik (angl. diffstat) — seznam datotek, ki so se spremenile v zahtevku potega in za koliko. Da vam povezavo na zahtevek potega na GitHubu. Da vam tudi nekaj URL-jev, ki jih lahko uporabite iz ukazne vrstice.
Če opazite vrstico, ki pravi git pull <url> patch-1, je to enostaven način za združevanje v oddaljeno vejo brez potrebe po dodajanju daljave.
Skozi to smo šli na hitro v razdelku Izvlečenje oddaljenih vej.
Če želite, lahko ustvarite in preklopite na tematsko vejo ter nato poženete ta ukaz za združitev sprememb zahtevka potega.
Druga zanimiva URL-ja sta .diff in .patch, ki, kot ste že ugotovili, ponujata enotno razliko in različici popravkov zahtevka potega.
Tehnično bi lahko združili zahtevek potega dela z nečim takim:
$ curl https://github.com/tonychacon/fade/pull/1.patch | git amSodelovanje na zahtevku potega
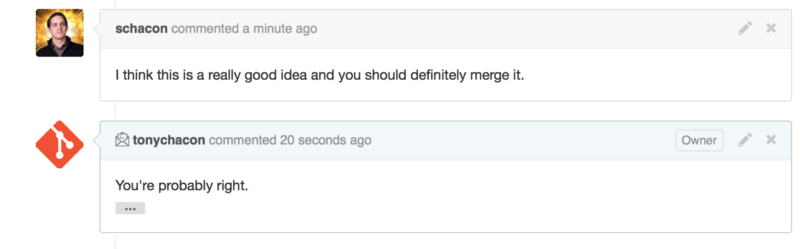
Kot smo pokrili v Potek GitHub, imate lahko sedaj pogovor z osebo, ki je odprla zahtevek potega. Lahko komentirate na določenih vrsticah kode, komentirate na celotnih potrditvah ali komentirate na celotnem zahtevku potega, povsod z uporabo GitHub Flavored Markdowna.
Vsakič, ko nekdo drug komentira na zahtevku potega, boste prejeli e-poštno obvestilo, da veste, da se dogaja dejavnost. Vsako obvestilo bo imelo povezavo na zahtevek potega, kjer se dejavnost dogaja, in lahko se tudi neposredno odzovete na e-pošto, da komentirate na temi zahtevka potega.
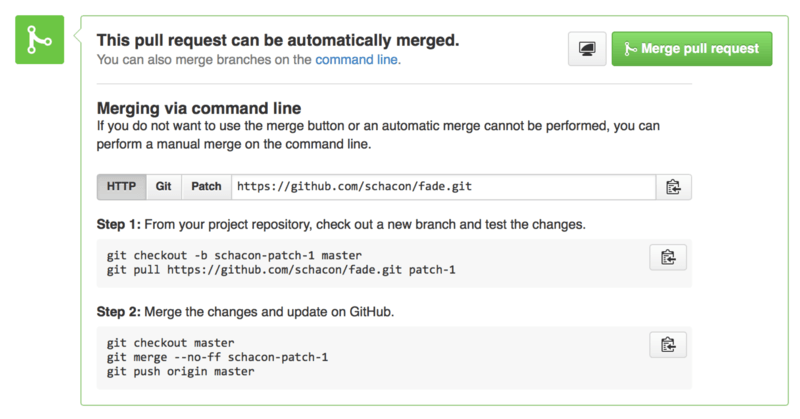
Ko je enkrat koda na mestu, ki ga želite, in želite to kodo združiti, lahko povlečete kodo in jo združite lokalno s sintakso git pull <url> <branch>, ki smo jo videli prej, ali pa dodate vejitev kot daljavo in jo prenesete ter združite.
Če je združevanje trivialno, lahko samo tudi pritisnete gumb »Merge« na strani GitHub. To bo naredilo združitev »non-fast-forward« in ustvarilo potrditev združitve, tudi če fast-forward združevanje ni možno. To pomeni, da ne glede na kaj, vsakič, ko pritisnete gumb za združitev, se ustvari potrditev združitve. Kot lahko vidite na sliki Gumb za združevanje in navodila za ročno združitev zahtevka potega, vam da GitHub vse te informacije, če kliknete na povezavo namiga.
Če se odločite, da ga ne želite združiti, lahko tudi samo zaprete zahtevek potega in oseba, ki je to odprla, bo obveščena.
Reference zahtevkov potega
Če se spopadate z velikim številom zahtevkov potega in ne želite dodati več daljav, ali vsakič izvajati enkratnega vlečenja, obstaja trik, ki vam ga omogoča GitHub. To je nekoliko bolj napreden trik, o katerem bomo podrobneje razpravljali v Refspec, vendar pa je lahko zelo uporaben.
GitHub dejansko oglašuje veje zahtevkov potega za določen repozitorij, kot nekakšne psevdo-veje na strežniku. Privzeto jih ne dobite pri kloniranju, vendar so tam na zakrit način, in do njih lahko dostopate zelo enostavno.
Za prikaz tega bomo uporabili nizkonivojski ukaz (pogosto imenovan kot ukaz »napeljave«, o katerem bomo več brali v Napeljava in keramika), ki se imenuje ls-remote.
Ta ukaz se običajno ne uporablja pri vsakodnevnih operacijah Git, vendar je koristen, da nam prikaže, katere reference so na voljo na strežniku.
Če ta ukaz poženemo na repozitoriju »blink«, ki smo ga uporabljali prej, bomo dobili seznam vseh vej, oznak in drugih referenc v repozitoriju.
$ git ls-remote https://github.com/schacon/blink
10d539600d86723087810ec636870a504f4fee4d	HEAD
10d539600d86723087810ec636870a504f4fee4d	refs/heads/master
6a83107c62950be9453aac297bb0193fd743cd6e	refs/pull/1/head
afe83c2d1a70674c9505cc1d8b7d380d5e076ed3	refs/pull/1/merge
3c8d735ee16296c242be7a9742ebfbc2665adec1	refs/pull/2/head
15c9f4f80973a2758462ab2066b6ad9fe8dcf03d	refs/pull/2/merge
a5a7751a33b7e86c5e9bb07b26001bb17d775d1a	refs/pull/4/head
31a45fc257e8433c8d8804e3e848cf61c9d3166c	refs/pull/4/merge
Seveda, če ste v svojem repozitoriju in zaženete git ls-remote origin ali kateri koli drug oddaljen repozitorij, ki ga želite izpisati, vam bo prikazalo nekaj podobnega temu.
Če se repozitorij nahaja na GitHubu in imate odprte zahtevke potegov, boste dobili te reference, ki imajo predpone refs/pull/.
To so v bistvu veje, vendar ker niso pod refs/heads/, jih običajno ne dobite, ko klonirate ali prenesete podatke s strežnika — postopek prenašanja jih običajno ignorira.
Za vsak zahtevek potega sta dve referenci — tista, ki se konča s /head, kaže na natančno isto potrditev kot zadnja potrditev na veji zahtevka potega.
Če torej nekdo odpre zahtevek potega v našem repozitoriju in je njegova veja poimenovana bug-fix ter kaže na potrditev a5a775, potem v našem repozitoriju ne bomo imeli veje bug-fix (ker je to v njegovi vejitvi), ampak bomo imeli pull/<pr#>/head, ki kaže na a5a775.
To pomeni, da lahko precej enostavno povlečete vse veje zahtevka potega v enem zamahu, ne da bi morali dodati kup daljav.
Sedaj lahko na primer prenesete referenco neposredno.
$ git fetch origin refs/pull/958/head
From https://github.com/libgit2/libgit2
 * branch            refs/pull/958/head -> FETCH_HEAD
To Gitu sporoči: »Poveži se z oddaljenim repozitorijem origin in prenesi sklic z imenom refs/pull/958/head.«
Git ubogljivo izvrši ukaz in prenese vse, kar potrebujete za sestavo tega sklica, ter postavi kazalec na potrditev, ki jo želite, pod .git/FETCH_HEAD.
Nato lahko z git merge FETCH_HEAD nadaljujete v vejo, v kateri jo želite preizkusiti, vendar je sporočilo združitve videti nekoliko čudno.
Če pregledujete veliko zahtevkov potegov, je to tudi dolgočasno.
Obstaja tudi način, kako prenesti vse zahtevke potegov in jih vedno posodobiti, ko se povežete z daljavo.
Odprite .git/config v priljubljenem urejevalniku in poiščite daljavo origin.
Videti bi moralo biti nekako tako:
[remote "origin"]
    url = https://github.com/libgit2/libgit2
    fetch = +refs/heads/*:refs/remotes/origin/*
Ta vrstica, ki se začne z fetch =, je »refspec«.
To je način za preslikavo imen na daljavi z imeni v vašem lokalnem direktoriju .git.
Ta posebni ukaz sporoči Gitu: »Stvari na daljavi, ki so pod refs/heads, naj bodo v mojem lokalnem repozitoriju pod refs/remotes/origin.«
To področje lahko spremenite in dodate nov refspec:
[remote "origin"]
    url = https://github.com/libgit2/libgit2.git
    fetch = +refs/heads/*:refs/remotes/origin/*
    fetch = +refs/pull/*/head:refs/remotes/origin/pr/*
Ta zadnja vrstica sporoči Gitu: »Vse sklice, ki so videti kot refs/pull/123/head, naj se lokalno shrani kot refs/remotes/origin/pr/123«.
Če zdaj shranite to datoteko in izvedete git fetch:
$ git fetch
# …
 * [new ref]         refs/pull/1/head -> origin/pr/1
 * [new ref]         refs/pull/2/head -> origin/pr/2
 * [new ref]         refs/pull/4/head -> origin/pr/4
# …
Zdaj so vsi oddaljeni zahtevki potegov predstavljeni lokalno s sklici, ki se obnašajo podobno kot sledilne veje; so samo za branje in se posodobijo ob prejemu ukaza za pridobitev. To močno olajša preizkušanje kode iz zahtevka potega lokalno:
$ git checkout pr/2
Checking out files: 100% (3769/3769), done.
Branch pr/2 set up to track remote branch pr/2 from origin.
Switched to a new branch 'pr/2'
Ostri opazovalci bodo opazili head na koncu oddaljenega dela refspeca.
Na strani GitHuba obstaja tudi referenca refs/pull/#/merge, ki predstavlja potrditev, ki bi se zgodila, če bi pritisnili gumb »merge« na spletnem mestu.
To vam omogoča preizkus združevanja, še preden pritisnete gumb.
Zahtevki potegov na zahtevku potega
Ne samo, da lahko odprete zahtevke potegov, ki ciljajo na glavno vejo ali vejo master, dejansko lahko odprete zahtevek potega, ki cilja na katero koli vejo v omrežju.
Pravzaprav lahko ciljate tudi drug zahtevek potega.
Če vidite zahtevek potega, ki se premika v pravo smer, in imate idejo za spremembo, ki je od nje odvisna, ali se vam zdi dobra ideja, ali pa nimate dostopa za potiskanje v ciljno vejo, lahko neposredno na njem odprete zahtevek potega.
Ko odprete zahtevek potega, je na vrhu strani polje, ki določa, katero vejo zahtevate, da se vanjo povleče in katero vejo zahtevate, da se iz nje povleče. Če kliknete gumb »Edit« desno od tega polja, lahko spremenite ne samo veje, temveč tudi vejitev.

Tukaj lahko dokaj enostavno določite, da se vaša nova veja združi v drug zahtevek potega ali drugo vejitev projekta.
Omenjanje in obvestila
GitHub ima tudi precej priročen sistem obvestil, ki vam lahko pride prav, ko imate vprašanja, ali potrebujete povratne informacije od določenih posameznikov ali ekip.
V vsakem komentarju lahko začnete vpisovati znak @, ki se bo začel samodokončanje z imeni in uporabniškimi imeni ljudi, ki so sodelavci ali sodelujoči na projektu.
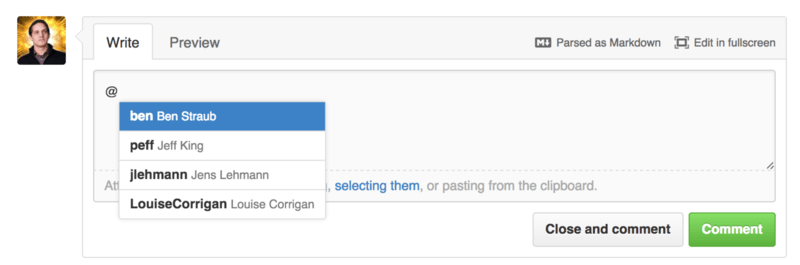
Omenite lahko tudi uporabnika, ki ga ni v tem spustnem seznamu, vendar pogostokrat samodokončanje lahko postopek poenostavi.
Ko objavite komentar z omembo uporabnika, bo ta uporabnik obveščen. To pomeni, da je to lahko zelo učinkovit način, da ljudi vključite v pogovore, namesto da morajo nenehno preverjati. Na GitHubu pogostokrat na zahtevkih potegov ljudje v svoje ekipe ali v svoje podjetje povabijo druge ljudi, da pregledajo težavo ali zahtevek potega.
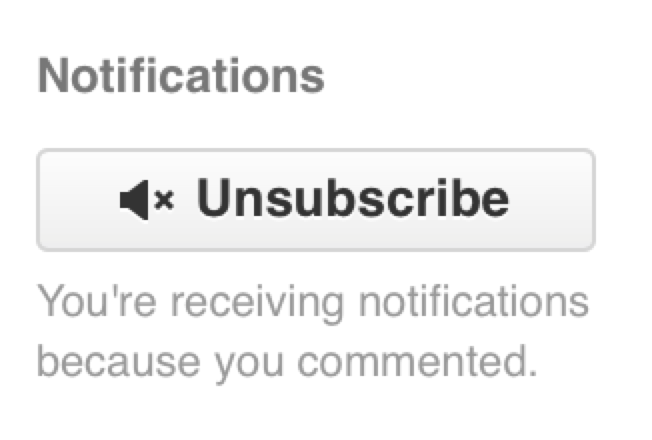
Če je nekdo omenjen na zahtevku potega ali težavi, bo nanjo »naročen« in bo še naprej prejemal obvestila ob vsaki dejavnosti na njej. Naročeni boste tudi, če ste jo odprli, če spremljate repozitorij, ali če nekaj komentirate. Če ne želite več prejemati obvestil, lahko na strani kliknete gumb »Unsubscribe«, da prenehate prejemati posodobitve o njej.
Stran z obvestili
Ko govorimo o »obvestilih« v zvezi z GitHubom, mislimo na poseben način, kako GitHub poskuša stopiti v stik z vami, ko se zgodijo določeni dogodki, in obstaja nekaj načinov, kako jih lahko konfigurirate. Če odprete zavihek »Notifications center« na strani z nastavitvami, lahko vidite nekatere možnosti, ki so vam na voljo.
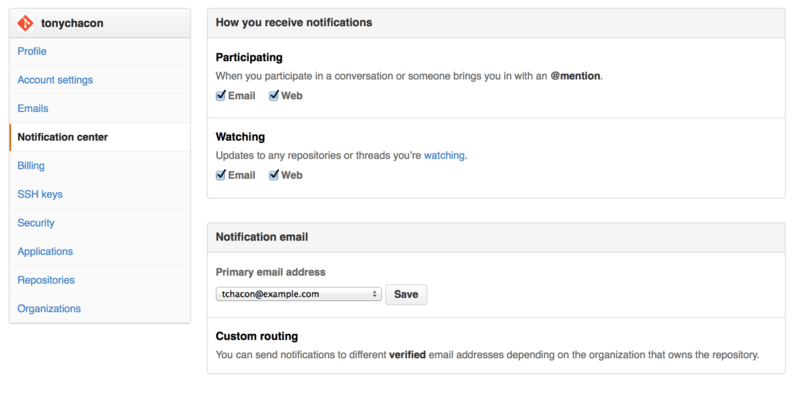
Dve izbiri sta, da prejmete obvestila po »e-pošti« in prek »spletnega vmesnika« in lahko izberete ali oboje, nobenega ali pa eno ali drugo možnost za aktivno sodelovanje in dejavnost na projektih, ki jih spremljate.
Spletna obvestila
Spletna obvestila obstajajo samo na GitHubu in jih lahko preverite samo tam. Če imate to možnost izbrano v svojih nastavitvah in se sproži obvestilo za vas, boste na vrhu zaslona, kot prikazano na sliki Center za obvestila, videli majhno modro piko nad ikono obvestil.
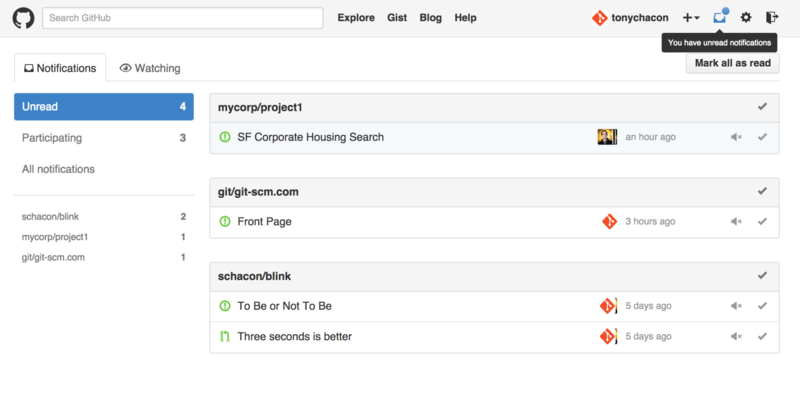
Če nanjo kliknete, boste videli seznam vseh elementov, o katerih ste bili obveščeni, razvrščenih po projektih. Filtrirate lahko obvestila za določen projekt, če kliknete njegovo ime v levem stranskem meniju. Obvestilo lahko potrdite s klikom na ikono kljukice poleg katerega koli obvestila, ali pa potrdite vsa obvestila v projektu s klikom na kljukico na vrhu skupine. Poleg vsake kljukice je tudi gumb za izklop, s katerim lahko prenehate prejemati nadaljnja obvestila o tem elementu.
Vsi ti pripomočki so zelo uporabni za obvladovanje velikega števila obvestil. Mnogi napredni uporabniki GitHuba bodo popolnoma izklopili obvestila po elektronski pošti in vsa svoja obvestila upravljali preko tega zaslona.
E-poštna obvestila
E-poštna obvestila so drug način, s katerimi lahko upravljate obvestila preko GitHuba. Če imate to funkcijo vklopljeno, boste prejeli e-poštna obvestila za vsako obvestilo. Videli smo primere tega na sliki Komentarji poslani kot e-poštna obvestila in E-poštno obvestilo o novem zahtevku potega. E-poštna sporočila bodo tudi pravilno urejena, kar je lepo, če uporabljate e-poštni odjemalec z nitmi.
V glavah e-poštnih sporočil, ki jih GitHub pošilja, je tudi precejšnje število metapodatkov, kar je lahko zelo koristno za nastavitev prilagojenih filtrov in pravil.
Na primer, če si ogledamo dejanske glave e-pošte, ki jih GitHub pošilja Tonyju v e-poštnem sporočilu, prikazanem na sliki E-poštno obvestilo o novem zahtevku potega, bomo med poslano informacijo videli:
To: tonychacon/fade <fade@noreply.github.com>
Message-ID: <tonychacon/fade/pull/1@github.com>
Subject: [fade] Wait longer to see the dimming effect better (#1)
X-GitHub-Recipient: tonychacon
List-ID: tonychacon/fade <fade.tonychacon.github.com>
List-Archive: https://github.com/tonychacon/fade
List-Post: <mailto:reply+i-4XXX@reply.github.com>
List-Unsubscribe: <mailto:unsub+i-XXX@reply.github.com>,...
X-GitHub-Recipient-Address: tchacon@example.com
Obstaja nekaj zanimivih stvari.
Če želite poudariti ali preusmeriti e-pošto na ta določeni projekt ali celo zahtevati potrditev povratne informacije za točno ta projekt ali celo zahtevek potega, vam podatki v Message-ID ponujajo vse podatke v formatu <uporabnik>/<projekt>/<vrsta>/<id>.
Če bi bila to na primer težava, bi bilo polje <vrsta> »issues« namesto »pull«.
Polji List-Post in List-Unsubscribe pomenita, da lahko, če imate poštni odjemalec, ki ju razume, enostavno pošljete sporočilo na seznam ali se »odjavite« iz niti.
To bi bilo bistveno enako kot klikanje gumba »mute« na spletni različici obvestila ali »Unsubscribe« na strani težave ali zahtevka potega.
Prav tako velja omeniti, da če imate omogočene obvestila prek e-pošte in spleta ter preberete različico obvestila prek e-pošte, bo spletna različica prav tako označena kot prebrana, če ima vaš poštni odjemalec omogočene slike.
Posebne datoteke
Obstaja nekaj posebnih datotek, ki jih bo GitHub opazil, če so prisotne v vašem repozitoriju.
README
Prva posebna datoteka je datoteka README, ki ima lahko skoraj katerikoli format, ki ga GitHub prepozna kot besedilo.
Na primer, lahko gre za README, README.md, README.asciidoc itd.
Če GitHub v vaši izvorni kodi opazi datoteko README, jo bo prikazal na začetni strani projekta.
Številne ekipe uporabljajo to datoteko za shranjevanje vseh pomembnih informacij o projektu za nekoga, ki se prvič srečuje z repozitorijem ali projektom. To običajno vključuje stvari, kot so:
-
Za kaj je projekt namenjen
-
Kako ga konfigurirati in namestiti
-
Primer uporabe ali zagona
-
Licenca, pod katero je projekt na voljo
-
Kako prispevati projektu
Ker bo GitHub to datoteko prikazal, jo lahko razširite tudi z vključevanjem slik ali povezav za dodatno razumljivost.
CONTRIBUTING
Druga posebna datoteka, ki jo GitHub prepozna, je datoteka CONTRIBUTING.
Če imate datoteko z imenom CONTRIBUTING s katero koli končnico datoteke, bo GitHub prikazal, kar je vidno na sliki Odpiranje zahtevka potega, ko datoteka CONTRIBUTING že obstaja, ko kdo odpre zahtevek potega.
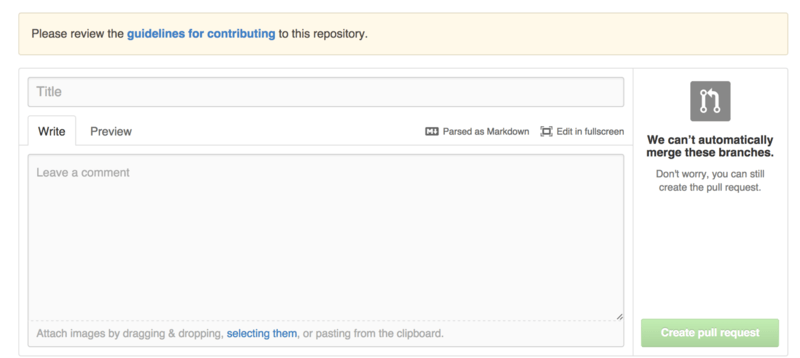
Ideja je, da lahko določite specifične stvari, ki jih želite, ali jih ne želite v zahtevku potega, ki je poslan v vaš projekt. Na ta način bodo ljudje morda prebrali smernice, preden odprejo zahtevek potega.
Projektna administracija
Splošno gledano, ni veliko upravljavskih stvari, ki jih lahko naredite z enim projektom, vendar obstajajo nekateri elementi, ki bi vas lahko zanimali.
Sprememba privzete veje
Če uporabljate drugo vejo od veje »master« kot privzeto, in želite, da ljudje privzeto vidijo to vejo ali odprejo zahtevke potegov nanjo, lahko to spremenite na strani nastavitev vašega repozitorija pod zavihkom »Options«.
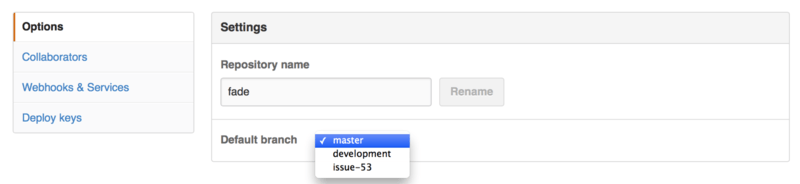
Preprosto spremenite privzeto vejo v spustnem meniju in ta bo privzeta za vse glavne operacije od takrat naprej, vključno z vejo, ki je privzeto izvlečena, ko nekdo klonira repozitorij.
Prenos projekta
Če želite prenesti projekt na drug uporabniški račun ali organizacijo na GitHubu, obstaja možnost »Prenos lastništva« (angl. Transfer ownership) na dnu istega zavihka »Options« v nastavitvah vašega repozitorija, ki vam to omogoča.
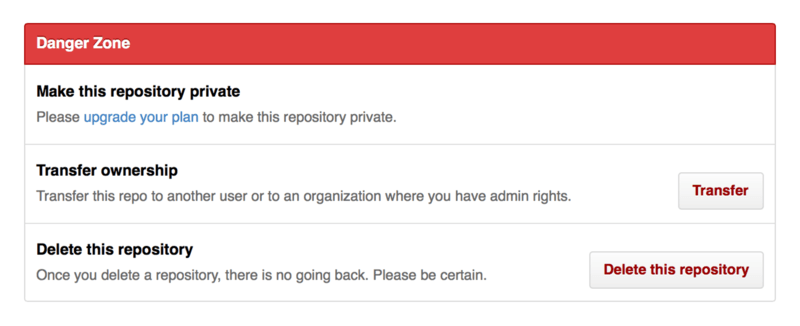
To je koristno, če zapuščate projekt in ga želi prevzeti nekdo drug, ali če se vaš projekt širi in ga želite premakniti v organizacijo.
To ne premakne samo repozitorija skupaj z vsemi njegovimi opazovalci in zvezdicami na drugo mesto, ampak tudi nastavi preusmeritev iz vašega URL-ja na novo mesto. Prav tako bo preusmerilo klone in pridobivanja iz Gita, ne samo spletnih zahtevkov.