
-
1. Першыя крокі
- 1.1 About Version Control
- 1.2 A Short History of Git
- 1.3 What is Git?
- 1.4 The Command Line
- 1.5 Installing Git
- 1.6 First-Time Git Setup
- 1.7 Getting Help
- 1.8 Падсумаваньне
-
2. Git Basics
- 2.1 Getting a Git Repository
- 2.2 Recording Changes to the Repository
- 2.3 Viewing the Commit History
- 2.4 Undoing Things
- 2.5 Working with Remotes
- 2.6 Tagging
- 2.7 Git Aliases
- 2.8 Summary
-
3. Git Branching
- 3.1 Branches in a Nutshell
- 3.2 Basic Branching and Merging
- 3.3 Branch Management
- 3.4 Branching Workflows
- 3.5 Remote Branches
- 3.6 Rebasing
- 3.7 Summary
-
4. Git on the Server
- 4.1 The Protocols
- 4.2 Getting Git on a Server
- 4.3 Generating Your SSH Public Key
- 4.4 Setting Up the Server
- 4.5 Git Daemon
- 4.6 Smart HTTP
- 4.7 GitWeb
- 4.8 GitLab
- 4.9 Third Party Hosted Options
- 4.10 Summary
-
5. Distributed Git
- 5.1 Distributed Workflows
- 5.2 Contributing to a Project
- 5.3 Maintaining a Project
- 5.4 Summary
-
6. GitHub
-
7. Git Tools
- 7.1 Revision Selection
- 7.2 Interactive Staging
- 7.3 Stashing and Cleaning
- 7.4 Signing Your Work
- 7.5 Searching
- 7.6 Rewriting History
- 7.7 Reset Demystified
- 7.8 Advanced Merging
- 7.9 Rerere
- 7.10 Debugging with Git
- 7.11 Submodules
- 7.12 Bundling
- 7.13 Replace
- 7.14 Credential Storage
- 7.15 Summary
-
8. Customizing Git
- 8.1 Git Configuration
- 8.2 Git Attributes
- 8.3 Git Hooks
- 8.4 An Example Git-Enforced Policy
- 8.5 Summary
-
9. Git and Other Systems
- 9.1 Git as a Client
- 9.2 Migrating to Git
- 9.3 Summary
-
10. Git Internals
- 10.1 Plumbing and Porcelain
- 10.2 Git Objects
- 10.3 Git References
- 10.4 Packfiles
- 10.5 The Refspec
- 10.6 Transfer Protocols
- 10.7 Maintenance and Data Recovery
- 10.8 Environment Variables
- 10.9 Summary
-
A1. Дадатак A: Git in Other Environments
- A1.1 Graphical Interfaces
- A1.2 Git in Visual Studio
- A1.3 Git in Visual Studio Code
- A1.4 Git in IntelliJ / PyCharm / WebStorm / PhpStorm / RubyMine
- A1.5 Git in Sublime Text
- A1.6 Git in Bash
- A1.7 Git in Zsh
- A1.8 Git in PowerShell
- A1.9 Summary
-
A2. Дадатак B: Embedding Git in your Applications
- A2.1 Command-line Git
- A2.2 Libgit2
- A2.3 JGit
- A2.4 go-git
- A2.5 Dulwich
-
A3. Дадатак C: Git Commands
- A3.1 Setup and Config
- A3.2 Getting and Creating Projects
- A3.3 Basic Snapshotting
- A3.4 Branching and Merging
- A3.5 Sharing and Updating Projects
- A3.6 Inspection and Comparison
- A3.7 Debugging
- A3.8 Patching
- A3.9 Email
- A3.10 External Systems
- A3.11 Administration
- A3.12 Plumbing Commands
5.3 Distributed Git - Maintaining a Project
Maintaining a Project
In addition to knowing how to contribute effectively to a project, you’ll likely need to know how to maintain one.
This can consist of accepting and applying patches generated via format-patch and emailed to you, or integrating changes in remote branches for repositories you’ve added as remotes to your project.
Whether you maintain a canonical repository or want to help by verifying or approving patches, you need to know how to accept work in a way that is clearest for other contributors and sustainable by you over the long run.
Working in Topic Branches
When you’re thinking of integrating new work, it’s generally a good idea to try it out in a topic branch — a temporary branch specifically made to try out that new work.
This way, it’s easy to tweak a patch individually and leave it if it’s not working until you have time to come back to it.
If you create a simple branch name based on the theme of the work you’re going to try, such as ruby_client or something similarly descriptive, you can easily remember it if you have to abandon it for a while and come back later.
The maintainer of the Git project tends to namespace these branches as well — such as sc/ruby_client, where sc is short for the person who contributed the work.
As you’ll remember, you can create the branch based off your master branch like this:
$ git branch sc/ruby_client masterOr, if you want to also switch to it immediately, you can use the checkout -b option:
$ git checkout -b sc/ruby_client masterNow you’re ready to add the contributed work that you received into this topic branch and determine if you want to merge it into your longer-term branches.
Applying Patches from Email
If you receive a patch over email that you need to integrate into your project, you need to apply the patch in your topic branch to evaluate it.
There are two ways to apply an emailed patch: with git apply or with git am.
Applying a Patch with apply
If you received the patch from someone who generated it with git diff or some variation of the Unix diff command (which is not recommended; see the next section), you can apply it with the git apply command.
Assuming you saved the patch at /tmp/patch-ruby-client.patch, you can apply the patch like this:
$ git apply /tmp/patch-ruby-client.patchThis modifies the files in your working directory.
It’s almost identical to running a patch -p1 command to apply the patch, although it’s more paranoid and accepts fewer fuzzy matches than patch.
It also handles file adds, deletes, and renames if they’re described in the git diff format, which patch won’t do.
Finally, git apply is an “apply all or abort all” model where either everything is applied or nothing is, whereas patch can partially apply patchfiles, leaving your working directory in a weird state.
git apply is overall much more conservative than patch.
It won’t create a commit for you — after running it, you must stage and commit the changes introduced manually.
You can also use git apply to see if a patch applies cleanly before you try actually applying it — you can run git apply --check with the patch:
$ git apply --check 0001-see-if-this-helps-the-gem.patch
error: patch failed: ticgit.gemspec:1
error: ticgit.gemspec: patch does not apply
If there is no output, then the patch should apply cleanly. This command also exits with a non-zero status if the check fails, so you can use it in scripts if you want.
Applying a Patch with am
If the contributor is a Git user and was good enough to use the format-patch command to generate their patch, then your job is easier because the patch contains author information and a commit message for you.
If you can, encourage your contributors to use format-patch instead of diff to generate patches for you.
You should only have to use git apply for legacy patches and things like that.
To apply a patch generated by format-patch, you use git am (the command is named am as it is used to "apply a series of patches from a mailbox").
Technically, git am is built to read an mbox file, which is a simple, plain-text format for storing one or more email messages in one text file.
It looks something like this:
From 330090432754092d704da8e76ca5c05c198e71a8 Mon Sep 17 00:00:00 2001
From: Jessica Smith <jessica@example.com>
Date: Sun, 6 Apr 2008 10:17:23 -0700
Subject: [PATCH 1/2] Add limit to log function

Limit log functionality to the first 20
This is the beginning of the output of the git format-patch command that you saw in the previous section; it also represents a valid mbox email format.
If someone has emailed you the patch properly using git send-email, and you download that into an mbox format, then you can point git am to that mbox file, and it will start applying all the patches it sees.
If you run a mail client that can save several emails out in mbox format, you can save entire patch series into a file and then use git am to apply them one at a time.
However, if someone uploaded a patch file generated via git format-patch to a ticketing system or something similar, you can save the file locally and then pass that file saved on your disk to git am to apply it:
$ git am 0001-limit-log-function.patch
Applying: Add limit to log function
You can see that it applied cleanly and automatically created the new commit for you.
The author information is taken from the email’s From and Date headers, and the message of the commit is taken from the Subject and body (before the patch) of the email.
For example, if this patch was applied from the mbox example above, the commit generated would look something like this:
$ git log --pretty=fuller -1
commit 6c5e70b984a60b3cecd395edd5b48a7575bf58e0
Author:     Jessica Smith <jessica@example.com>
AuthorDate: Sun Apr 6 10:17:23 2008 -0700
Commit:     Scott Chacon <schacon@gmail.com>
CommitDate: Thu Apr 9 09:19:06 2009 -0700

   Add limit to log function

   Limit log functionality to the first 20
The Commit information indicates the person who applied the patch and the time it was applied.
The Author information is the individual who originally created the patch and when it was originally created.
But it’s possible that the patch won’t apply cleanly.
Perhaps your main branch has diverged too far from the branch the patch was built from, or the patch depends on another patch you haven’t applied yet.
In that case, the git am process will fail and ask you what you want to do:
$ git am 0001-see-if-this-helps-the-gem.patch
Applying: See if this helps the gem
error: patch failed: ticgit.gemspec:1
error: ticgit.gemspec: patch does not apply
Patch failed at 0001.
When you have resolved this problem run "git am --resolved".
If you would prefer to skip this patch, instead run "git am --skip".
To restore the original branch and stop patching run "git am --abort".
This command puts conflict markers in any files it has issues with, much like a conflicted merge or rebase operation.
You solve this issue much the same way — edit the file to resolve the conflict, stage the new file, and then run git am --resolved to continue to the next patch:
$ (fix the file)
$ git add ticgit.gemspec
$ git am --resolved
Applying: See if this helps the gem
If you want Git to try a bit more intelligently to resolve the conflict, you can pass a -3 option to it, which makes Git attempt a three-way merge.
This option isn’t on by default because it doesn’t work if the commit the patch says it was based on isn’t in your repository.
If you do have that commit — if the patch was based on a public commit — then the -3 option is generally much smarter about applying a conflicting patch:
$ git am -3 0001-see-if-this-helps-the-gem.patch
Applying: See if this helps the gem
error: patch failed: ticgit.gemspec:1
error: ticgit.gemspec: patch does not apply
Using index info to reconstruct a base tree...
Falling back to patching base and 3-way merge...
No changes -- Patch already applied.
In this case, without the -3 option the patch would have been considered as a conflict.
Since the -3 option was used the patch applied cleanly.
If you’re applying a number of patches from an mbox, you can also run the am command in interactive mode, which stops at each patch it finds and asks if you want to apply it:
$ git am -3 -i mbox
Commit Body is:
--------------------------
See if this helps the gem
--------------------------
Apply? [y]es/[n]o/[e]dit/[v]iew patch/[a]ccept all
This is nice if you have a number of patches saved, because you can view the patch first if you don’t remember what it is, or not apply the patch if you’ve already done so.
When all the patches for your topic are applied and committed into your branch, you can choose whether and how to integrate them into a longer-running branch.
Checking Out Remote Branches
If your contribution came from a Git user who set up their own repository, pushed a number of changes into it, and then sent you the URL to the repository and the name of the remote branch the changes are in, you can add them as a remote and do merges locally.
For instance, if Jessica sends you an email saying that she has a great new feature in the ruby-client branch of her repository, you can test it by adding the remote and checking out that branch locally:
$ git remote add jessica git://github.com/jessica/myproject.git
$ git fetch jessica
$ git checkout -b rubyclient jessica/ruby-client
If she emails you again later with another branch containing another great feature, you could directly fetch and checkout because you already have the remote setup.
This is most useful if you’re working with a person consistently. If someone only has a single patch to contribute once in a while, then accepting it over email may be less time consuming than requiring everyone to run their own server and having to continually add and remove remotes to get a few patches. You’re also unlikely to want to have hundreds of remotes, each for someone who contributes only a patch or two. However, scripts and hosted services may make this easier — it depends largely on how you develop and how your contributors develop.
The other advantage of this approach is that you get the history of the commits as well.
Although you may have legitimate merge issues, you know where in your history their work is based; a proper three-way merge is the default rather than having to supply a -3 and hope the patch was generated off a public commit to which you have access.
If you aren’t working with a person consistently but still want to pull from them in this way, you can provide the URL of the remote repository to the git pull command.
This does a one-time pull and doesn’t save the URL as a remote reference:
$ git pull https://github.com/onetimeguy/project
From https://github.com/onetimeguy/project
 * branch            HEAD       -> FETCH_HEAD
Merge made by the 'recursive' strategy.
Determining What Is Introduced
Now you have a topic branch that contains contributed work. At this point, you can determine what you’d like to do with it. This section revisits a couple of commands so you can see how you can use them to review exactly what you’ll be introducing if you merge this into your main branch.
It’s often helpful to get a review of all the commits that are in this branch but that aren’t in your master branch.
You can exclude commits in the master branch by adding the --not option before the branch name.
This does the same thing as the master..contrib format that we used earlier.
For example, if your contributor sends you two patches and you create a branch called contrib and applied those patches there, you can run this:
$ git log contrib --not master
commit 5b6235bd297351589efc4d73316f0a68d484f118
Author: Scott Chacon <schacon@gmail.com>
Date:   Fri Oct 24 09:53:59 2008 -0700

    See if this helps the gem

commit 7482e0d16d04bea79d0dba8988cc78df655f16a0
Author: Scott Chacon <schacon@gmail.com>
Date:   Mon Oct 22 19:38:36 2008 -0700

    Update gemspec to hopefully work better
To see what changes each commit introduces, remember that you can pass the -p option to git log and it will append the diff introduced to each commit.
To see a full diff of what would happen if you were to merge this topic branch with another branch, you may have to use a weird trick to get the correct results. You may think to run this:
$ git diff masterThis command gives you a diff, but it may be misleading.
If your master branch has moved forward since you created the topic branch from it, then you’ll get seemingly strange results.
This happens because Git directly compares the snapshots of the last commit of the topic branch you’re on and the snapshot of the last commit on the master branch.
For example, if you’ve added a line in a file on the master branch, a direct comparison of the snapshots will look like the topic branch is going to remove that line.
If master is a direct ancestor of your topic branch, this isn’t a problem; but if the two histories have diverged, the diff will look like you’re adding all the new stuff in your topic branch and removing everything unique to the master branch.
What you really want to see are the changes added to the topic branch — the work you’ll introduce if you merge this branch with master.
You do that by having Git compare the last commit on your topic branch with the first common ancestor it has with the master branch.
Technically, you can do that by explicitly figuring out the common ancestor and then running your diff on it:
$ git merge-base contrib master
36c7dba2c95e6bbb78dfa822519ecfec6e1ca649
$ git diff 36c7db
or, more concisely:
$ git diff $(git merge-base contrib master)However, neither of those is particularly convenient, so Git provides another shorthand for doing the same thing: the triple-dot syntax.
In the context of the git diff command, you can put three periods after another branch to do a diff between the last commit of the branch you’re on and its common ancestor with another branch:
$ git diff master...contribThis command shows you only the work your current topic branch has introduced since its common ancestor with master.
That is a very useful syntax to remember.
Integrating Contributed Work
When all the work in your topic branch is ready to be integrated into a more mainline branch, the question is how to do it. Furthermore, what overall workflow do you want to use to maintain your project? You have a number of choices, so we’ll cover a few of them.
Merging Workflows
One basic workflow is to simply merge all that work directly into your master branch.
In this scenario, you have a master branch that contains basically stable code.
When you have work in a topic branch that you think you’ve completed, or work that someone else has contributed and you’ve verified, you merge it into your master branch, delete that just-merged topic branch, and repeat.
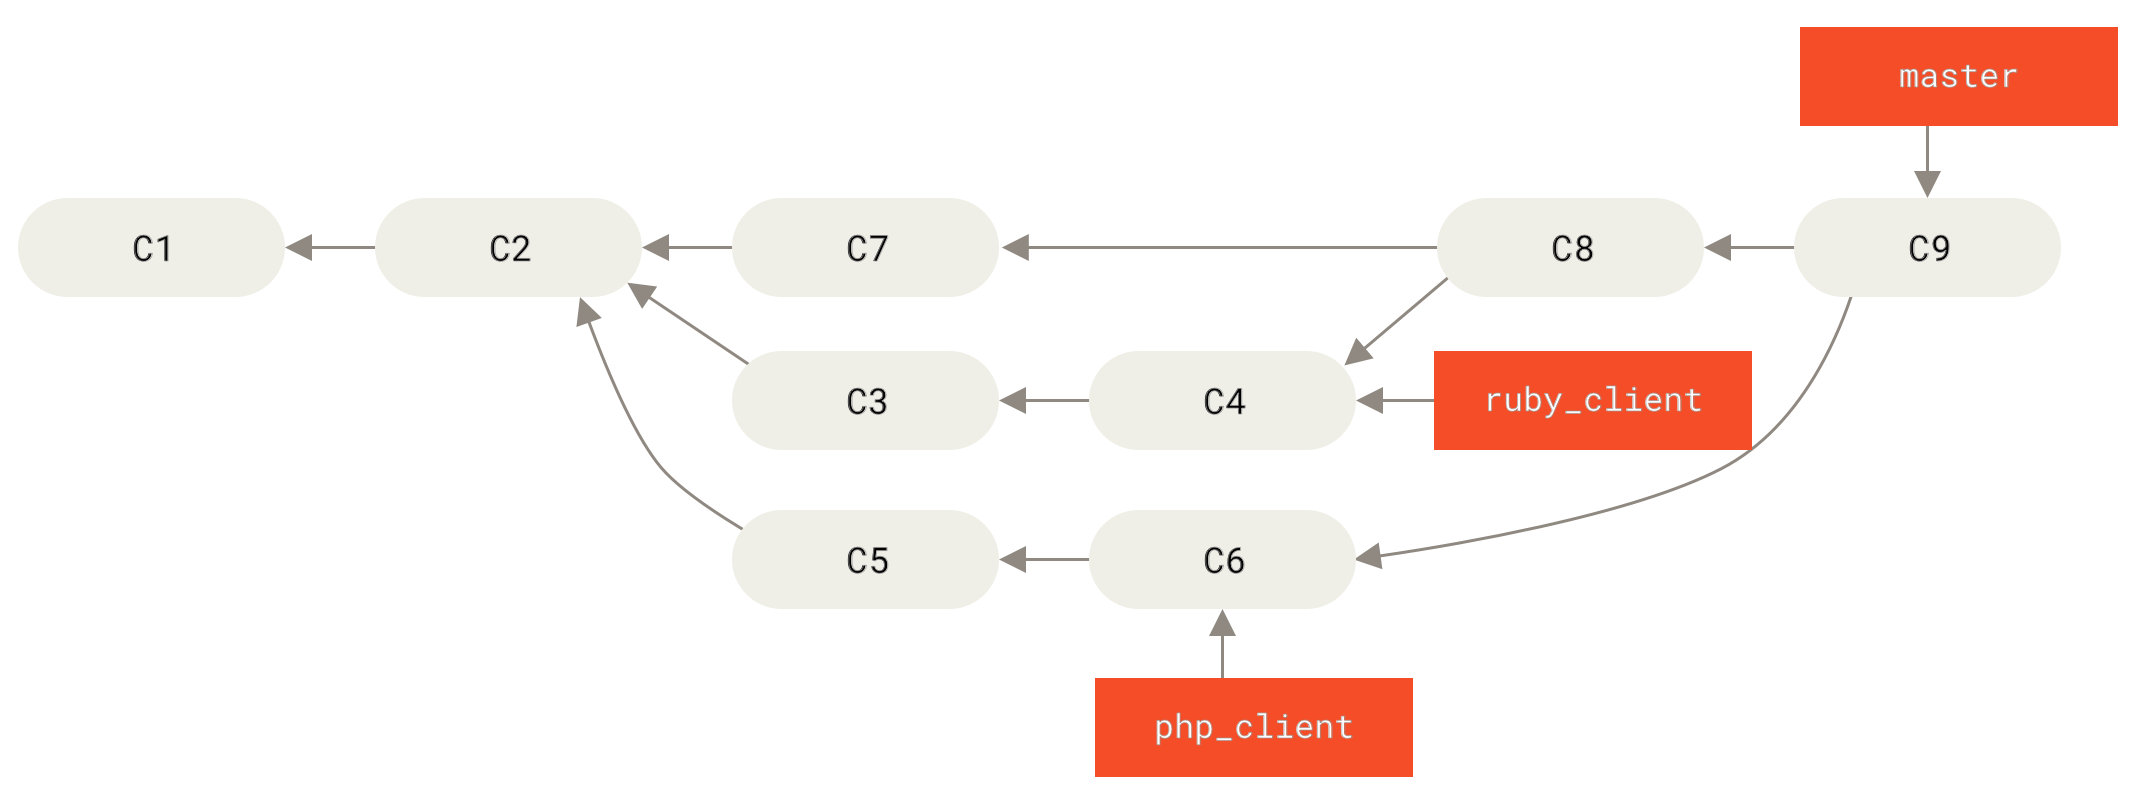
For instance, if we have a repository with work in two branches named ruby_client and php_client that looks like History with several topic branches, and we merge ruby_client followed by php_client, your history will end up looking like After a topic branch merge.

That is probably the simplest workflow, but it can possibly be problematic if you’re dealing with larger or more stable projects where you want to be really careful about what you introduce.
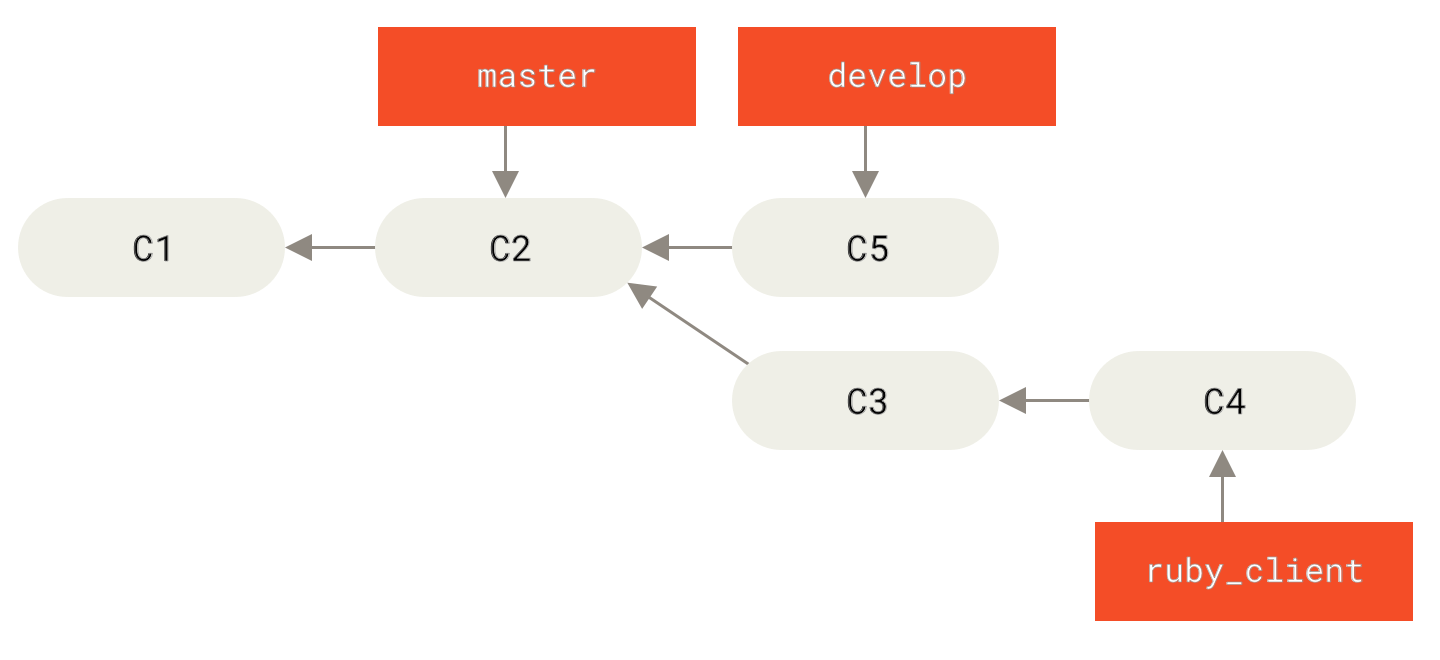
If you have a more important project, you might want to use a two-phase merge cycle.
In this scenario, you have two long-running branches, master and develop, in which you determine that master is updated only when a very stable release is cut and all new code is integrated into the develop branch.
You regularly push both of these branches to the public repository.
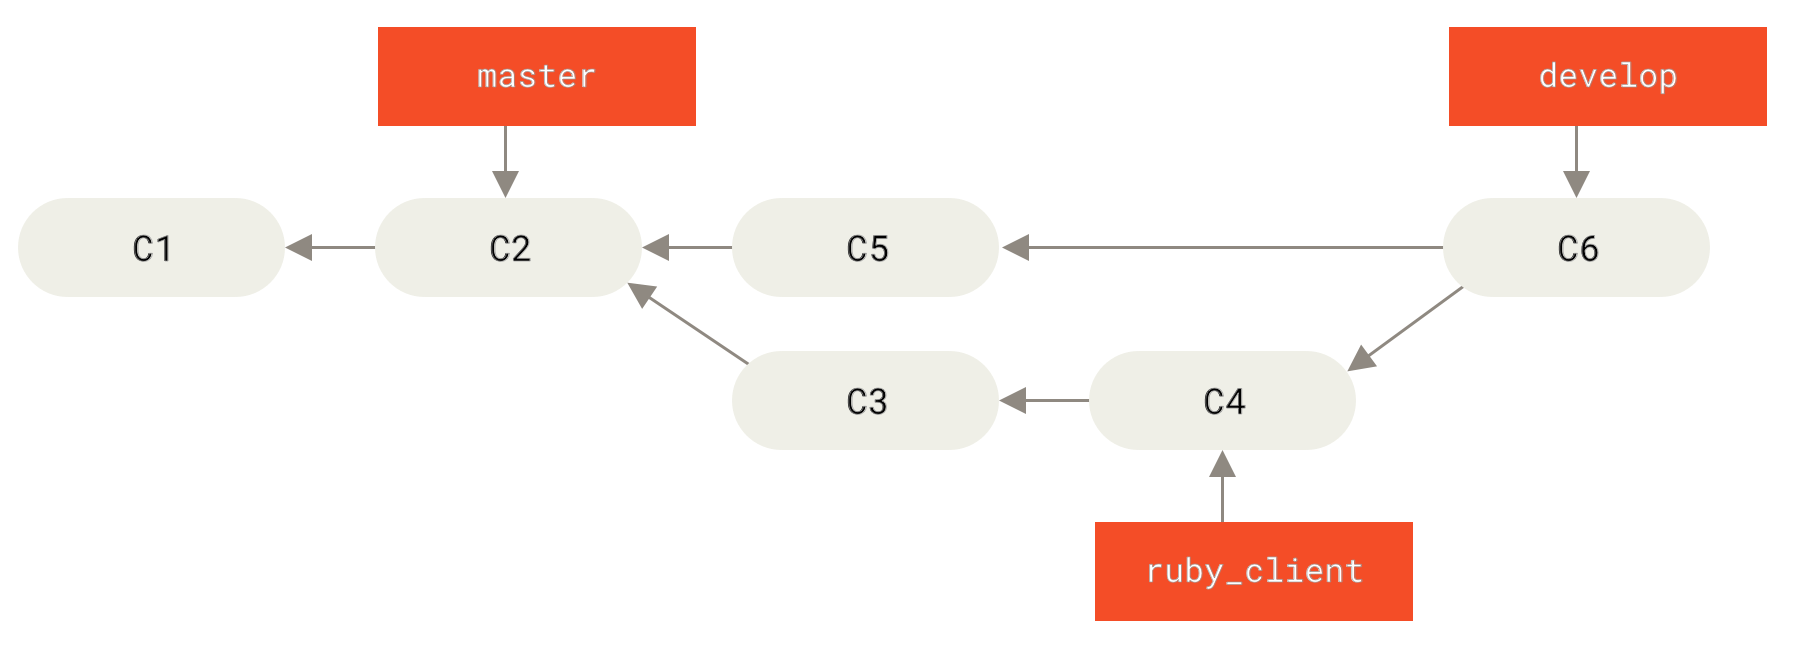
Each time you have a new topic branch to merge in (Before a topic branch merge), you merge it into develop (After a topic branch merge); then, when you tag a release, you fast-forward master to wherever the now-stable develop branch is (After a project release).
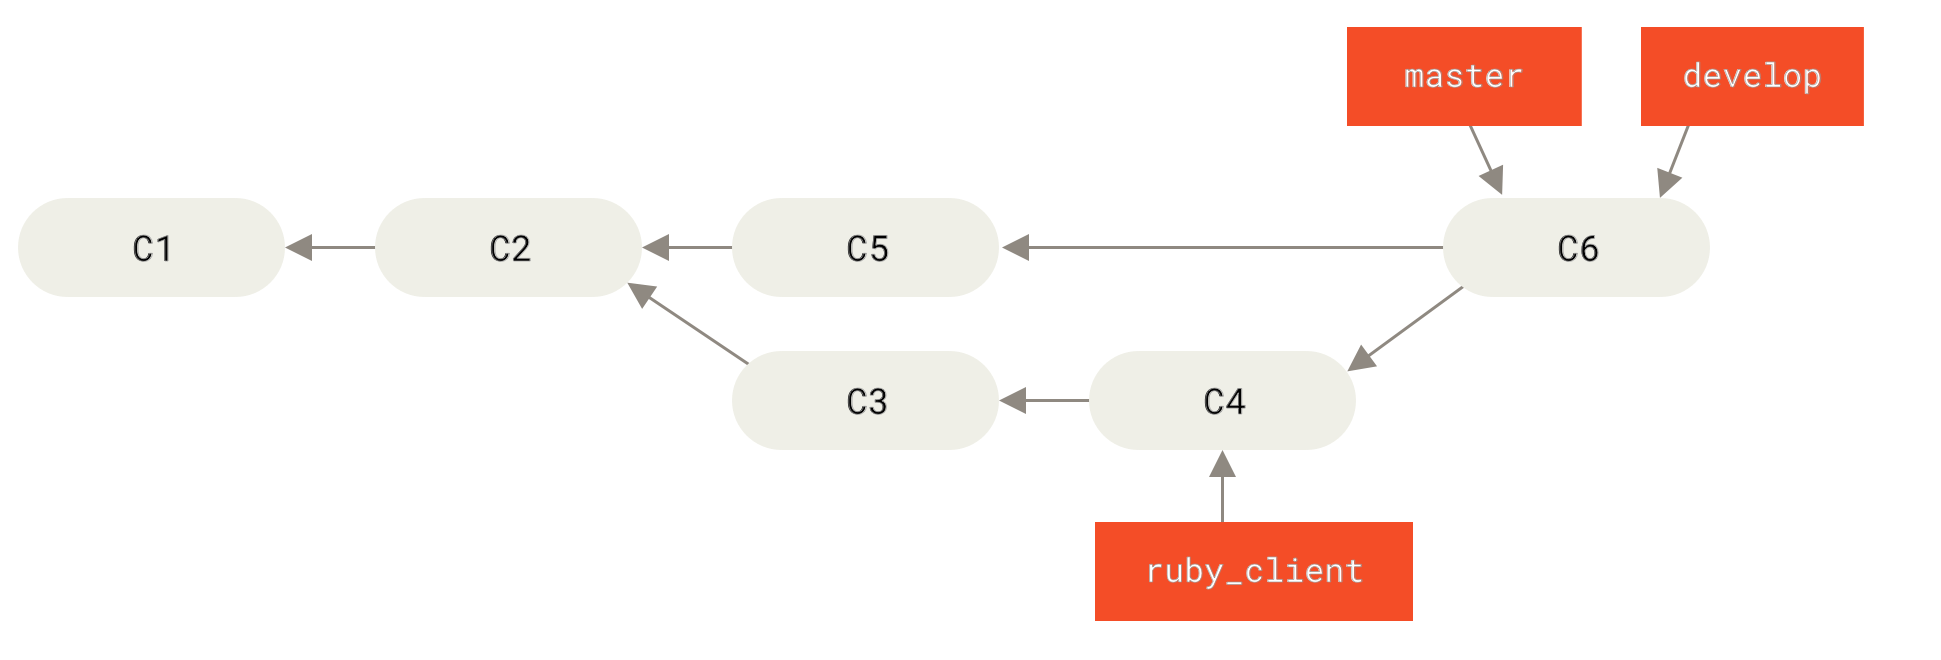
This way, when people clone your project’s repository, they can either check out master to build the latest stable version and keep up to date on that easily, or they can check out develop, which is the more cutting-edge content.
You can also extend this concept by having an integrate branch where all the work is merged together.
Then, when the codebase on that branch is stable and passes tests, you merge it into a develop branch; and when that has proven itself stable for a while, you fast-forward your master branch.
Large-Merging Workflows
The Git project has four long-running branches: master, next, and seen (formerly 'pu' — proposed updates) for new work, and maint for maintenance backports.
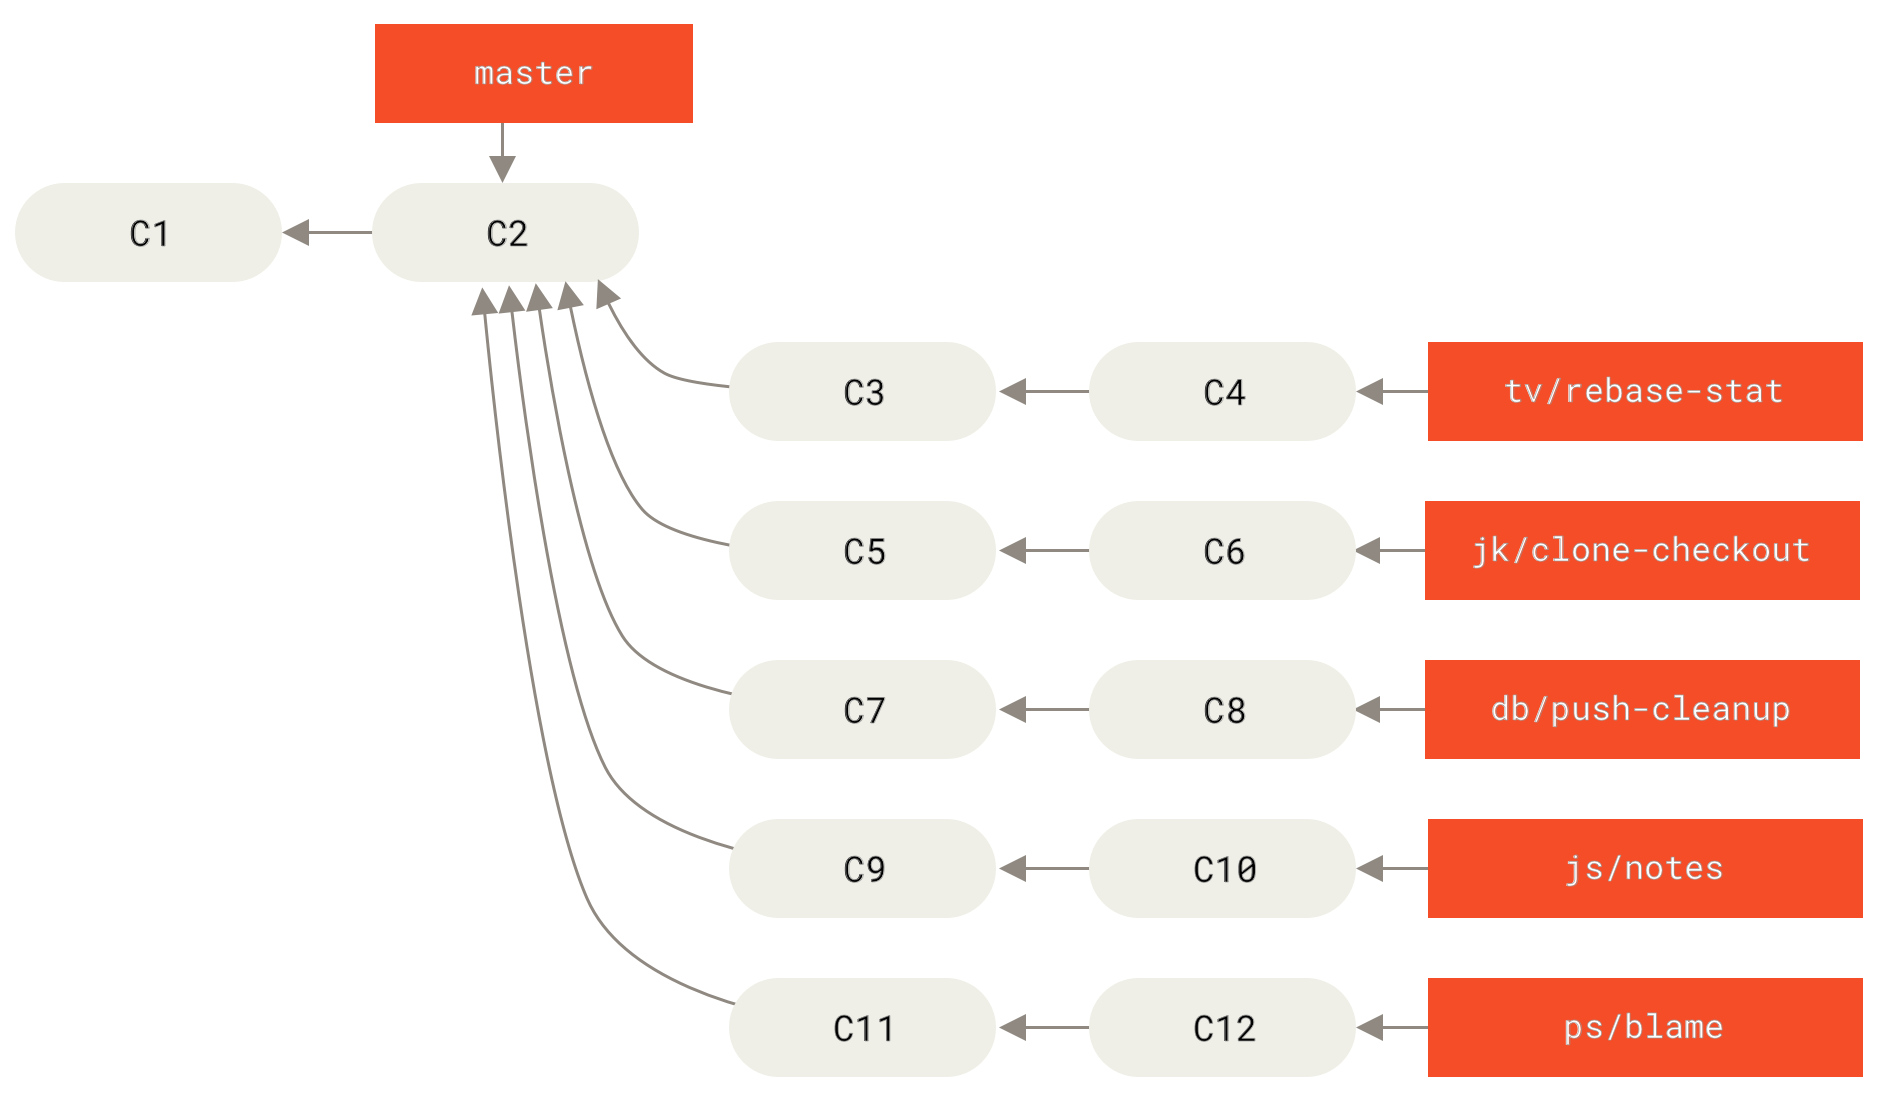
When new work is introduced by contributors, it’s collected into topic branches in the maintainer’s repository in a manner similar to what we’ve described (see Managing a complex series of parallel contributed topic branches).
At this point, the topics are evaluated to determine whether they’re safe and ready for consumption or whether they need more work.
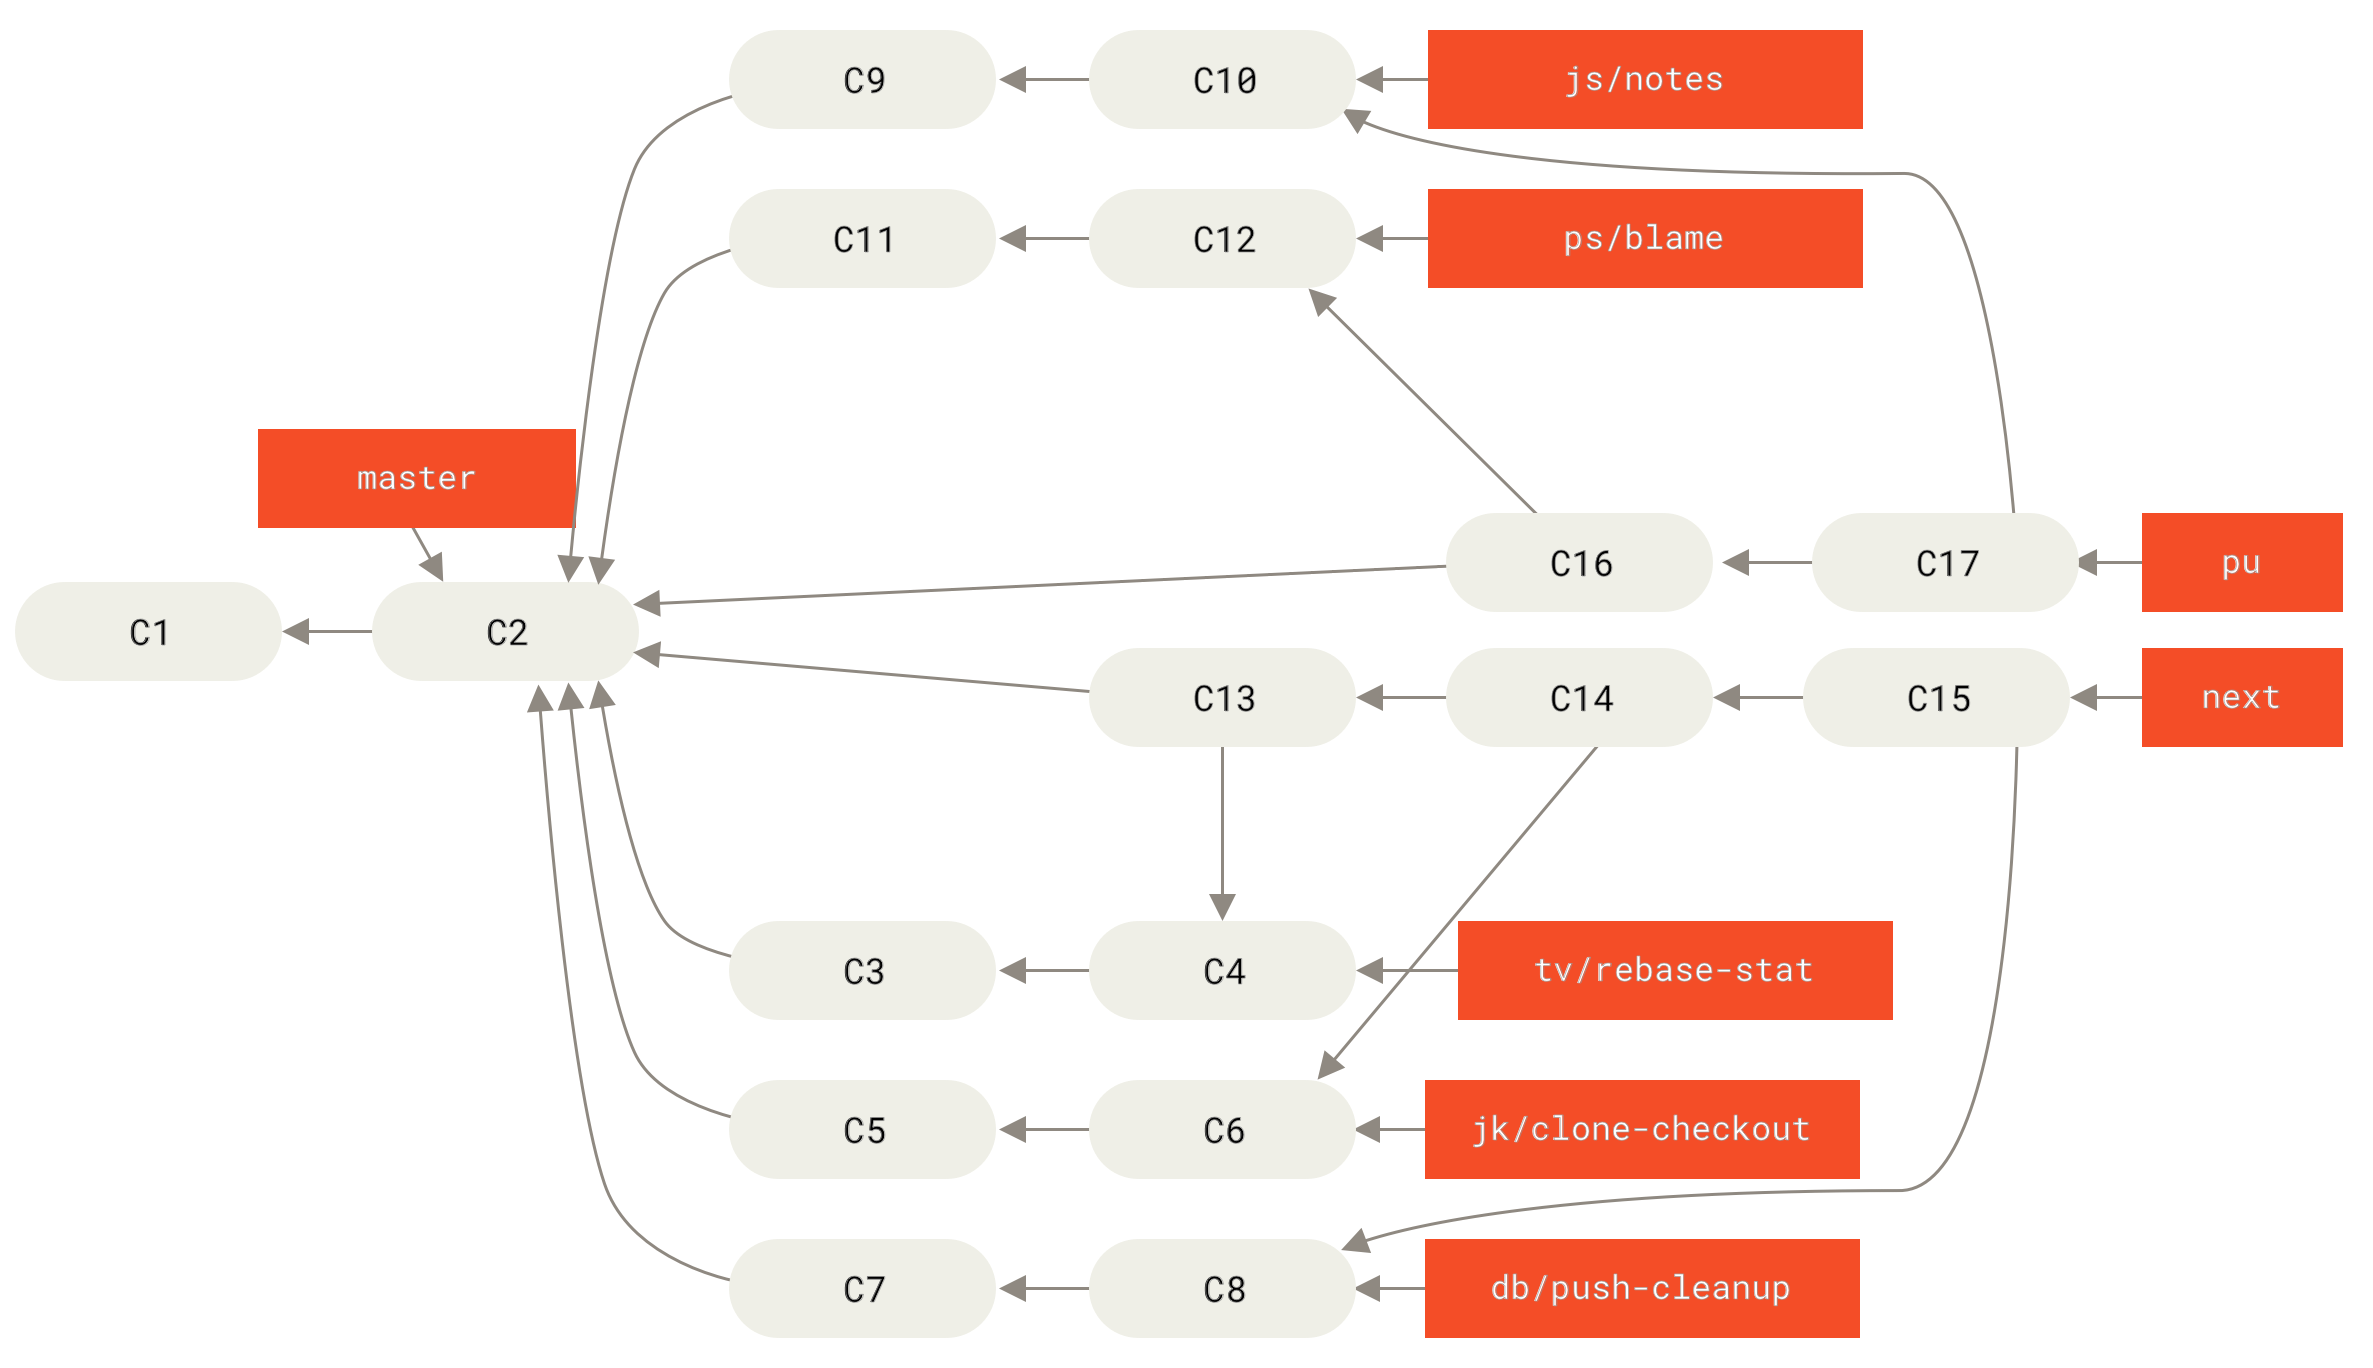
If they’re safe, they’re merged into next, and that branch is pushed up so everyone can try the topics integrated together.
If the topics still need work, they’re merged into seen instead.
When it’s determined that they’re totally stable, the topics are re-merged into master.
The next and seen branches are then rebuilt from the master.
This means master almost always moves forward, next is rebased occasionally, and seen is rebased even more often:
When a topic branch has finally been merged into master, it’s removed from the repository.
The Git project also has a maint branch that is forked off from the last release to provide backported patches in case a maintenance release is required.
Thus, when you clone the Git repository, you have four branches that you can check out to evaluate the project in different stages of development, depending on how cutting edge you want to be or how you want to contribute; and the maintainer has a structured workflow to help them vet new contributions.
The Git project’s workflow is specialized.
To clearly understand this you could check out the Git Maintainer’s guide.
Rebasing and Cherry-Picking Workflows
Other maintainers prefer to rebase or cherry-pick contributed work on top of their master branch, rather than merging it in, to keep a mostly linear history.
When you have work in a topic branch and have determined that you want to integrate it, you move to that branch and run the rebase command to rebuild the changes on top of your current master (or develop, and so on) branch.
If that works well, you can fast-forward your master branch, and you’ll end up with a linear project history.
The other way to move introduced work from one branch to another is to cherry-pick it. A cherry-pick in Git is like a rebase for a single commit. It takes the patch that was introduced in a commit and tries to reapply it on the branch you’re currently on. This is useful if you have a number of commits on a topic branch and you want to integrate only one of them, or if you only have one commit on a topic branch and you’d prefer to cherry-pick it rather than run rebase. For example, suppose you have a project that looks like this:
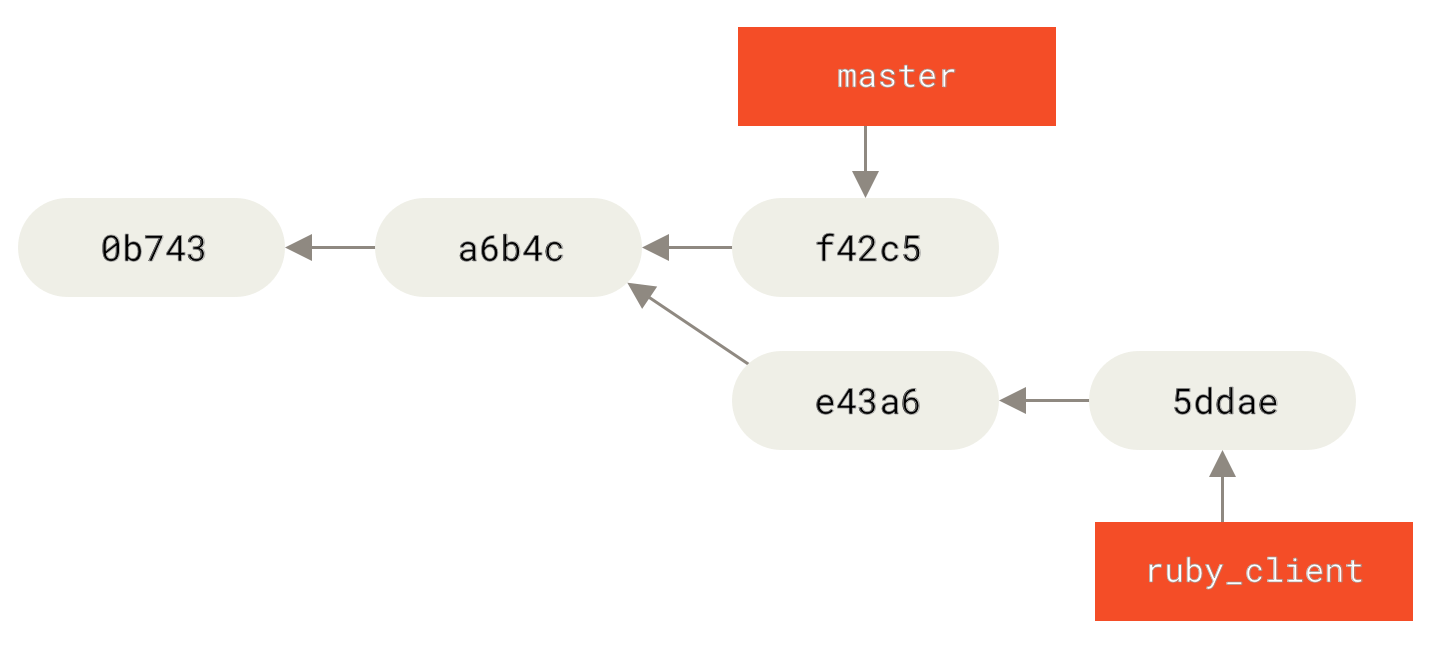
If you want to pull commit e43a6 into your master branch, you can run:
$ git cherry-pick e43a6
Finished one cherry-pick.
[master]: created a0a41a9: "More friendly message when locking the index fails."
 3 files changed, 17 insertions(+), 3 deletions(-)
This pulls the same change introduced in e43a6, but you get a new commit SHA-1 value, because the date applied is different.
Now your history looks like this:
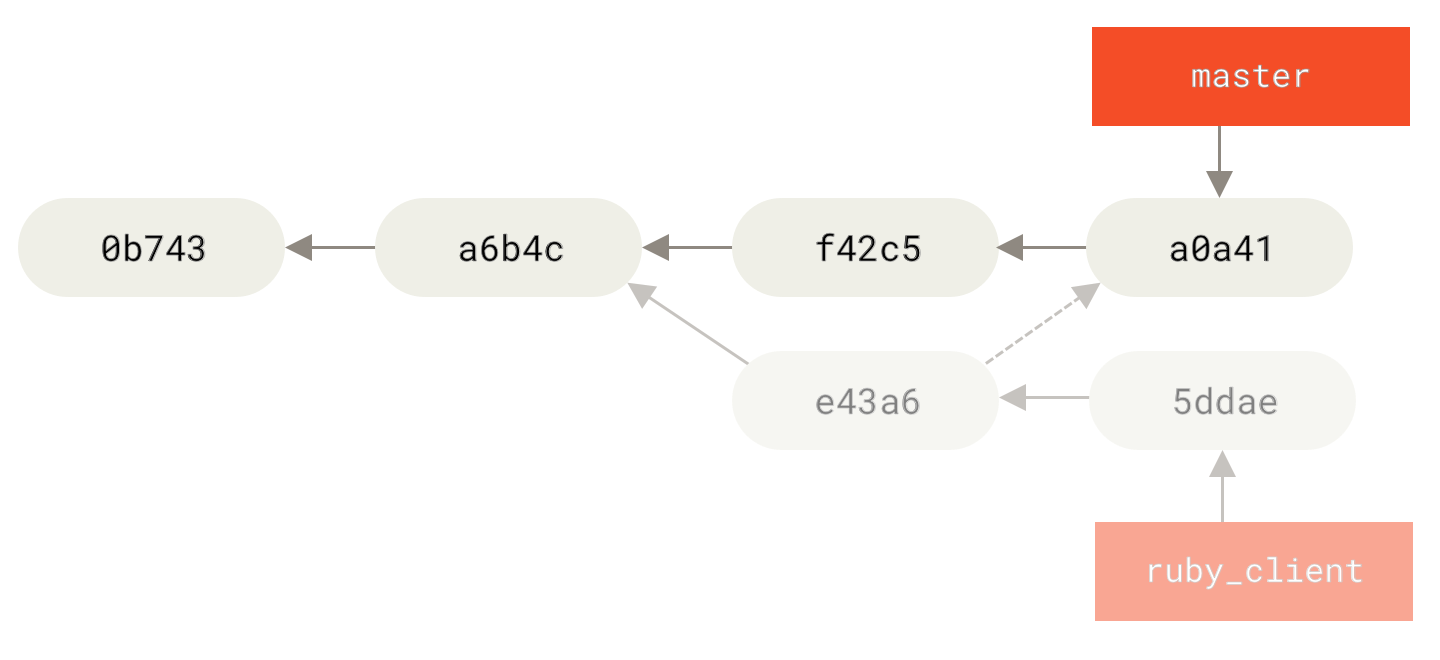
Now you can remove your topic branch and drop the commits you didn’t want to pull in.
Rerere
If you’re doing lots of merging and rebasing, or you’re maintaining a long-lived topic branch, Git has a feature called “rerere” that can help.
Rerere stands for “reuse recorded resolution” — it’s a way of shortcutting manual conflict resolution. When rerere is enabled, Git will keep a set of pre- and post-images from successful merges, and if it notices that there’s a conflict that looks exactly like one you’ve already fixed, it’ll just use the fix from last time, without bothering you with it.
This feature comes in two parts: a configuration setting and a command.
The configuration setting is rerere.enabled, and it’s handy enough to put in your global config:
$ git config --global rerere.enabled trueNow, whenever you do a merge that resolves conflicts, the resolution will be recorded in the cache in case you need it in the future.
If you need to, you can interact with the rerere cache using the git rerere command.
When it’s invoked alone, Git checks its database of resolutions and tries to find a match with any current merge conflicts and resolve them (although this is done automatically if rerere.enabled is set to true).
There are also subcommands to see what will be recorded, to erase specific resolution from the cache, and to clear the entire cache.
We will cover rerere in more detail in Rerere.
Tagging Your Releases
When you’ve decided to cut a release, you’ll probably want to assign a tag so you can re-create that release at any point going forward. You can create a new tag as discussed in Git Basics. If you decide to sign the tag as the maintainer, the tagging may look something like this:
$ git tag -s v1.5 -m 'my signed 1.5 tag'
You need a passphrase to unlock the secret key for
user: "Scott Chacon <schacon@gmail.com>"
1024-bit DSA key, ID F721C45A, created 2009-02-09
If you do sign your tags, you may have the problem of distributing the public PGP key used to sign your tags.
The maintainer of the Git project has solved this issue by including their public key as a blob in the repository and then adding a tag that points directly to that content.
To do this, you can figure out which key you want by running gpg --list-keys:
$ gpg --list-keys
/Users/schacon/.gnupg/pubring.gpg
---------------------------------
pub   1024D/F721C45A 2009-02-09 [expires: 2010-02-09]
uid                  Scott Chacon <schacon@gmail.com>
sub   2048g/45D02282 2009-02-09 [expires: 2010-02-09]
Then, you can directly import the key into the Git database by exporting it and piping that through git hash-object, which writes a new blob with those contents into Git and gives you back the SHA-1 of the blob:
$ gpg -a --export F721C45A | git hash-object -w --stdin
659ef797d181633c87ec71ac3f9ba29fe5775b92
Now that you have the contents of your key in Git, you can create a tag that points directly to it by specifying the new SHA-1 value that the hash-object command gave you:
$ git tag -a maintainer-pgp-pub 659ef797d181633c87ec71ac3f9ba29fe5775b92If you run git push --tags, the maintainer-pgp-pub tag will be shared with everyone.
If anyone wants to verify a tag, they can directly import your PGP key by pulling the blob directly out of the database and importing it into GPG:
$ git show maintainer-pgp-pub | gpg --importThey can use that key to verify all your signed tags.
Also, if you include instructions in the tag message, running git show <tag> will let you give the end user more specific instructions about tag verification.
Generating a Build Number
Because Git doesn’t have monotonically increasing numbers like 'v123' or the equivalent to go with each commit, if you want to have a human-readable name to go with a commit, you can run git describe on that commit.
In response, Git generates a string consisting of the name of the most recent tag earlier than that commit, followed by the number of commits since that tag, followed finally by a partial SHA-1 value of the commit being described (prefixed with the letter "g" meaning Git):
$ git describe master
v1.6.2-rc1-20-g8c5b85c
This way, you can export a snapshot or build and name it something understandable to people.
In fact, if you build Git from source code cloned from the Git repository, git --version gives you something that looks like this.
If you’re describing a commit that you have directly tagged, it gives you simply the tag name.
By default, the git describe command requires annotated tags (tags created with the -a or -s flag); if you want to take advantage of lightweight (non-annotated) tags as well, add the --tags option to the command.
You can also use this string as the target of a git checkout or git show command, although it relies on the abbreviated SHA-1 value at the end, so it may not be valid forever.
For instance, the Linux kernel recently jumped from 8 to 10 characters to ensure SHA-1 object uniqueness, so older git describe output names were invalidated.
Preparing a Release
Now you want to release a build.
One of the things you’ll want to do is create an archive of the latest snapshot of your code for those poor souls who don’t use Git.
The command to do this is git archive:
$ git archive master --prefix='project/' | gzip > `git describe master`.tar.gz
$ ls *.tar.gz
v1.6.2-rc1-20-g8c5b85c.tar.gz
If someone opens that tarball, they get the latest snapshot of your project under a project directory.
You can also create a zip archive in much the same way, but by passing the --format=zip option to git archive:
$ git archive master --prefix='project/' --format=zip > `git describe master`.zipYou now have a nice tarball and a zip archive of your project release that you can upload to your website or email to people.
The Shortlog
It’s time to email your mailing list of people who want to know what’s happening in your project.
A nice way of quickly getting a sort of changelog of what has been added to your project since your last release or email is to use the git shortlog command.
It summarizes all the commits in the range you give it; for example, the following gives you a summary of all the commits since your last release, if your last release was named v1.0.1:
$ git shortlog --no-merges master --not v1.0.1
Chris Wanstrath (6):
      Add support for annotated tags to Grit::Tag
      Add packed-refs annotated tag support.
      Add Grit::Commit#to_patch
      Update version and History.txt
      Remove stray `puts`
      Make ls_tree ignore nils

Tom Preston-Werner (4):
      fix dates in history
      dynamic version method
      Version bump to 1.0.2
      Regenerated gemspec for version 1.0.2
You get a clean summary of all the commits since v1.0.1, grouped by author, that you can email to your list.