-
1. Почеток
- 1.1 За верзиска контрола
- 1.2 Кратка историја на Git
- 1.3 Основи на Гит
- 1.4 Командната линија
- 1.5 Инсталирање на Git
- 1.6 First-Time Git Setup
- 1.7 Getting Help
- 1.8 Заклучок
-
2. Основите на Git
-
3. Гранење во Git
- 3.1 Гранење објаснето
- 3.2 Основно разгранување и спојување
- 3.3 Branch Management
- 3.4 Работни процеси
- 3.5 Далечински гранки
- 3.6 Ребаза
- 3.7 Заклучок
-
4. Git на Сервер
- 4.1 Протоколите
- 4.2 Добивање на Git на сервер
- 4.3 Генерирање на вашиот SSH јавен клуч
- 4.4 Поставување на серверот
- 4.5 Гит демон
- 4.6 Smart HTTP
- 4.7 GitWeb
- 4.8 GitLab
- 4.9 Опции за домаќини на трети лица
- 4.10 Заклучок
-
5. Дистрибуиран Git
- 5.1 Дистрибуирани работни процеси
- 5.2 Придонес кон проект
- 5.3 Приватен мал тим
- 5.4 Одржување на проект
- 5.5 Заклучок
-
6. GitHub
-
7. Git Алатки
- 7.1 Revision Selection
- 7.2 Интерактивно стажирање
- 7.3 Stashing and Cleaning
- 7.4 Signing Your Work
- 7.5 Searching
- 7.6 Rewriting History
- 7.7 Reset Demystified
- 7.8 Напредно спојување
- 7.9 Rerere
- 7.10 Дебагирање со Git
- 7.11 Submodules
- 7.12 Збивање
- 7.13 Заменување
- 7.14 Складирање на ингеренции
- 7.15 Заклучок
-
8. Персонализација на Git
- 8.1 Git Configuration
- 8.2 Git Атрибути
- 8.3 Git Hooks
- 8.4 An Example Git-Enforced Policy
- 8.5 Заклучок
-
9. Git и други системи
- 9.1 Git како Клиент
- 9.2 Мигрирање кон Git
- 9.3 Заклучок
-
10. Внатрешноста на Git
- 10.1 Plumbing and Porcelain
- 10.2 Git Objects
- 10.3 Git References
- 10.4 Packfiles
- 10.5 The Refspec
- 10.6 Transfer Protocols
- 10.7 Maintenance and Data Recovery
- 10.8 Environment Variables
- 10.9 Заклучок
-
A1. Appendix A: Git во други околини
- A1.1 Graphical Interfaces
- A1.2 Git in Visual Studio
- A1.3 Git in Eclipse
- A1.4 Git in Bash
- A1.5 Git in Zsh
- A1.6 Git in Powershell
- A1.7 Заклучок
-
A2. Appendix B: Вметнување на Git во вашите апликации
- A2.1 Command-line Git
- A2.2 Libgit2
- A2.3 JGit
- A2.4 go-git
-
A3. Appendix C: Git команди
- A3.1 Setup and Config
- A3.2 Getting and Creating Projects
- A3.3 Basic Snapshotting
- A3.4 Branching and Merging
- A3.5 Sharing and Updating Projects
- A3.6 Inspection and Comparison
- A3.7 Debugging
- A3.8 Patching
- A3.9 Email
- A3.10 External Systems
- A3.11 Administration
- A3.12 Plumbing Commands
7.7 Git Алатки - Reset Demystified
Reset Demystified
Before moving on to more specialized tools, let’s talk about the Git reset and checkout commands.
These commands are two of the most confusing parts of Git when you first encounter them.
They do so many things that it seems hopeless to actually understand them and employ them properly.
For this, we recommend a simple metaphor.
The Three Trees
An easier way to think about reset and checkout is through the mental frame of Git being a content manager of three different trees.
By “tree” here, we really mean “collection of files”, not specifically the data structure.
(There are a few cases where the index doesn’t exactly act like a tree, but for our purposes it is easier to think about it this way for now.)
Git as a system manages and manipulates three trees in its normal operation:
| Tree | Role |
|---|---|
HEAD |
Last commit snapshot, next parent |
Index |
Proposed next commit snapshot |
Working Directory |
Sandbox |
The HEAD
HEAD is the pointer to the current branch reference, which is in turn a pointer to the last commit made on that branch. That means HEAD will be the parent of the next commit that is created. It’s generally simplest to think of HEAD as the snapshot of your last commit on that branch.
In fact, it’s pretty easy to see what that snapshot looks like. Here is an example of getting the actual directory listing and SHA-1 checksums for each file in the HEAD snapshot:
$ git cat-file -p HEAD
tree cfda3bf379e4f8dba8717dee55aab78aef7f4daf
author Scott Chacon  1301511835 -0700
committer Scott Chacon  1301511835 -0700

initial commit

$ git ls-tree -r HEAD
100644 blob a906cb2a4a904a152...   README
100644 blob 8f94139338f9404f2...   Rakefile
040000 tree 99f1a6d12cb4b6f19...   lib
The Git cat-file and ls-tree commands are “plumbing” commands that are used for lower level things and not really used in day-to-day work, but they help us see what’s going on here.
The Index
The Index is your proposed next commit.
We’ve also been referring to this concept as Git’s “Staging Area” as this is what Git looks at when you run git commit.
Git populates this index with a list of all the file contents that were last checked out into your working directory and what they looked like when they were originally checked out.
You then replace some of those files with new versions of them, and git commit converts that into the tree for a new commit.
$ git ls-files -s
100644 a906cb2a4a904a152e80877d4088654daad0c859 0	README
100644 8f94139338f9404f26296befa88755fc2598c289 0	Rakefile
100644 47c6340d6459e05787f644c2447d2595f5d3a54b 0	lib/simplegit.rb
Again, here we’re using git ls-files, which is more of a behind the scenes command that shows you what your index currently looks like.
The index is not technically a tree structure — it’s actually implemented as a flattened manifest — but for our purposes it’s close enough.
The Working Directory
Finally, you have your working directory.
The other two trees store their content in an efficient but inconvenient manner, inside the .git folder.
The Working Directory unpacks them into actual files, which makes it much easier for you to edit them.
Think of the Working Directory as a sandbox, where you can try changes out before committing them to your staging area (index) and then to history.
$ tree
.
├── README
├── Rakefile
└── lib
    └── simplegit.rb

1 directory, 3 files
The Workflow
Git’s main purpose is to record snapshots of your project in successively better states, by manipulating these three trees.

Let’s visualize this process: say you go into a new directory with a single file in it.
We’ll call this v1 of the file, and we’ll indicate it in blue.
Now we run git init, which will create a Git repository with a HEAD reference which points to an unborn branch (master doesn’t exist yet).

At this point, only the Working Directory tree has any content.
Now we want to commit this file, so we use git add to take content in the Working Directory and copy it to the Index.
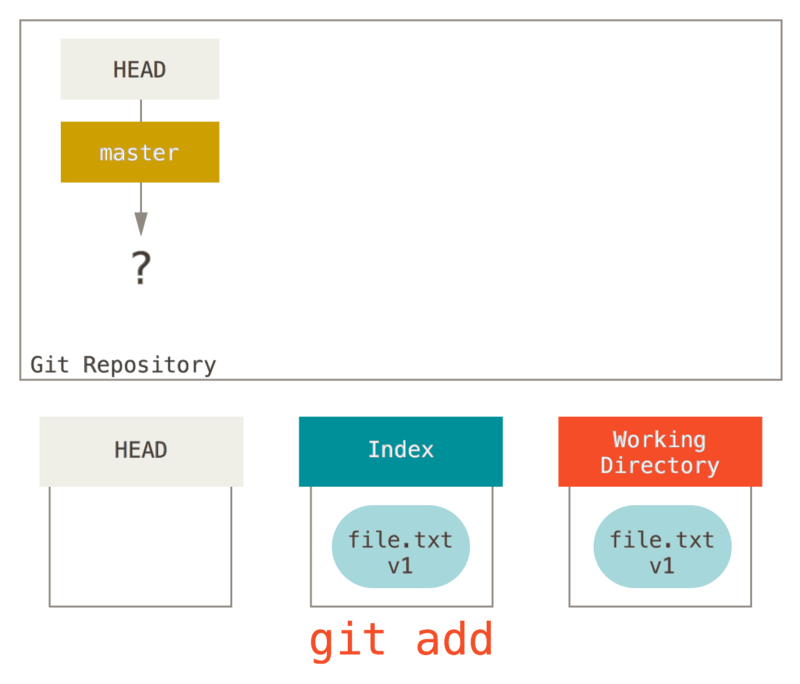
Then we run git commit, which takes the contents of the Index and saves it as a permanent snapshot, creates a commit object which points to that snapshot, and updates master to point to that commit.
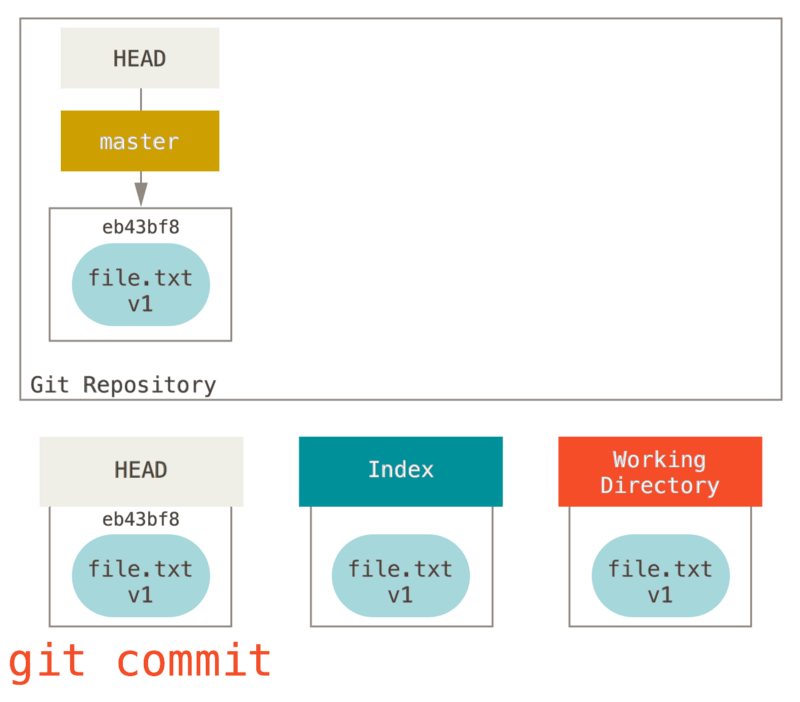
If we run git status, we’ll see no changes, because all three trees are the same.
Now we want to make a change to that file and commit it. We’ll go through the same process; first we change the file in our working directory. Let’s call this v2 of the file, and indicate it in red.

If we run git status right now, we’ll see the file in red as “Changes not staged for commit,” because that entry differs between the Index and the Working Directory.
Next we run git add on it to stage it into our Index.
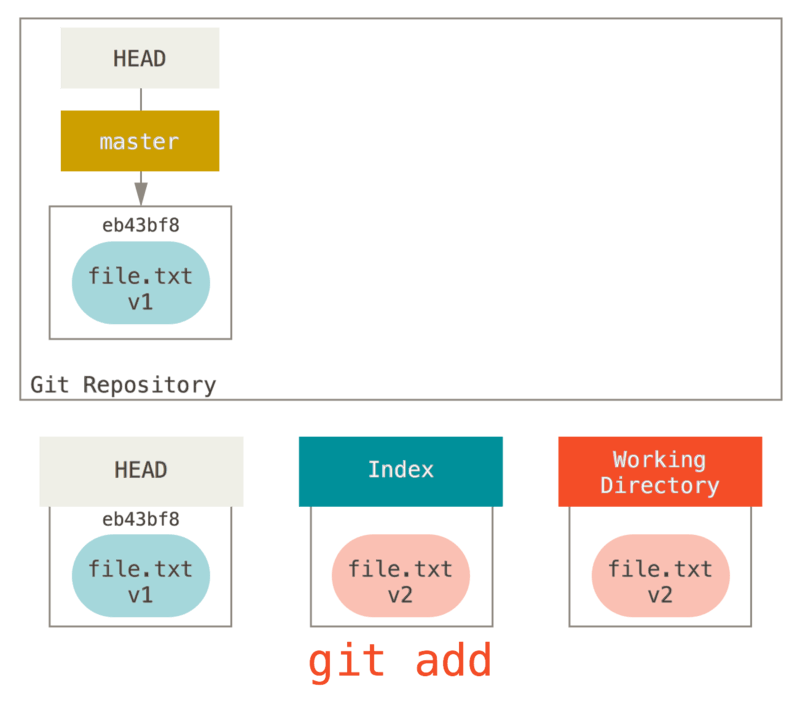
At this point, if we run git status, we will see the file in green under “Changes to be committed” because the Index and HEAD differ — that is, our proposed next commit is now different from our last commit.
Finally, we run git commit to finalize the commit.
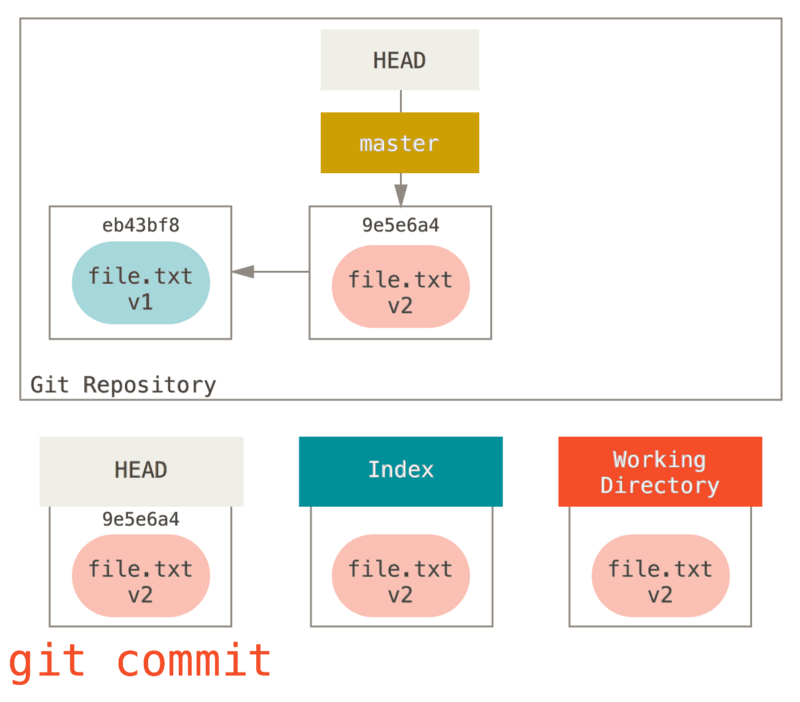
Now git status will give us no output, because all three trees are the same again.
Switching branches or cloning goes through a similar process. When you checkout a branch, it changes HEAD to point to the new branch ref, populates your Index with the snapshot of that commit, then copies the contents of the Index into your Working Directory.
The Role of Reset
The reset command makes more sense when viewed in this context.
For the purposes of these examples, let’s say that we’ve modified file.txt again and committed it a third time.
So now our history looks like this:
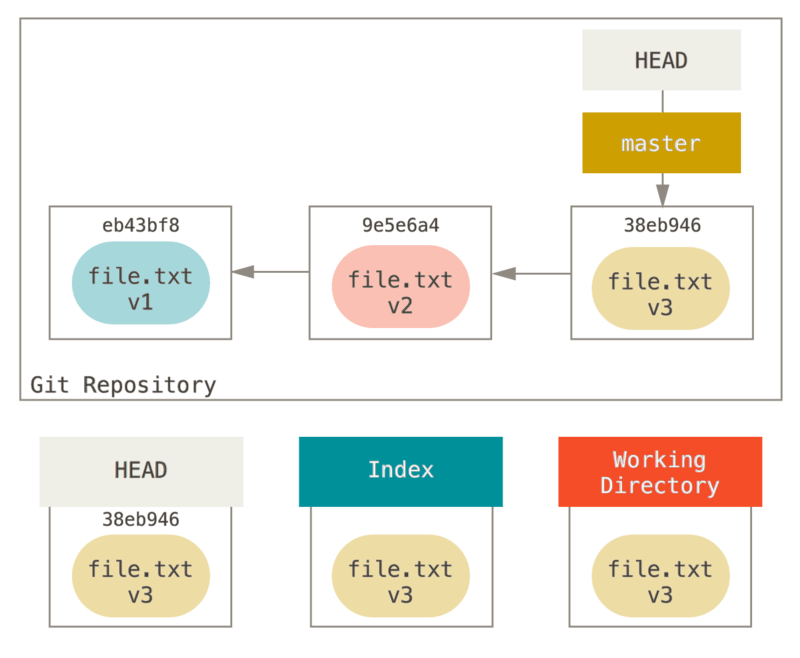
Let’s now walk through exactly what reset does when you call it.
It directly manipulates these three trees in a simple and predictable way.
It does up to three basic operations.
Step 1: Move HEAD
The first thing reset will do is move what HEAD points to.
This isn’t the same as changing HEAD itself (which is what checkout does); reset moves the branch that HEAD is pointing to.
This means if HEAD is set to the master branch (i.e. you’re currently on the master branch), running git reset 9e5e6a4 will start by making master point to 9e5e6a4.
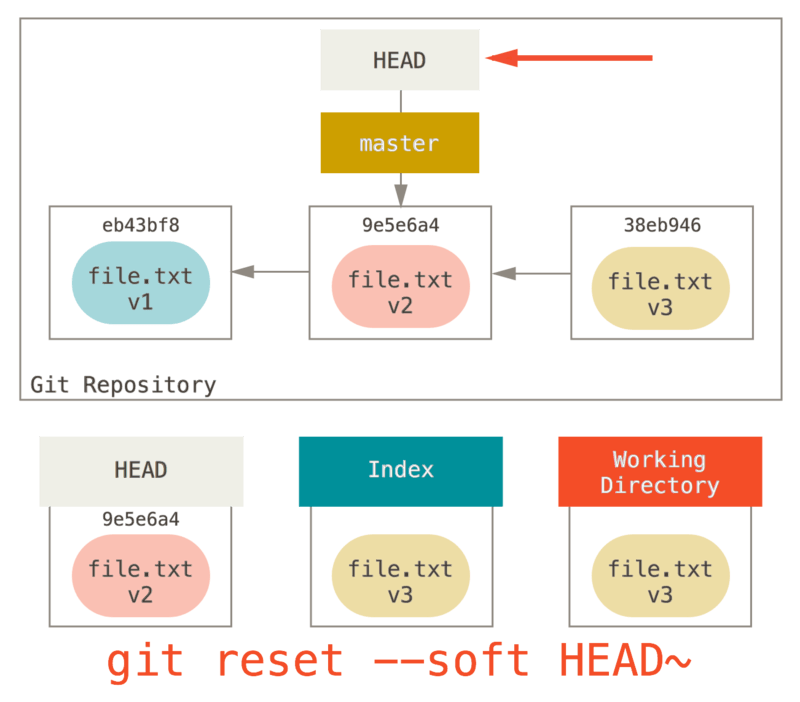
No matter what form of reset with a commit you invoke, this is the first thing it will always try to do.
With reset --soft, it will simply stop there.
Now take a second to look at that diagram and realize what happened: it essentially undid the last git commit command.
When you run git commit, Git creates a new commit and moves the branch that HEAD points to up to it.
When you reset back to HEAD~ (the parent of HEAD), you are moving the branch back to where it was, without changing the Index or Working Directory.
You could now update the Index and run git commit again to accomplish what git commit --amend would have done (see Changing the Last Commit).
Step 2: Updating the Index (--mixed)
Note that if you run git status now you’ll see in green the difference between the Index and what the new HEAD is.
The next thing reset will do is to update the Index with the contents of whatever snapshot HEAD now points to.
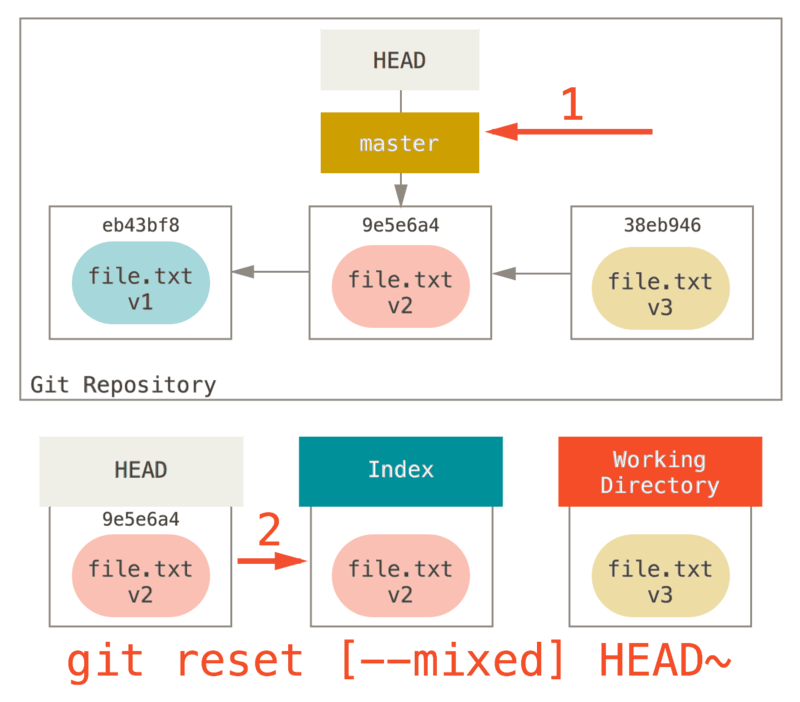
If you specify the --mixed option, reset will stop at this point.
This is also the default, so if you specify no option at all (just git reset HEAD~ in this case), this is where the command will stop.
Now take another second to look at that diagram and realize what happened: it still undid your last commit, but also unstaged everything.
You rolled back to before you ran all your git add and git commit commands.
Step 3: Updating the Working Directory (--hard)
The third thing that reset will do is to make the Working Directory look like the Index.
If you use the --hard option, it will continue to this stage.

So let’s think about what just happened.
You undid your last commit, the git add and git commit commands, and all the work you did in your working directory.
It’s important to note that this flag (--hard) is the only way to make the reset command dangerous, and one of the very few cases where Git will actually destroy data.
Any other invocation of reset can be pretty easily undone, but the --hard option cannot, since it forcibly overwrites files in the Working Directory.
In this particular case, we still have the v3 version of our file in a commit in our Git DB, and we could get it back by looking at our reflog, but if we had not committed it, Git still would have overwritten the file and it would be unrecoverable.
Recap
The reset command overwrites these three trees in a specific order, stopping when you tell it to:
-
Move the branch HEAD points to (stop here if
--soft) -
Make the Index look like HEAD (stop here unless
--hard) -
Make the Working Directory look like the Index
Reset With a Path
That covers the behavior of reset in its basic form, but you can also provide it with a path to act upon.
If you specify a path, reset will skip step 1, and limit the remainder of its actions to a specific file or set of files.
This actually sort of makes sense — HEAD is just a pointer, and you can’t point to part of one commit and part of another.
But the Index and Working directory can be partially updated, so reset proceeds with steps 2 and 3.
So, assume we run git reset file.txt.
This form (since you did not specify a commit SHA-1 or branch, and you didn’t specify --soft or --hard) is shorthand for git reset --mixed HEAD file.txt, which will:
-
Move the branch HEAD points to (skipped)
-
Make the Index look like HEAD (stop here)
So it essentially just copies file.txt from HEAD to the Index.
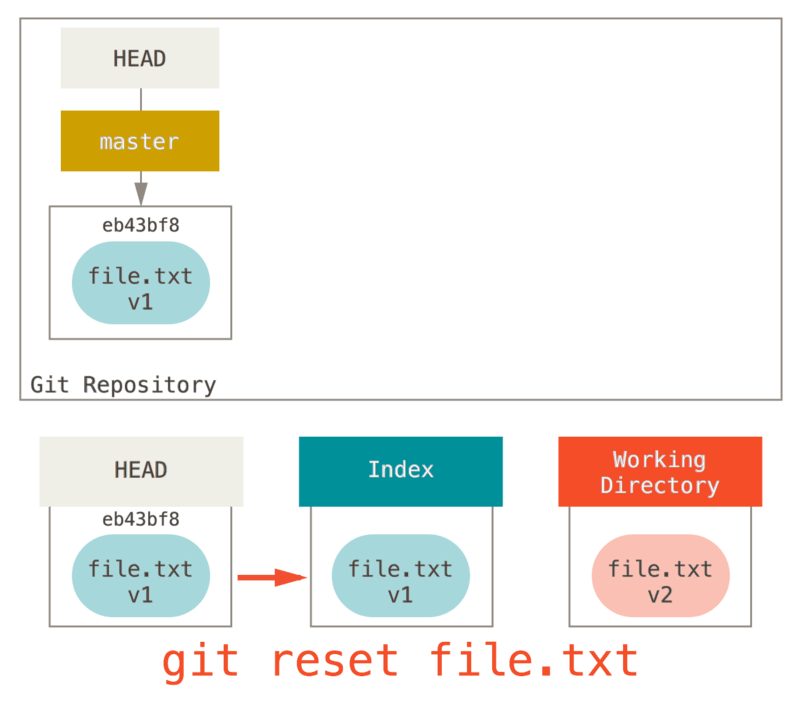
This has the practical effect of unstaging the file.
If we look at the diagram for that command and think about what git add does, they are exact opposites.
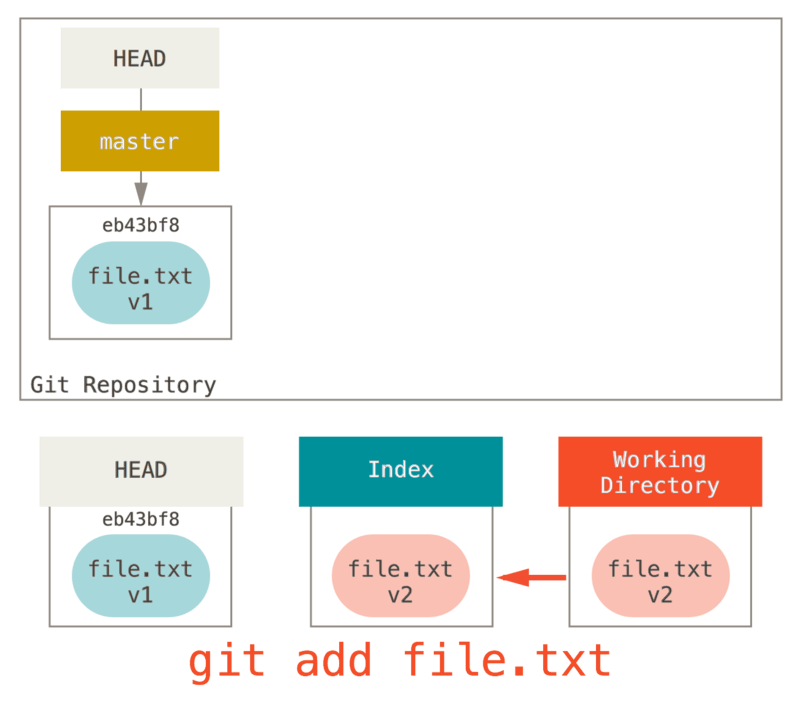
This is why the output of the git status command suggests that you run this to unstage a file.
(See Расклопување на изведена датотека for more on this.)
We could just as easily not let Git assume we meant “pull the data from HEAD” by specifying a specific commit to pull that file version from.
We would just run something like git reset eb43bf file.txt.
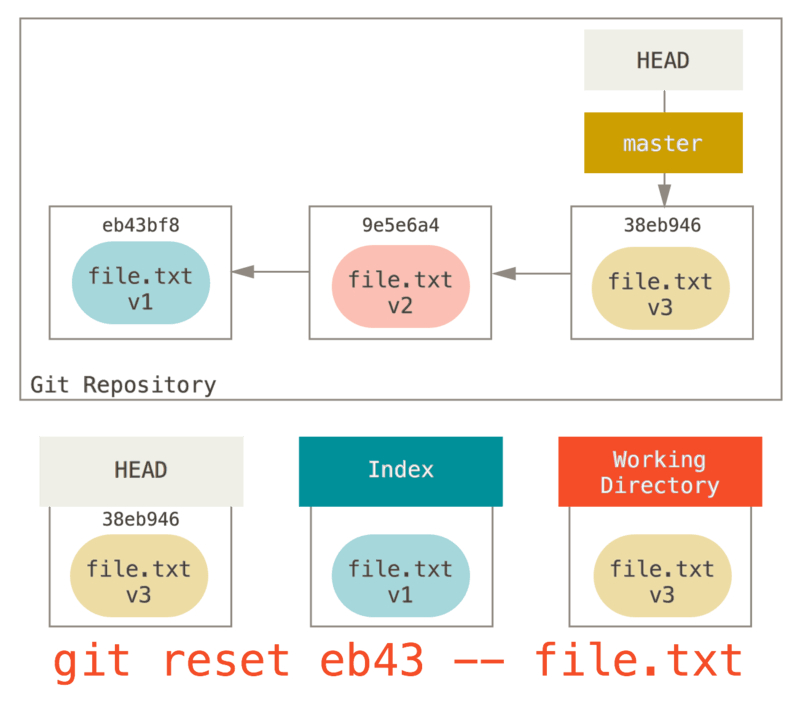
This effectively does the same thing as if we had reverted the content of the file to v1 in the Working Directory, ran git add on it, then reverted it back to v3 again (without actually going through all those steps).
If we run git commit now, it will record a change that reverts that file back to v1, even though we never actually had it in our Working Directory again.
It’s also interesting to note that like git add, the reset command will accept a --patch option to unstage content on a hunk-by-hunk basis.
So you can selectively unstage or revert content.
Squashing
Let’s look at how to do something interesting with this newfound power — squashing commits.
Say you have a series of commits with messages like “oops.”, “WIP” and “forgot this file”.
You can use reset to quickly and easily squash them into a single commit that makes you look really smart.
(Squashing Commits shows another way to do this, but in this example it’s simpler to use reset.)
Let’s say you have a project where the first commit has one file, the second commit added a new file and changed the first, and the third commit changed the first file again. The second commit was a work in progress and you want to squash it down.

You can run git reset --soft HEAD~2 to move the HEAD branch back to an older commit (the most recent commit you want to keep):

And then simply run git commit again:

Now you can see that your reachable history, the history you would push, now looks like you had one commit with file-a.txt v1, then a second that both modified file-a.txt to v3 and added file-b.txt.
The commit with the v2 version of the file is no longer in the history.
Check It Out
Finally, you may wonder what the difference between checkout and reset is.
Like reset, checkout manipulates the three trees, and it is a bit different depending on whether you give the command a file path or not.
Without Paths
Running git checkout [branch] is pretty similar to running git reset --hard [branch] in that it updates all three trees for you to look like [branch], but there are two important differences.
First, unlike reset --hard, checkout is working-directory safe; it will check to make sure it’s not blowing away files that have changes to them.
Actually, it’s a bit smarter than that — it tries to do a trivial merge in the Working Directory, so all of the files you haven’t changed will be updated.
reset --hard, on the other hand, will simply replace everything across the board without checking.
The second important difference is how checkout updates HEAD.
Whereas reset will move the branch that HEAD points to, checkout will move HEAD itself to point to another branch.
For instance, say we have master and develop branches which point at different commits, and we’re currently on develop (so HEAD points to it).
If we run git reset master, develop itself will now point to the same commit that master does.
If we instead run git checkout master, develop does not move, HEAD itself does.
HEAD will now point to master.
So, in both cases we’re moving HEAD to point to commit A, but how we do so is very different.
reset will move the branch HEAD points to, checkout moves HEAD itself.

With Paths
The other way to run checkout is with a file path, which, like reset, does not move HEAD.
It is just like git reset [branch] file in that it updates the index with that file at that commit, but it also overwrites the file in the working directory.
It would be exactly like git reset --hard [branch] file (if reset would let you run that) — it’s not working-directory safe, and it does not move HEAD.
Also, like git reset and git add, checkout will accept a --patch option to allow you to selectively revert file contents on a hunk-by-hunk basis.
Summary
Hopefully now you understand and feel more comfortable with the reset command, but are probably still a little confused about how exactly it differs from checkout and could not possibly remember all the rules of the different invocations.
Here’s a cheat-sheet for which commands affect which trees. The “HEAD” column reads “REF” if that command moves the reference (branch) that HEAD points to, and “HEAD” if it moves HEAD itself. Pay especial attention to the WD Safe? column — if it says NO, take a second to think before running that command.
| HEAD | Index | Workdir | WD Safe? | |
|---|---|---|---|---|
Commit Level |
||||
|
REF |
NO |
NO |
YES |
|
REF |
YES |
NO |
YES |
|
REF |
YES |
YES |
NO |
|
HEAD |
YES |
YES |
YES |
File Level |
||||
|
NO |
YES |
NO |
YES |
|
NO |
YES |
YES |
NO |
