
-
1. Getting Started
- 1.1 About Version Control
- 1.2 A Short History of Git
- 1.3 What is Git?
- 1.4 The Command Line
- 1.5 Installing Git
- 1.6 First-Time Git Setup
- 1.7 Getting Help
- 1.8 Summary
-
2. Git Basics
- 2.1 Getting a Git Repository
- 2.2 Recording Changes to the Repository
- 2.3 Viewing the Commit History
- 2.4 Undoing Things
- 2.5 Working with Remotes
- 2.6 Tagging
- 2.7 Git Aliases
- 2.8 Summary
-
3. Git Branching
- 3.1 Branches in a Nutshell
- 3.2 Basic Branching and Merging
- 3.3 Branch Management
- 3.4 Branching Workflows
- 3.5 Remote Branches
- 3.6 Rebasing
- 3.7 Summary
-
4. Git on the Server
- 4.1 The Protocols
- 4.2 Getting Git on a Server
- 4.3 Generating Your SSH Public Key
- 4.4 Setting Up the Server
- 4.5 Git Daemon
- 4.6 Smart HTTP
- 4.7 GitWeb
- 4.8 GitLab
- 4.9 Third Party Hosted Options
- 4.10 Summary
-
5. Distributed Git
- 5.1 Distributed Workflows
- 5.2 Contributing to a Project
- 5.3 Maintaining a Project
- 5.4 Summary
-
6. GitHub
-
7. Git Tools
- 7.1 Revision Selection
- 7.2 Interactive Staging
- 7.3 Stashing and Cleaning
- 7.4 Signing Your Work
- 7.5 Searching
- 7.6 Rewriting History
- 7.7 Reset Demystified
- 7.8 Advanced Merging
- 7.9 Rerere
- 7.10 Debugging with Git
- 7.11 Submodules
- 7.12 Bundling
- 7.13 Replace
- 7.14 Credential Storage
- 7.15 Summary
-
8. Customizing Git
- 8.1 Git Configuration
- 8.2 Git Attributes
- 8.3 Git Hooks
- 8.4 An Example Git-Enforced Policy
- 8.5 Summary
-
9. Git and Other Systems
- 9.1 Git as a Client
- 9.2 Migrating to Git
- 9.3 Summary
-
10. Git Internals
- 10.1 Plumbing and Porcelain
- 10.2 Git Objects
- 10.3 Git References
- 10.4 Packfiles
- 10.5 The Refspec
- 10.6 Transfer Protocols
- 10.7 Maintenance and Data Recovery
- 10.8 Environment Variables
- 10.9 Summary
-
A1. Appendix A: Git in Other Environments
- A1.1 Graphical Interfaces
- A1.2 Git in Visual Studio
- A1.3 Git in Visual Studio Code
- A1.4 Git in IntelliJ / PyCharm / WebStorm / PhpStorm / RubyMine
- A1.5 Git in Sublime Text
- A1.6 Git in Bash
- A1.7 Git in Zsh
- A1.8 Git in PowerShell
- A1.9 Summary
-
A2. Appendix B: Embedding Git in your Applications
- A2.1 Command-line Git
- A2.2 Libgit2
- A2.3 JGit
- A2.4 go-git
- A2.5 Dulwich
-
A3. Appendix C: Git Commands
- A3.1 Setup and Config
- A3.2 Getting and Creating Projects
- A3.3 Basic Snapshotting
- A3.4 Branching and Merging
- A3.5 Sharing and Updating Projects
- A3.6 Inspection and Comparison
- A3.7 Debugging
- A3.8 Patching
- A3.9 Email
- A3.10 External Systems
- A3.11 Administration
- A3.12 Plumbing Commands
6.1 GitHub - Account Setup and Configuration
GitHub is the single largest host for Git repositories, and is the central point of collaboration for millions of developers and projects. A large percentage of all Git repositories are hosted on GitHub, and many open-source projects use it for Git hosting, issue tracking, code review, and other things. So while it’s not a direct part of the Git open source project, there’s a good chance that you’ll want or need to interact with GitHub at some point while using Git professionally.
This chapter is about using GitHub effectively. We’ll cover signing up for and managing an account, creating and using Git repositories, common workflows to contribute to projects and to accept contributions to yours, GitHub’s programmatic interface and lots of little tips to make your life easier in general.
If you are not interested in using GitHub to host your own projects or to collaborate with other projects that are hosted on GitHub, you can safely skip to Git Tools.
Account Setup and Configuration
The first thing you need to do is set up a free user account. Simply visit https://github.com, choose a user name that isn’t already taken, provide an email address and a password, and click the big green “Sign up for GitHub” button.
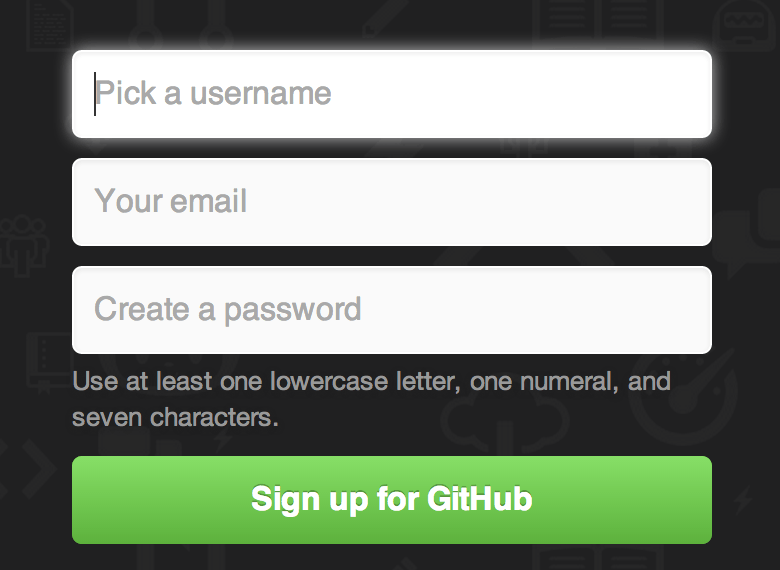
The next thing you’ll see is the pricing page for upgraded plans, but it’s safe to ignore this for now. GitHub will send you an email to verify the address you provided. Go ahead and do this; it’s pretty important (as we’ll see later).
|
Note
|
GitHub provides almost all of its functionality with free accounts, except some advanced features. GitHub’s paid plans include advanced tools and features as well as increased limits for free services, but we won’t be covering those in this book. To get more information about available plans and their comparison, visit https://github.com/pricing. |
Clicking the Octocat logo at the top-left of the screen will take you to your dashboard page. You’re now ready to use GitHub.
SSH Access
As of right now, you’re fully able to connect with Git repositories using the https:// protocol, authenticating with the username and password you just set up.
However, to simply clone public projects, you don’t even need to sign up - the account we just created comes into play when we fork projects and push to our forks a bit later.
If you’d like to use SSH remotes, you’ll need to configure a public key. If you don’t already have one, see Generating Your SSH Public Key. Open up your account settings using the link at the top-right of the window:
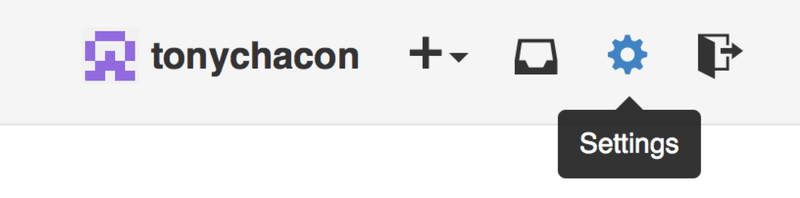
Then select the “SSH keys” section along the left-hand side.
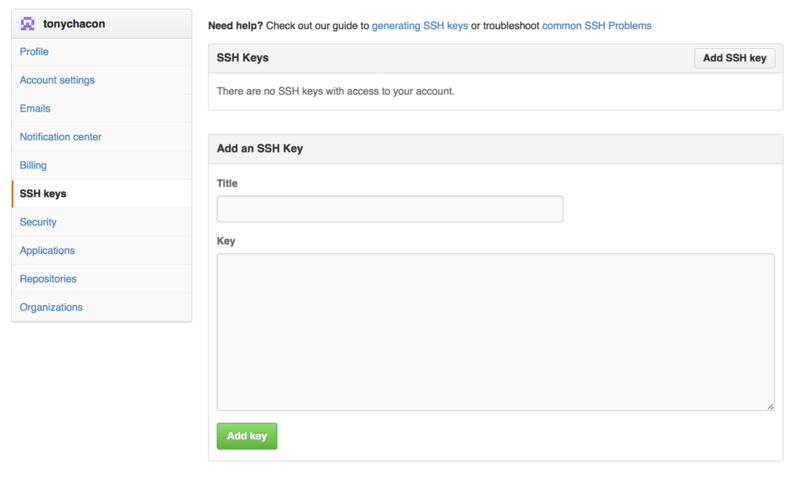
From there, click the “Add an SSH key” button, give your key a name, paste the contents of your ~/.ssh/id_rsa.pub (or whatever you named it) public-key file into the text area, and click “Add key”.
|
Note
|
Be sure to name your SSH key something you can remember. You can name each of your keys (e.g. "My Laptop" or "Work Account") so that if you need to revoke a key later, you can easily tell which one you’re looking for. |
Your Avatar
Next, if you wish, you can replace the avatar that is generated for you with an image of your choosing. First go to the “Profile” tab (above the SSH Keys tab) and click “Upload new picture”.
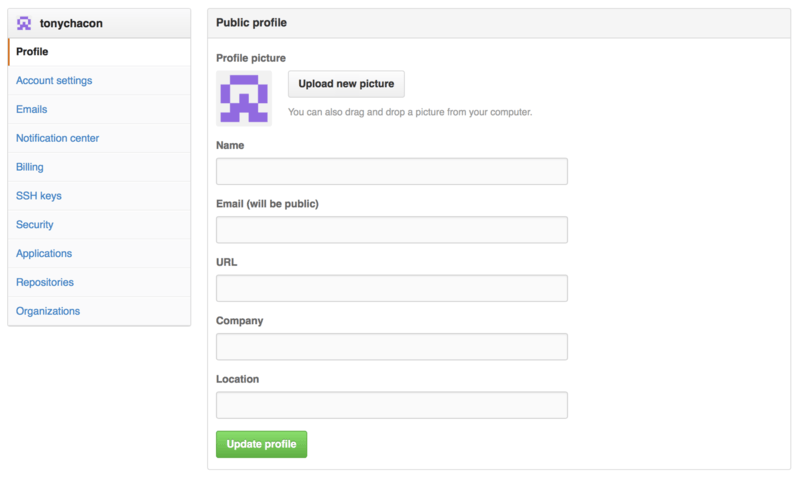
We’ll choose a copy of the Git logo that is on our hard drive and then we get a chance to crop it.
Now anywhere you interact on the site, people will see your avatar next to your username.
If you happen to have uploaded an avatar to the popular Gravatar service (often used for WordPress accounts), that avatar will be used by default and you don’t need to do this step.
Your Email Addresses
The way that GitHub maps your Git commits to your user is by email address. If you use multiple email addresses in your commits and you want GitHub to link them up properly, you need to add all the email addresses you have used to the Emails section of the admin section.
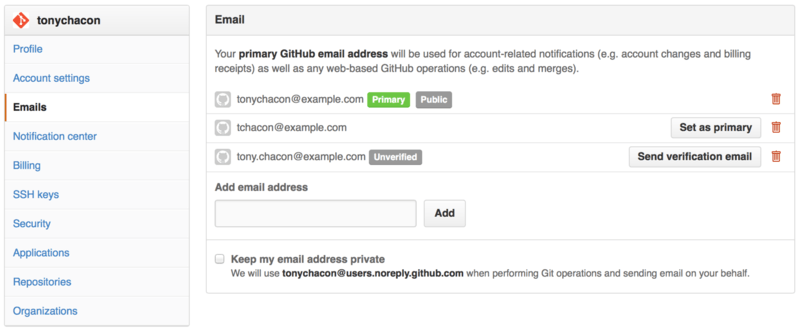
In Add all your email addresses we can see some of the different states that are possible. The top address is verified and set as the primary address, meaning that is where you’ll get any notifications and receipts. The second address is verified and so can be set as the primary if you wish to switch them. The final address is unverified, meaning that you can’t make it your primary address. If GitHub sees any of these in commit messages in any repository on the site, it will be linked to your user now.
Two Factor Authentication
Finally, for extra security, you should definitely set up Two-factor Authentication or “2FA”. Two-factor Authentication is an authentication mechanism that is becoming more and more popular recently to mitigate the risk of your account being compromised if your password is stolen somehow. Turning it on will make GitHub ask you for two different methods of authentication, so that if one of them is compromised, an attacker will not be able to access your account.
You can find the Two-factor Authentication setup under the Security tab of your Account settings.

If you click on the “Set up two-factor authentication” button, it will take you to a configuration page where you can choose to use a phone app to generate your secondary code (a “time based one-time password”), or you can have GitHub send you a code via SMS each time you need to log in.
After you choose which method you prefer and follow the instructions for setting up 2FA, your account will then be a little more secure and you will have to provide a code in addition to your password whenever you log into GitHub.